• HOME
  • RELATIONSHIPS
  • HOLIDAYS
  • WELLNESS
  • CAREER & FINANCE
  • FASHION
  • BEAUTY
  • LIVING

Advice From Nobody

You are here: Home / Archives for AdviceFromNobody

How to do a Pedicure At-home That’s Salon-Worthy

Filed Under: Nail Ideas // 01/04/2023

foot massage spa

There’s something about getting a pedicure or manicure that makes you feel fancy. And as soon as it’s sandal season, it’s time to whip your toes back into shape.

That being said, sometimes a trip to the salon just isn’t happening.

The good news is, doing your at-home pedicure can save you time and money.

With these easy steps, your feet will be looking better than if they had just come from an actual foot spa.

Step 1: Prep Your Toes For Your At-Home Pedicure

To kick off your at-home pedicure remove any old polish with a cotton pad and nail polish remover. Hold the pad on each nail for a few seconds to allow the nail polish to break down, then wipe it away.

A good nail polish remover will remove any stubborn colors quickly, but acetone is used for better results.

Cutex Ultra-Powerful Nail Polish Remover

ZOYA Remove Plus 3 in 1 Formula

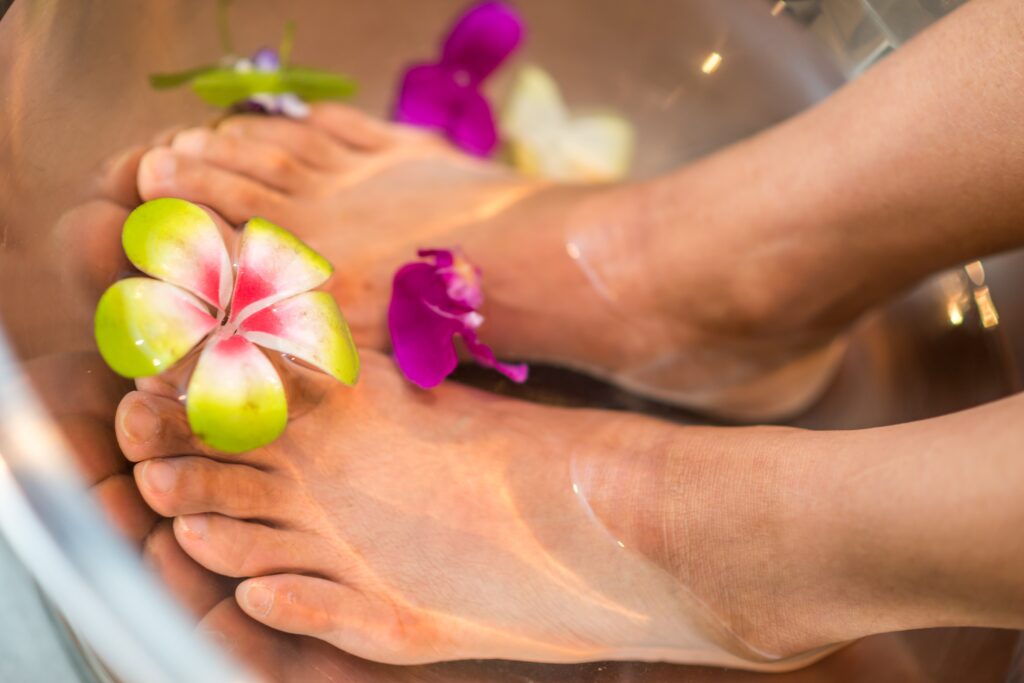
Step 2: Soak Your Feet and Toes in a Foot Bath

Now that you’re all set for your pedicure, whip out your foot bath and get ready to be transported to absolute bliss(if you don’t have a foot bath, you can fill up a bucket with water and use that instead).

Fill your bath/bucket with warm water and your favorite bath salt. Now submerge your feet.

Soak your feet for 10-15 minutes or until the water runs cold, this will help soften your cuticles and calluses. Then dry off your feet.

Conair HEAT SENSE Pedicure Foot Spa Bath

Tea Tree Oil Foot Soak with Epsom Salt

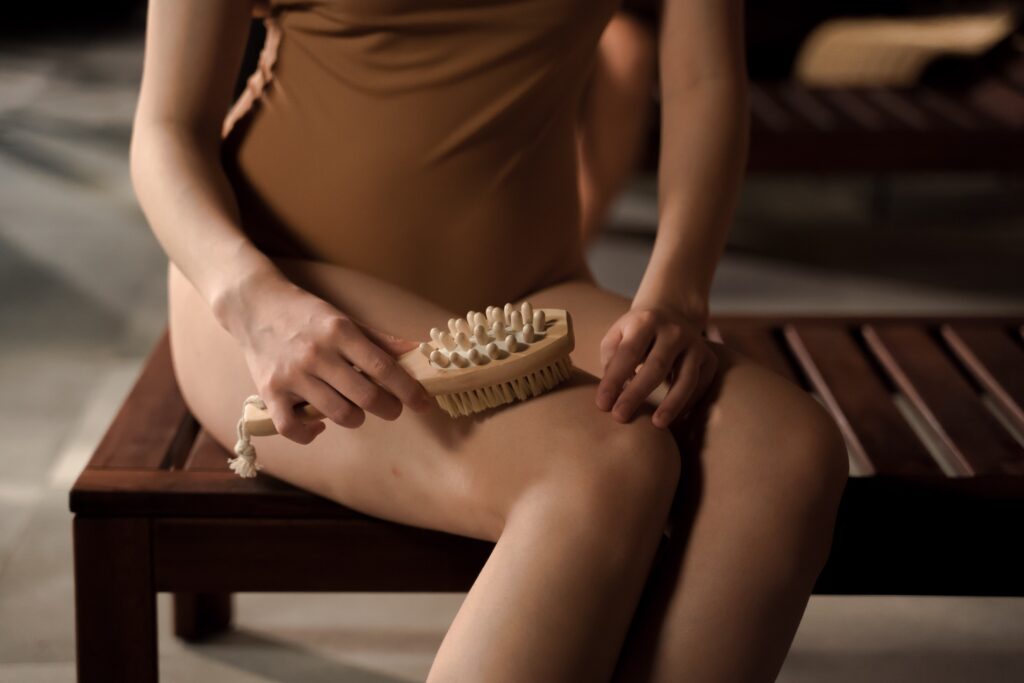
Step 3: Remove Calluses

Now it’s time to get down and dirty. This is most people’s favorite part of a pedicure. It can be satisfying to feel how smooth your feet get after grinding off all that dead skin.

Grab your foot file, pumice stone, or washcloth for a gentler approach, and begin grinding.

Focus on any problem areas you may have, calluses, corns, or rough heels.

Natural Earth Lava Pumice Stone Black

Colossal Foot Rasp & Wood Handle Callus Shaver

Step 4: Trim, Shape, and Buff Your Nails

Cut down your nails and begin shaping them. Start by cutting toenails straight across and then filing down the edges, this will prevent ingrown nails.

Use your buffer to prep your nails for the polish, removing the top layer of the nail will help your pedicure last even longer.

Add a bit of cuticle oil on and around your prepped nails for a finishing touch.

Step 5: Massage Your Feet With Your Favorite Lotion

With a foot cream or body lotion of your choosing, begin massaging your toes and feet until they are tender and you feel more relaxed.

The massage will both relax you and hydrate your feet after you’ve just scrubbed off all your calluses, if you have a foot spa massager, you can use it to really get in there.

After you’ve finished, grab a new cotton pad and wipe away any excess oil and lotion. This will help your polish last longer. Now grab your toe separators and you’re all set for your polish.

Nekteck Foot Massager with Heat

Arnica Sore Muscle Massage Oil for Body and Feet

Step 6: Apply Your Base Coat

After your nails are cleaned and buffed, it’s time to add your base coat.

The base coat acts as a barrier between your natural nails and the actual polish. Using this will help your pedicure last even longer, so don’t skip this step of your DIY pedicure if you want it to look professional.

No Wipe Gel Matte Mirror Top Coat Base Coat

AILLSA Gel Base and Top Coat Set

Step 7: Paint Your Toenails

Once your base layer has dried and set, apply a layer of your nail polish of choice.

Let it dry and apply a second layer. Make sure to apply it in thin layers, because you can achieve an even finish and it allows for faster drying time.

Step 8: Finnish Off Your At-Home Spa With a Top Coat

Another very important step for a long-lasting, professional-looking pedicure.

A thin layer of top coat will seal everything in and prevents premature chipping after it has dried and a few drops of cuticle oil to really finish it off.

An at-home pedicure is as simple as you make it. In eight simple steps, you now have a salon-worthy pedicure in under 30 minutes.

For a full spa experience, try these at-home spa treatments and make sure to grab all the essentials to make it extra perfect.

[jetpack-related-posts]

How to Have a Budget Spa Day At Home

Filed Under: Self Care // 01/02/2023

Every now and then, life gets the best of us, and we’re left feeling tired and overwhelmed, and just needing to unwind.

A spa day would help you get well-deserved rest, but fancy hotel spas can get pretty pricey and fast.

Setting up your own at-home spa is easy! Follow these easy steps to set up your pamper day in the comfort of your home.

Benefits of DIY Spa Day

1. Helps to destress:

A relaxing spa day at home is one of the best ways to relieve the week’s stress and quiet your mind.

No matter the treatment, you’re going to notice that your mind immediately begins to feel at ease when you pamper yourself and finally treat yourself to a rare and highly deserved moment of “me” time and a self-care day.

Just a few of our suggested relaxing at-home spa treatments will leave you feeling rejuvenated and refreshed.

2. Enhances your sleep:

Getting proper sleep is vital, yet can be really hard to achieve. Many of us are so busy that we don’t have enough time in a day to get well rested.

With stress from work, school, relationships, and overall responsibilities, the time we do spend in bed can be stressful and our minds just don’t seem to want to shut off.

After a wonderful time of facials, self-pampering, and body treatments, your body will naturally unwind for a great night’s sleep.

3. Makes you a happier person:

As if you needed even more reasons, spas are healing to both your mind and soul. It allows your mind to clear out all your negative thoughts.

Add in the factor of being in your own home, so much serotonin and dopamine-you might just overdose.

This is why many people who suffer from depression choose to regularly treat themselves to a relaxing spa treatment and there are many more benefits to pampering yourself.

4. Self-Care:

If you’re looking to enhance your self-confidence, you can rest assured that plenty of these treatments are incredibly effective. You can use this chance to address any beauty concerns you may haven’t had any time to take care of lately.

Acne breakouts, split ends, dull hair, or any chipped nail you haven’t had time to attend to.

At the end of the day, you’re going to feel significantly better after you’ve treated yourself to this amazing pamper day in your at-home spa.

It’s only natural to feel your best self after pampering yourself. Whether you treat yourself with a facial, a pedicure, or an aromatherapy shower. 

Either way, you can look forward to ending the night feeling radiant and the best version of yourself.

Step 1: Preparing for your Selfcare day

Supplies for at home spa day

For the perfect at-home spa day, preparation is key. Having an at-home spa day checklist will help you figure out everything you need.

Have all your supplies ready and at hand to avoid any distractions and not break your flow of relaxation at any point.

Taking the time to ensure that you have everything you need allows you to stay in the moment and make this spa day the best you’ve ever had.

Step 2: Set the Scene for your at-home spa day

The reason why spas are so successful is that they know exactly how to engage all your senses, getting your mind and body instantly relaxed.

You can recreate this tranquil atmosphere with these simple steps.

–The Perfect Scent: Aromatherapy plays a vital role in helping your mind and body to relax and release. Consider setting up your diffuser with your favorite essential oils. I recommend lavender, chamomile, or eucalyptus for stress relief, especially after a long day.

–Create Ambiance with Lighting: Light a few of your favorite candles, dim the light and burn some incense. This will make your home feel warm and cozy, adding to the aromatherapy and relaxing scents from the diffuser.

–Set the Tone With Good Music: The right type of music can really make you feel like you’re in a luxury spa. The music can help drown out any noise around you and isolate you for your night. You can try using beach sounds or waves instead of music for an even more tranquil atmosphere.

–Get Cosy: Throw on a fluffy white robe and soft slippers, the warmth on your skin will really transport you to luxury.

Step 3: Spa Ideas: Activities and Treatments

Now that your scene has been set and you’ve acquired all your supplies. It’s time to relax.

Here is a list of activities and treatments that will leave you feeling pampered and refreshed.

1. Soak Away Your Day With a Warm Bubble Bath

Pamper day spa at home

Draw a hot relaxing bath and pour in a soothing bath salt or moisturizing bath bomb. Surrounded by your candles and calming music, your bath will set you up for the best spa day you’ve ever experienced.

-Use essential oils, bath salts, and a bath bomb for an aromatherapy bath time.

-To better enjoy your glass of wine, read your favorite book, or watch an entertaining show in your bath, set up your bath caddy to make your experience as luxe as possible.

-Invest in a jacuzzi mat, a jacuzzi bath mat is a long mat with suction cups under it. You attach it to the bottom of your bathtub and connect an air hose that blows bubbles into your tub, massaging your back in the process so are heated to allow for a more thorough massage.

–Meditate, quiet your mind, and be fully in the present. Focus on your breathing and reflect on the day you’ve had, really wind down, and allow yourself to relax.

2. At Home Steam Facial

Follow this six-step facial to make your skin feel purified and pampered.

–Cleanse: Start your home spa facial with pure, clean skin. Lift away any impurities with your favorite cleanser. Use it twice for a double cleanse.

–Exfoliate: Now follow up with a gentle face scrub, you can choose between a chemical or a physical exfoliant. Exfoliating can be vital in an anti-aging skincare routine, as it can help encourage healthier growth. Clean skin is healthier skin all around.

-Steam Facial: Now that you have a clean fresh face, we can use a facial steamer designed to work with essential oils and open up your pores. You can also use a pot and water to steam your face if you don’t have a steamer.

–Face mask: Throw on a replenishing and hydrating face mask to add moisture back to your skin.

-Facial massage: After you remove the face mask, treat yourself to a facial massage. Grab an ice-cold jade roller or gua-sha(that you’ve stored in your skincare fridge beforehand). This will boost blood circulation, reduce bags under your eyes, increase lymphatic drainage, and allows for the absorption of product into your skin.

–Moisturize: Finnish off your facial with your favorite moisturizer to really lock in the moisture.

3. Put on a Hair Mask

No matter what your hair care needs may be, a hair mask is always an ideal curly hair product to have for the health of your hair.

They are formulated to strengthen hair, moisturize hair and improve its condition and can ultimately reduce hair breakage, smooth frizz, make the hair more manageable, enhance shine, and feel less dry.

Throw one on before your bath or while you’re busy with your facial.

4. Give Yourself A Pedicure And At-home Foot Spa

As long as you have a handful of tools, it won’t be too hard to DIY your at-home foot spa.

At home pedicure for pamper day

–Step 1: Remove old nail polish with a cotton ball and nail polish remover.

-Step 2: Soak your feet in a warm foot bath. Add in a good Epsom salt if your feet are sore. Soak for about 10-15 minutes or until the water runs cold.

–Step 3: Trim and file your nails.

-Step 4: Give yourself a massage. Put on a good moisturizer and massage your feet and toes for a few minutes.

–Step 5: Remove oil with a cotton pad to allow the polish to go on smoother.

–Step 6: Apply your base coat then follow up with your nail polish.

-Step 7: Finnish it off with a top coat.

5. Pamper your Hands and Nails

Now that you’ve had a pedicure, treat yourself to a DIY manicure. Massage your hands and cuticles with a hand balm or cuticle cream.

–Step 1: File Your Nails to your desired length and shape.

–Step 2: Soak Your Nails, apply your favorite hand cream, then, soak your nails in warm, soapy water for a few minutes to soften the cuticles.

–Step 3: Push back your cuticles with a wet nail stone.

–Step 4: Apply a base coat, it will help the color go on smoothly and last longer.

-Step 5: Apply two coats of your color of choice, waiting in between coats to dry. (Apply thin layers for an even finish).

-Step 6: Apply a top coat to seal it all in.

For a more fun and modern manicure, try out our micro French manicure tutorial.

6. Exfoliate your Skin

After you’ve dry-brushed your skin, go in with a gentle exfoliant( preferably a chemical exfoliant to avoid irritating your skin too much).

This will help brighten up your complexion, increase circulation, and can give you a radiant healthy glow.

7. Try Out Dry Brushing

Self care day skin care

Dry brushing is a method of gently exfoliating your skin using a special firm-bristled brush.

Some people use it as part of their skin routine to try to restore firmness, get rid of dry skin flaking, and encourage blood flow to certain areas of the body. Dry brushing has roots in the healing practices of ancient cultures.

Brushing before a shower is best. The bristles of a dry brush can exfoliate your skin, and showering afterward should help wash away any dead, flaky skin cells.

Dry brushing unclogs pores in the exfoliation process. It also helps detoxify your skin by increasing blood circulation and promoting lymph drainage, it also makes it easier for the body to sweat and eliminate toxins in your system.

8. Have an Aromatherapy Shower

Maybe you don’t quite enjoy baths/or don’t have access to a bathtub. You can actually create a spa-like experience in your shower.

Hang some eucalyptus under your shower head for a boost of energy and relaxation. Take a hot shower with your favorite shower bomb to compliment the eucalyptus scent, I suggest using the …bath bomb to help you relax.

9. Have a Relaxing “Massage”

After a long day, your body may be sore and need to release some tension. Eucalyptus essential oils can help make everything better with their healing capabilities.

After a good rub down of this oil, you’ll feel almost as good as just having come out of a great spa aromatherapy massage.

10. Try a Lip Mask

Lip masks are easy and often forgotten—just pick an extra-hydrating balm and slather on a thick layer before bed, or whenever your lips are chapped.

This small thing can make a huge difference in the plumpness and appearance of your lips, allowing you to look your best all the time.

I hope you’ll make some time to try this at-home spa day. Taking care of yourself is important, and this is such an easy way to relax and unwind.

[jetpack-related-posts]

12 Best Skincare Ingredients That Will Give You Amazing Skin

Filed Under: Skin // 12/22/2022

Whether you’re just starting a skincare routine or are looking to add new products to your roster. You can easily find yourself overwhelmed by the number of skin care products available to you.

There are so many tips and skincare secrets out there that it can be very difficult to know where to begin.

Knowing what specific ingredients to look for can make it a lot easier and help you through making your decisions.

1. Hyaluronic acid

Hyaluronic acid is effective because it holds its weight a thousand times in water and is always a great addition to any skincare routine. This helps retain moisture in the skin and prevents the moisture from evaporating into the air.

It’s a great moisturizing agent for all skin types. A good hyaluronic acid serum is great for any skincare routine, especially in the drier months.

2. Alpha-hydroxy acids (AHAs)

Products that include AHAs(glycolic, lactic, tartaric, and citric acids) have become very popular in the skincare industry over recent years.

Although primarily used for exfoliation, the great benefits of AHAs are, promoting collagen and blood flow, correcting discoloration and age spots, preventing acne breakouts, brightening your complexion, and increasing product absorption.

Creams, lotions, and serums with Alpha-hydroxy acids can help reduce fine lines, wrinkles, and irregular pigmentation and have also been known to reduce enlarged pores.

3. Ceramides

Ceramides are long-chain lipids and are essentially the glue that holds our skin cells together to keep our skin barrier intact and healthy. A healthy skin barrier helps seal in moisture and seal out harmful elements.

Although the body produces ceramides, levels in the skin decline with age.

Ceramides have multiple benefits for skin health, they; maintain the skin barrier, boost hydration, rejuvenate aging skin, and prevent UV skin damage.

This CeraVe cleanser contains three essential ceramides and hyaluronic acid. It cleanses, hydrates, and helps restore the protective skin barrier. It’s always been a favorite of mine when doing my daily skincare. 

4. Retinol

Retinol is a powerful antioxidant derived from Vitamin A and can be found in many anti-aging products.

It has multiple benefits; it improves acne and acne scarring, patchy and irregular pigmentation, fine lines and wrinkles, skin texture, skin tone, and color. As well as your skin’s hydration levels promote cell renewal and boost collagen production.

It is recommended to introduce retinol to your routine slowly, to build up your skin’s tolerance to it. It may cause sensitivity so make sure to follow up with a broad-spectrum sunscreen.

5. Vitamin C

Ascorbic acid (Vitamin C) is an antioxidant that helps fight free radicals and environmental stressors, repairs UV damage, prevents premature aging, reduces hyperpigmentation, and helps to even out skin tone, stimulates the synthesis of collagen, minimizes fine lines, scars and wrinkles.

Initial use of Vitamin C-containing creams may cause stinging or redness, but these side effects go away with continued use.

6. Vitamin E

Vitamin E is an oil-soluble antioxidant, there are many forms of Vitamin E. Unless you have oily, acne-prone, or sensitive skin, Vitamin E can provide your skin with multiple benefits.

Vitamin E creams can hydrate and heal the skin and acts as an anti-inflammatory agent.

Paired with Vitamin C, both ingredients work even better, so aim to find products with both these ingredients.

7. Niacinimide

Niacinimide has multiple benefits, from moisturizing to repairing the skin’s barrier.

Also known as Vitamin B3 it boosts keratin, provides protection from environmental stressors, helps keep skin firm and healthy, may help retain moisture, and stops skin flushing.

If you have sensitive skin, experts suggest choosing products with a lower concentration of under 5%.

8. Beta-hydroxy acids (salicylic acid)

Salicylic acid removes dead skin and may improve the texture and color of sun-damaged skin. It penetrates oil-laden hair follicle openings and helps prevent acne.

In many cases, salicylic acid can be less irritating to the skin than products that contain AHAs. But provide similar improvements in skin texture and color.

9. Alpha Arbutin

Alpha Arbutin is a skin brighter, and gentler than hydroquinone and a safer way to treat uneven skin tone, melasma, and hyperpigmentation with little to no irritation.

It can be used to treat pigmentation when combined with kojic acid or Vitamin C.

10. Dimethicone

The silicone-based ingredient is the second most common ingredient in moisturizers. If you deal with dry skin, this ingredient can be very beneficial, especially in winter.

This ingredient can help with scar tissue and makes your skin feel soft.

11. Glycerin

A major skin care ingredient found in moisturizers and lotions. It is a humectant found naturally in the skin and acts as a moisturizing agent to establish hydration and prevents dryness.

Glycerin’s skin-replenishing and skin-restoring properties make it the best humectant among others such as hyaluronic acid and AHAs.

12. Polyhydroxy acids

Polyhydroxy acids are a type of hydroxy acid just like AHAs and BHAs but is the gentlest of the three by far.

PHA helps shed dead skin cells, reduce hyperpigmentation and reverse sun damage to promote an even-toned and radiant complexion.

PHAs are great for almost all skin types as they don’t dry up the skin. Experts recommend using PHAs in combination with hyaluronic acid and glycerin.

So, armed with any of these products and an amazing skincare routine, and a skincare fridge to cool your products, you’ll soon be making your way to perfect skin.

[jetpack-related-posts]

How To Hot Oil Treatment and The Benefits It Holds

Filed Under: Hair // 06/20/2022

recommended oils for hot oil treatments

If you’re a part of the natural hair community, you’ve heard about or tried hot oil treatments.

The oils, like olive, almond, and coconut, when used in hot oil treatments work by sealing the hair cuticle.

This helps strengthen and protect your locks.

If your hair is dry, brittle, frizzy, color-treated, or prone to split ends, a hot oil treatment may be beneficial, or if you’re just looking to add some shine to your hair.

Benefits Of Hot Oil Treatments

Hot oil treatments are also useful for helping to stimulate blood flow, as well as helping with hair growth. Hot oil treatments for hair provide many benefits to help your mane flourish such as:

-Moisturizes dry and brittle hair

-Revives your curls

-Helps with dry scalp

-Increases the blood circulation in your scalp

-Strengthens the hair

-Adds shine to your hair

-Helps prevent split ends and frizz

-Help with dandruff relief

-Reduces frizz

Benefits of hot oil treatments

Safety Measures Before Doing a Hot Oil Treatment

Hot oil treatments involve applying heated oil to your hair and scalp. It is important to take safety measures when performing a hot oil treatment to prevent burns or injury.

-Always ensure the oil is not too hot before applying it to the hair and scalp, apply a small amount to your wrist to test it out.

-Never leave the heated oil unattended, especially if you have any children or pets around.

-Start with a small amount of oil and apply it to a small section of hair to test the temperature before applying it to the entire head. Yes, even after you’ve tested it on your wrist.

-Never heat oil that is in a plastic container as it can melt.

-To reduce the risk of a reaction, look for oils that aren’t combined with any synthetic ingredients.

-If you experience any burning or discomfort during the treatment, rinse the oil out immediately and seek medical attention if necessary.

What Oil Is Best For An At-Home Hot Oil Treatment

There are many different oils that can be used for hot oil treatments, each with its own unique benefits for the hair and scalp. It’s important to find the right blend for you. Some of the most popular oils used for hot oil treatments include:

-Coconut oil: This oil is rich in fatty acids and vitamins, making it great for moisturizing the hair and scalp. It also helps to strengthen hair and prevent breakage. This leaves the hair soft and shiny.

-Olive oil: This oil is rich in antioxidants and fatty acids, making it great for moisturizing the hair and scalp. This oil tends to be on the heavier side, so it’s best for drier hair that really needs that moisture retention. Be careful not to be too heavy-handed as it can weigh down your hair. It also helps to strengthen hair and prevent breakage. This oil is great for damaged hair and can help combat frizz and flyaways.

-Jojoba oil: This oil is similar to the natural oil produced by the scalp, making it an effective moisturizer. It also helps to balance the scalp’s natural oil production, and it can help to improve hair growth. It is a light oil that is easily absorbed by the hair and scalp. It helps to moisturize and nourish the hair and scalp, leaving it feeling soft and smooth.

-Argan oil: Argan oil is rich in antioxidants and essential fatty acids, it helps to hydrate and nourish the hair, improving its elasticity and reducing breakage. It also helps to repair damage, promote hair growth, and control frizz.

-Castor oil: This oil is rich in fatty acids and has antibacterial properties that make it great for promoting hair growth. It also helps to moisturize the hair and scalp. Castor oil is also known for its ability to promote hair thickness and helps treat dry and itchy scalp.

-Almond oil: This oil is rich in vitamins E and D, which makes it great for moisturizing the hair and scalp. It also helps to strengthen hair and prevent breakage. It is known for its ability to nourish the hair and scalp, it also works as a detangler making hair more manageable.

-Avocado oil: Avocado oil is high in vitamins A, D, and E, and is also rich in fatty acids. It is known to penetrate the hair shaft to nourish and moisturize the hair.

These are a few of our favorites, always make sure to pick the oil best suited for your need at that time. Additionally, you can always create your own blend of oils or use a premade oil treatment.

Use the oil that best suits your hair type, also it is best to use pure, cold-pressed, organic oils for the best results.

How To Do a DIY Hot Oil Treatment

Now that you’ve decided on which oil to use, let’s get into the process of hot oiling by following these simple steps,

-Work on clean hair: Hot oil tends to work best on clean hair. This allows the oil to deeply penetrate the hair cuticle. However, if you do want to do a hot oil treatment before your washday, this is also fine.

-Heat the oil: Place your oil in an applicator bottle or in a bowl that is safe for heating. Then, put your oil in hot water if you are using an applicator bottle or the microwave for around 10 seconds if you are using a bowl.

-Test the heat: Before applying the oil to your hair and scalp, test a small amount of the oil on your wrist to make sure it’s not too hot, this will prevent you from burning your scalp.

-Detangle: Run a brush through your hair to get rid of any knots, this will help make the application process all that much easier and help ensure smooth styling afterward.

-Apply: Apply the oil evenly throughout your hair and massage it into your scalp. Cover your head with a shower cap and your bonnet for more insulation. And wait for 20 minutes to an hour. Ideally, you can leave it in overnight.

Rinse: After a minimum of 20 minutes, completely rinse out the oil from your hair, and follow up with your normal conditioner.

And that’s it, You now know how to do an at-home hot oil treatment, you can now use your favorite products and continue to style your hair as desired.

[jetpack-related-posts]

How To Revive Dry Hair

Filed Under: Hair // 06/11/2022

dry hair revival

When your hair is dry, it can feel brittle and hay-like to the touch. Physically your hair looks dull and lifeless which can also be a sign of biotin deficiency.

Whether you have damaged hair, dry hair, or simply want to improve the overall health of your hair, these following inexpensive tips will help keep your hair conditioned and leave you with gorgeous, healthy hair.

What is dry hair?

Dry hair is hair that doesn’t produce or retain enough moisture and oil for it to maintain its texture and sheen.

Dry hair has a coarse and rough texture. Some visible signs that your hair is dry can be that it looks dull, is brittle, and is constantly frizzy.

This can be a result of low nutritional value of Ferritin, Vitamin B 12, Vitamin D, or minerals like zinc & magnesium in your diet. Which in turn means your hair lacks these nutrients.

Or it could simply be from overexposure to pollution in the air, heat damage from styling tools or humidity, and even smoking.

How To Treat Dry Hair

Incorporating these simple tips into your haircare regime can over time help your hair retain more moisture and become healthier;

1. Stop The Daily Shampooing

Skipping a few days between shampooing lets your scalp relax, and it stops working overtime to produce protective oils. Your strands have time to breathe and don’t have to work overtime to produce natural oils.

The less you’re washing your hair, the more time your hair has to produce and retain these natural oils. These oils need time to work their way down the hair shaft and moisturize your locks. Washing your hair less can also prevent itching and flaking, and keep the hair soft and shiny.

If you have hair that gets greasy, try skipping a few more days and using a good dry shampoo.

Dry shampoo is used to absorb excess oil and dirt from the hair, giving the appearance of freshly washed hair without the need for water. It can also add volume and texture to hair.

2. Invest In A Good Shampoo, Conditioner Combo

Now that you’re washing your hair less, make sure that your wash days are the best they can be, one of the ways to do that is to find the best shampoo and conditioner for you and your hair type.

Choose a keratin shampoo if you’re able to. Also look for vitamins D3, E, and B5, which all serve different functions but help support your hair and scalp health.

3. Cut Back on The Heat

Using heat on hair can cause damage over time, such as dryness, breakage, split ends, and a loss of shine.

The high temperatures can also strip hair of its natural oils, making it more susceptible to damage.

While using heat protection products can help reduce the damage, it is best to limit the use of heat styling tools and to let hair dry naturally as much as possible.

4. Trim Your Dry Ends

Trimming hair regularly can help prevent split ends and breakage, which can make hair look and feel healthier.

This is because split ends can travel up the hair shaft, causing damage to the hair. Regular trims can also help hair grow faster and stronger, as it removes damaged and dead ends that can inhibit your hair growth.

Additionally, regular trims help maintain the shape of a haircut and make it look more polished.

5. Protect Your Hair From The Sun

Sunscreen for hair is a product that is designed to protect the hair from the damaging effects of UV rays.

Exposure to the sun can cause damage to the hair, such as dryness, discoloration, and fading. Sunscreen for hair can help prevent this damage by creating a barrier that shields the hair from the sun’s rays.

Some hair care products, such as leave-in conditioners and hair oils, contain UV filters and can be used as sunscreen for hair. Sun hats or head scarves also can help protect hair from the sun.

6. Brush Your Hair With Care

To avoid damage when brushing your hair, and allow dry hair to heal, it’s important to use the right type of brush and to be gentle when brushing. Here are some tips to follow:

1. Use a detangling brush: These types of brushes are less likely to snag or pull on tangles, which can cause breakage. They are designed to work with tangles and gently detangle your hair.

2. Start at your ends: When detangling, start at the ends of your hair and work your way up to the roots. This will help prevent pulling and tugging on tangles.

3. Don’t brush dry hair: Dry hair is more susceptible to damage than wet hair, so it’s best to detangle your hair in the shower or with conditioner on your hair.

Dry hair will easily snag on your brush and this can cause damage to your hair.

4. Brush gently: Avoid tugging or pulling on your hair when brushing. Instead, use gentle strokes to work through tangles and knots.

By following these tips, you can help avoid damaging your already dry hair while brushing and maintaining healthy hair.

7. Hot Oil Treatments

Hot oil treatments tend to work wonders for hair that’s dry, brittle, or damaged.

These treatments can also protect and moisturize your hair. It’s very effective and is simple to incorporate into your routine.

It involves soaking your hair in warm oils helping them penetrate into the hair strand and moisturize from within.

8. Deep Condition Your Dry Hair

Opt for an at-home treatment with keratin. Use it once a week with special attention to your hair in the colder months.

This helps to restore your hair and bring it back to life. I like to use it just after rinsing off my hot oil treatment.

They help to add back any moisture lost during the week and seal it in too. Deep conditioners are your best friend!

9. LOC In The Moisture

Liquid, oil, and cream. This is the holy trinity for hair moisturizing. The order in which you apply them, however, will depend on your hair’s porosity.

In general, low-porosity hair will find better results from the LCO method. While high porosity hair will find better results from the LOC method.

Make sure to test out these methods and see how your hair responds to each one and see what works best for you.

Mastering your hair moisturizing routine will be the final step in sealing the deal for healthier and stronger hair.

[jetpack-related-posts]

The Only Sunday Routine You Need

Filed Under: LIVING // 06/10/2022

sunday routine reset

With the unanswered yet very looming question of whether your week begins or ends on Sunday, it can be very difficult to decide how to spend your day and get the most out of it.

While it can be a great day to catch up on unfinished work or selfishly have a self-care day, there’s a better and more effective way to curate your Sunday routine, that’ll leave you not only feeling accomplished but relaxed as well.

Sounds great, right? Let’s get started. 

How To Have The Perfect Sunday Routine

1. Evaluate Your Week

Your Sunday doesn’t only have to be left for curing hangovers and binge-watching (and/or eating).

You need to start looking at Sundays as both the end of the past week and the beginning of a new one.

It takes a load off you for the looming Monday, and getting a head start on your week helps you get through it with more ease.

Accept that you have done all you have been able to for the week that has passed, this allows your mind to prepare itself for the week ahead.

Lay out all that’s on your agenda for the week ahead and let yourself know if you’re going to have a tough or stressful week.

Carve out a few hours for creative thinking, brainstorming, and problem-solving.

This will save you a lot of time next week because you’ll have fewer moments where you feel overwhelmed and thus decrease procrastination.

2. Plan The Week Ahead

plan your day

Now that you’ve prepared yourself for the week ahead and you know what to expect, plan your week as thoroughly as you can.

Whether your week is set to be relaxing and chill or you’re having, more of a work-intensive week, make sure to jot everything that needs to be done into your calendar.

Plan your week down to the hour if possible, write down all your most important to-dos, and build your days around them.

Make sure to write them down as results and not actions.

Let’s say you have to study for an exam, don’t just put it down as “study”, but rather indicate the results you would like to achieve. For this example, it would be “finish chapter 5 of Chemistry”.

Be detailed and specific, this will help overall productivity and improve time management.

And don’t forget to include all social activities, times at the gym, and even the time you’d take to cook and clean, and get organized.

Omitting anything, however minor it may seem, can end up eating at your time and leaving you feeling rushed.

Plan every last task.

Related Post: The Best Planners To Reach All Your Goals

3. Meal Prep

I know it’s difficult and takes up a lot of time, but this is a must for a productive week.

Now I’m not saying get out all your pots and pans and make yourself every meal you’ll eat for the next 7 days, do your version of meal prep.

Whether it simply means writing down what you’ll eat for the next week and ordering it daily, or picking up groceries for the entire week. Go into the week knowing what you want to fuel your body with.

Know what you want to eat for breakfast, lunch, and dinner, and this does not have to be ultra-specific. Just have a general knowledge of what you need and go get groceries for the week.

This will save you time on meals as well as help you stick to your specific diet. Having food readily available for the week makes it less likely to succumb to fast food and stray from your health goals.

Also, plan for healthy snacking and have healthy ready-to-eat options available.

4. Be Social

socialize with friends

Who says that Sundays are meant only to stay home, not me!

Schedule an early dinner with friends, a movie date, or an evening picnic at a park, then you give yourself a positive focus for the day.

Catch up with friends that you haven’t seen all week or go on a date with your significant other.

A chill evening out will not leave you too tired for the next day, it will help rejuvenate you and help you end off and start your week on a positive note.

5. And On This Day You Will Rest

Speaking of positive, end your Sunday on a relaxing note.

Read a few pages of a good book in bed snuggled up next to your pet, or take a relaxing shower.

If you have natural hair, it’s a great time to have your wash day and spend a few hours giving your locks some TLC, cleansing your scalp and all that good stuff.

Whatever it is, it should be something that makes you feel truly rested before Monday rolls around.

6. Don’t Give In To The Monday Blues

Blue Mondays are a myth, don’t believe me, then try this out.

Pretend you love Mondays. When the anxiety creeps in on Sunday, tell yourself you’re perfectly OK with everything and tell yourself that you’re fully prepared for the week ahead.

See what happens if you create a new belief system for yourself about Mondays. Because if you think about it—Mondays are nothing more than another day of the week, where anything can happen, even greatness.

Follow these 6 easy steps for a more productive Sunday and an even better weekly routine.

PIN FOR LATER!

The perfect productive Sunday routine
Sunday reset routine
[jetpack-related-posts]
  • « Previous Page
  • 1
  • …
  • 52
  • 53
  • 54

Copyright © 2026 · Theme by Marketing Templates Co.

We use cookies on our website to give you the most relevant experience by remembering your preferences and repeat visits.Read More By clicking “Accept All”, you consent to the use of ALL the cookies. However, you may visit "Cookie Settings" to provide a controlled consent.
Cookie SettingsAccept All
Manage consent

Privacy Overview

This website uses cookies to improve your experience while you navigate through the website. Out of these, the cookies that are categorized as necessary are stored on your browser as they are essential for the working of basic functionalities of the website. We also use third-party cookies that help us analyze and understand how you use this website. These cookies will be stored in your browser only with your consent. You also have the option to opt-out of these cookies. But opting out of some of these cookies may affect your browsing experience.
Necessary
Always Enabled
Necessary cookies are absolutely essential for the website to function properly. These cookies ensure basic functionalities and security features of the website, anonymously.
CookieDurationDescription
cookielawinfo-checkbox-analytics11 monthsThis cookie is set by GDPR Cookie Consent plugin. The cookie is used to store the user consent for the cookies in the category "Analytics".
cookielawinfo-checkbox-functional11 monthsThe cookie is set by GDPR cookie consent to record the user consent for the cookies in the category "Functional".
cookielawinfo-checkbox-necessary11 monthsThis cookie is set by GDPR Cookie Consent plugin. The cookies is used to store the user consent for the cookies in the category "Necessary".
cookielawinfo-checkbox-others11 monthsThis cookie is set by GDPR Cookie Consent plugin. The cookie is used to store the user consent for the cookies in the category "Other.
cookielawinfo-checkbox-performance11 monthsThis cookie is set by GDPR Cookie Consent plugin. The cookie is used to store the user consent for the cookies in the category "Performance".
viewed_cookie_policy11 monthsThe cookie is set by the GDPR Cookie Consent plugin and is used to store whether or not user has consented to the use of cookies. It does not store any personal data.
Functional
Functional cookies help to perform certain functionalities like sharing the content of the website on social media platforms, collect feedbacks, and other third-party features.
Performance
Performance cookies are used to understand and analyze the key performance indexes of the website which helps in delivering a better user experience for the visitors.
Analytics
Analytical cookies are used to understand how visitors interact with the website. These cookies help provide information on metrics the number of visitors, bounce rate, traffic source, etc.
Advertisement
Advertisement cookies are used to provide visitors with relevant ads and marketing campaigns. These cookies track visitors across websites and collect information to provide customized ads.
Others
Other uncategorized cookies are those that are being analyzed and have not been classified into a category as yet.
SAVE & ACCEPT