• HOME
  • RELATIONSHIPS
  • HOLIDAYS
  • WELLNESS
  • CAREER & FINANCE
  • FASHION
  • BEAUTY
  • LIVING

Advice From Nobody

You are here: Home / Archives for HOLIDAYS / Fall

Brown Nail Ideas for Fall That Are Seriously Too Cute to Pass Up

Filed Under: Fall, Nail Ideas // 08/07/2025

brown nails

Okay, bestie, let’s talk about fall nails—because the cozy vibes are officially on. The air’s getting crisper, the leaves are basically showing off, and you already know that PSL season is in full swing. But here’s the thing… your nails? Yeah, they deserve to be part of the fall aesthetic too.

And nothing (I repeat, nothing) screams fall more than the perfect brown nail look. Think warm mochas, cozy taupes, rich chocolates—basically, the nail equivalent of wrapping yourself in a knit sweater with a chai latte in hand.

So if you’re on the hunt for brown nail ideas for fall that are cute, classy, and totally on trend, you’ve landed in the right corner of the internet. I’ve rounded up the most gorgeous brown nail designs that’ll have your fingers looking like they just stepped out of a Pinterest board.

Brown Fall Nail Ideas

Leopard Nails

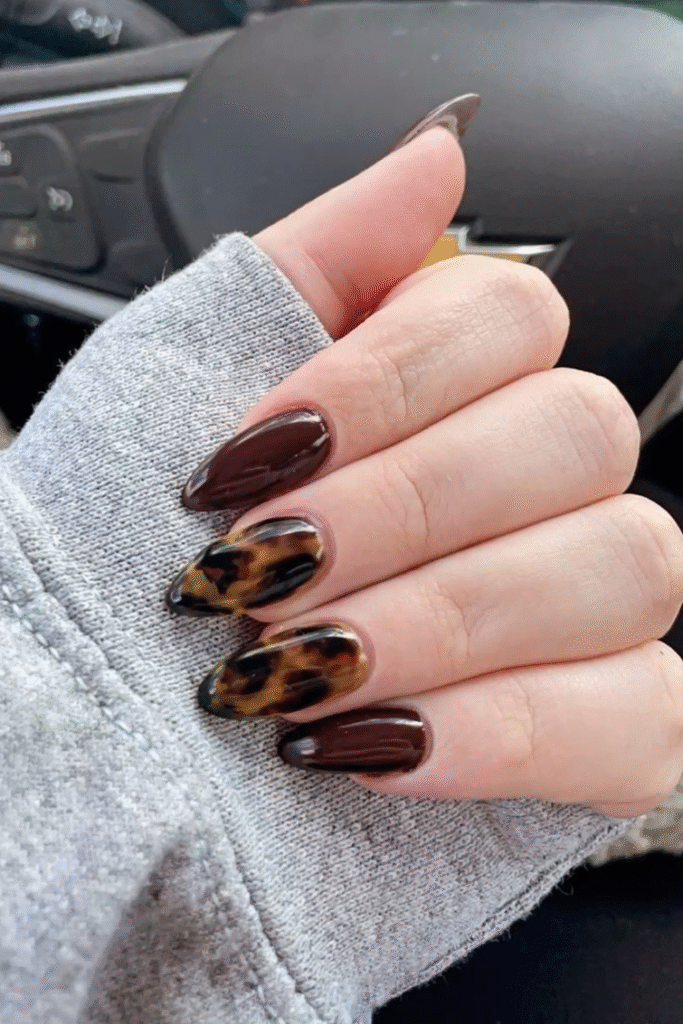
Fall + leopard print = an elite combo. These nails are bold, chic, and give off “I’m stylish without even trying” energy. Go full print or pair a leopard accent nail with solid browns for the perfect fall nail moment.

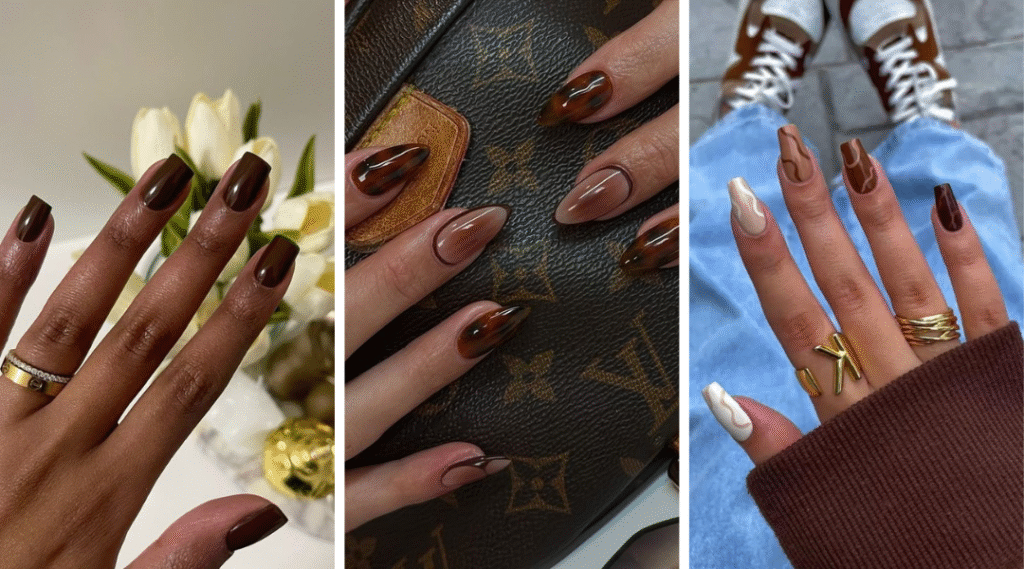
Simple Almond Nails with Swirls

If you’re all about that soft and elegant vibe, this one’s for you. The almond shape keeps things feminine, while the brown swirls add a little artsy flair without going overboard. Totally Instagram-worthy.

Simple Brown Round Nails

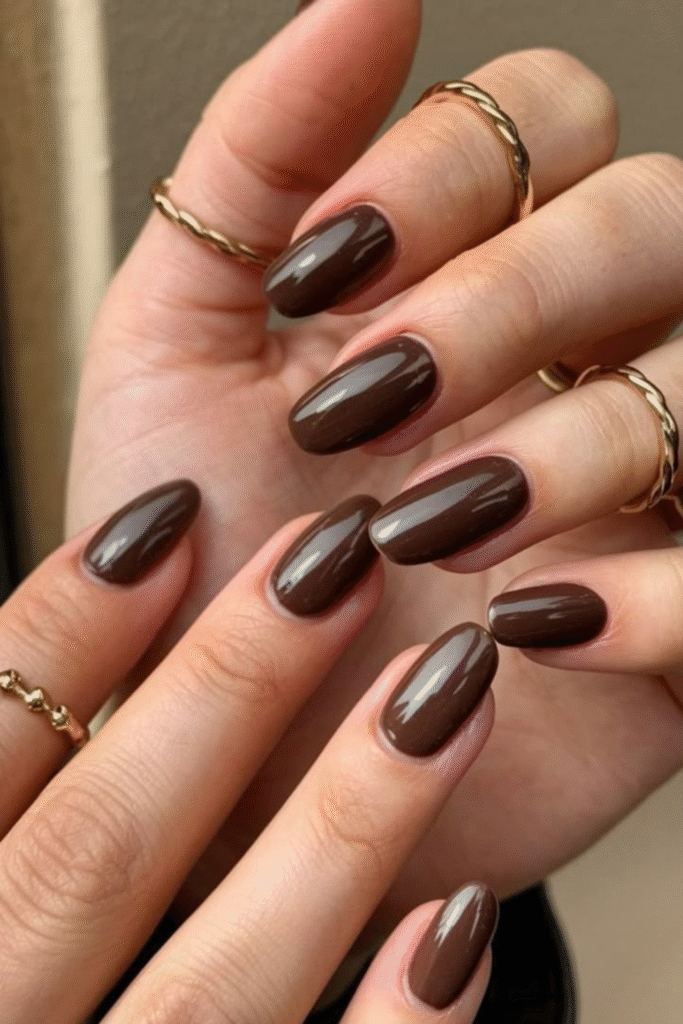
Sometimes less is more. These round-shaped brown nails are understated in the best way possible. Pick your favorite shade—milk chocolate, cinnamon, deep espresso—and you’re good to go. It’s the definition of cozy chic.

Stiletto Nails with Hearts and Different Shades of Brown

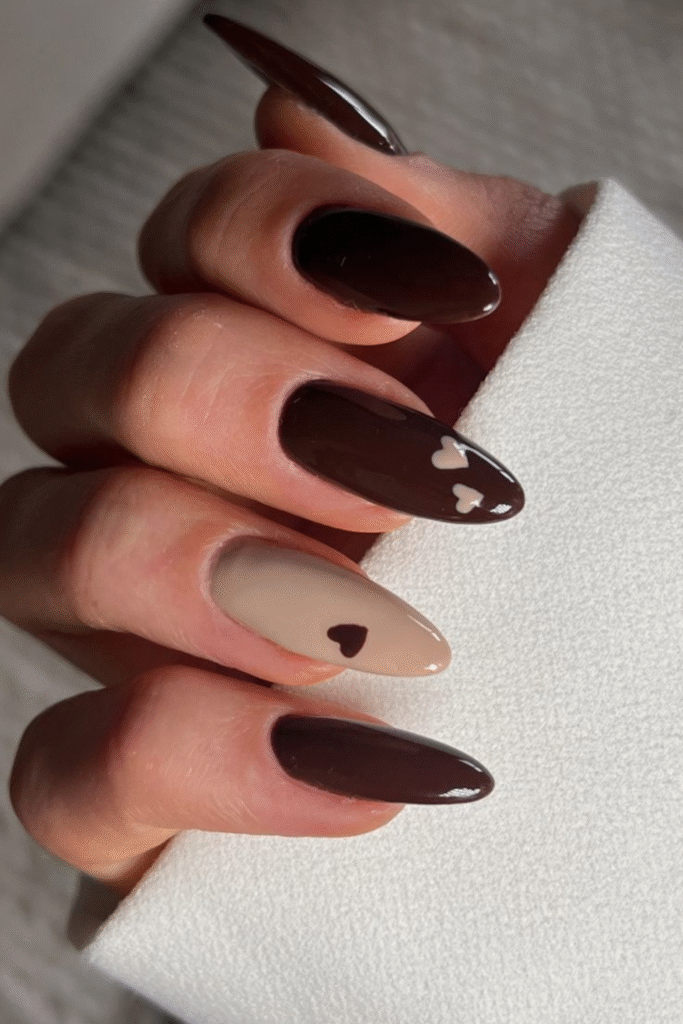
Okay, this one is giving drama in the best way. The stiletto shape is bold, but the cute little heart details and ombré browns balance it out with some playful sweetness. Perfect for fall date nights or if you just want your nails to make a statement.

Brown Swirl Nails with Gradient from Dark to White

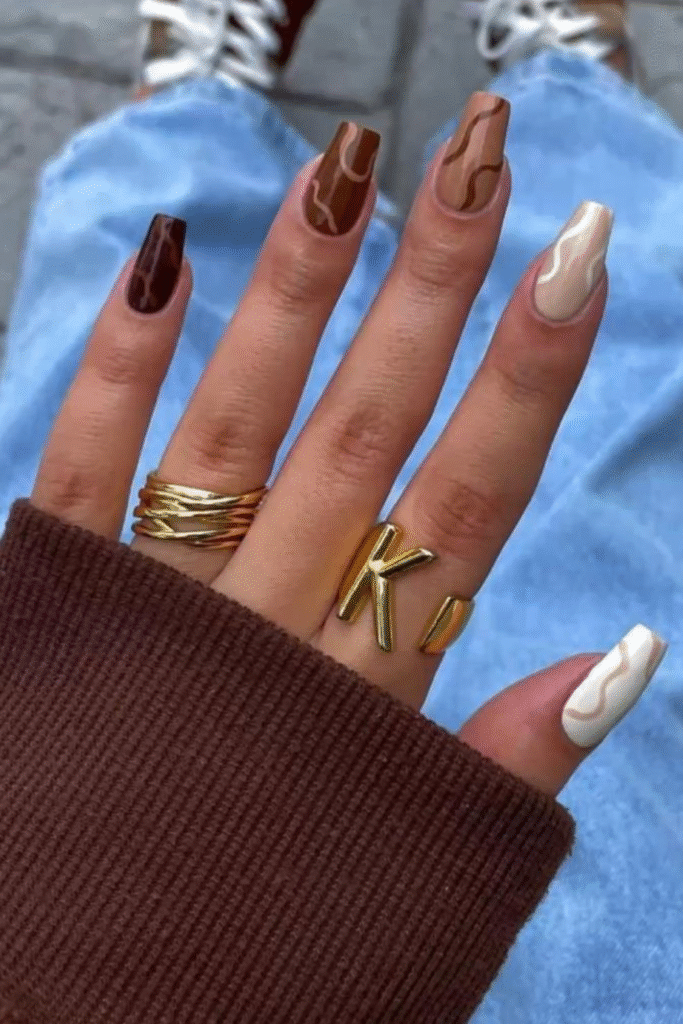
This look is pure perfection. Start with a deep, dark brown on the pinky and work your way up to a clean white on the thumb, adding swirls to tie it all together. It’s like a fall gradient dream—but on your hands.

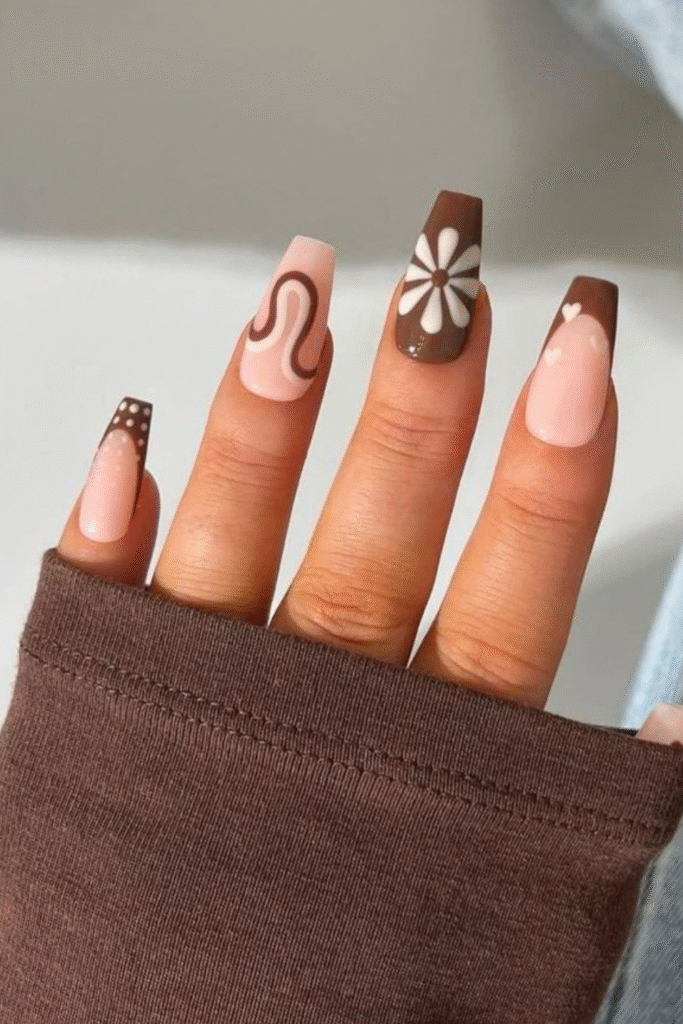
Short Brown Nails with Little Flowers

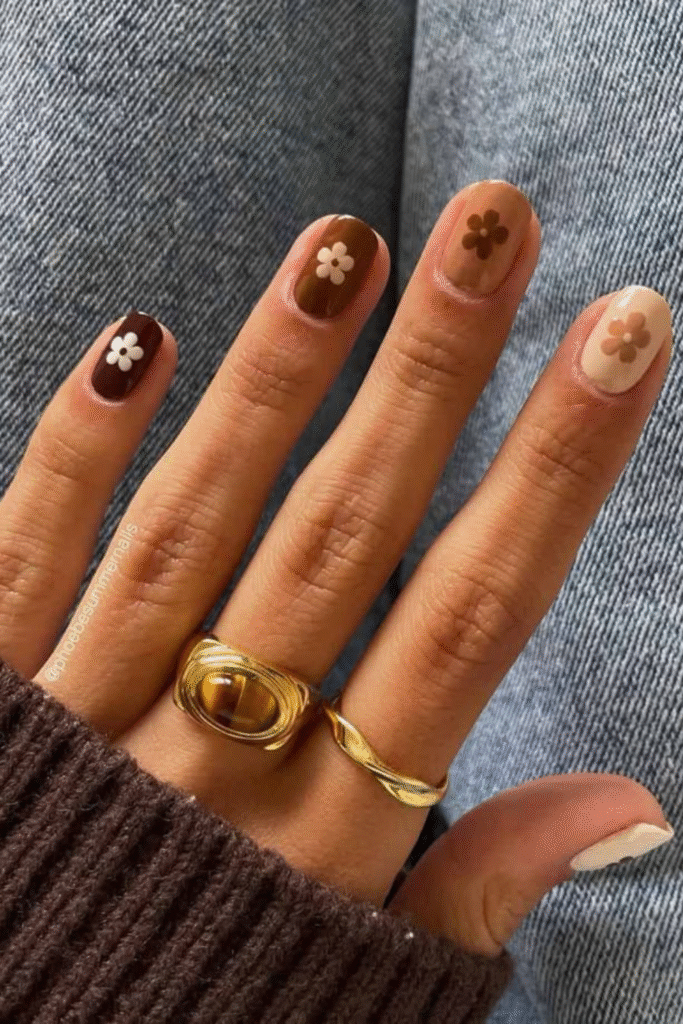
Calling all soft girls! These short nails in varying brown shades feature adorable brown flowers on each nail. Think fall picnic, apple orchard, sipping cider-level cute.

Glossy Leopard Nails with Brown Aura Index Fingers

This one’s for the trendsetters. The glossy leopard design screams fashion-forward, while the brown aura nails on your index fingers add a mystical, dreamy touch. These are chef’s kiss.

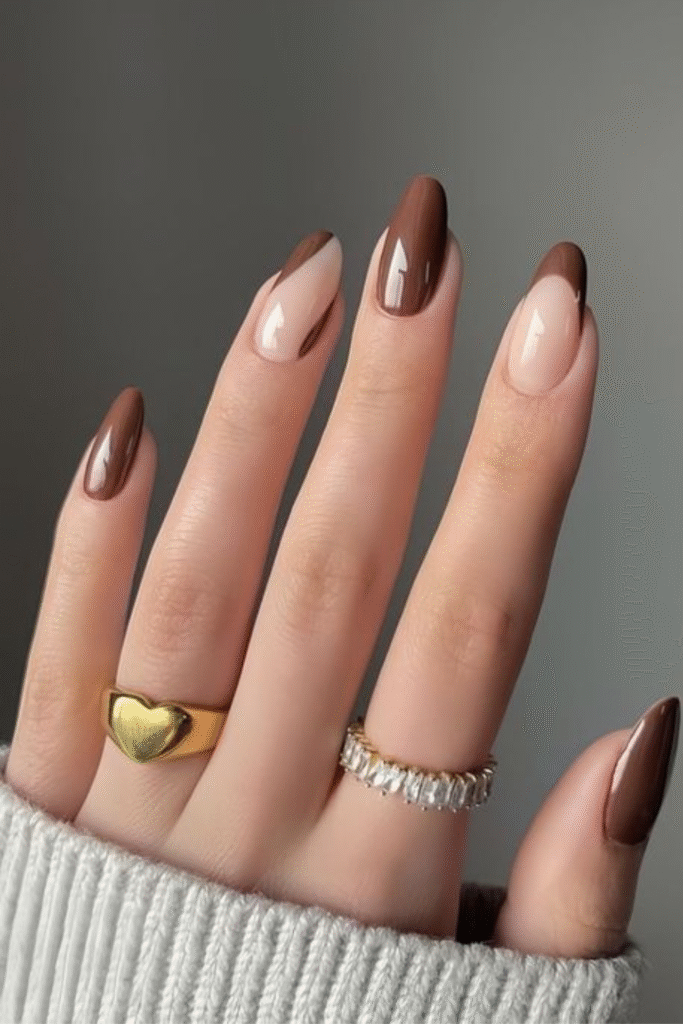
Brown French Tips with Cut-Out Heart

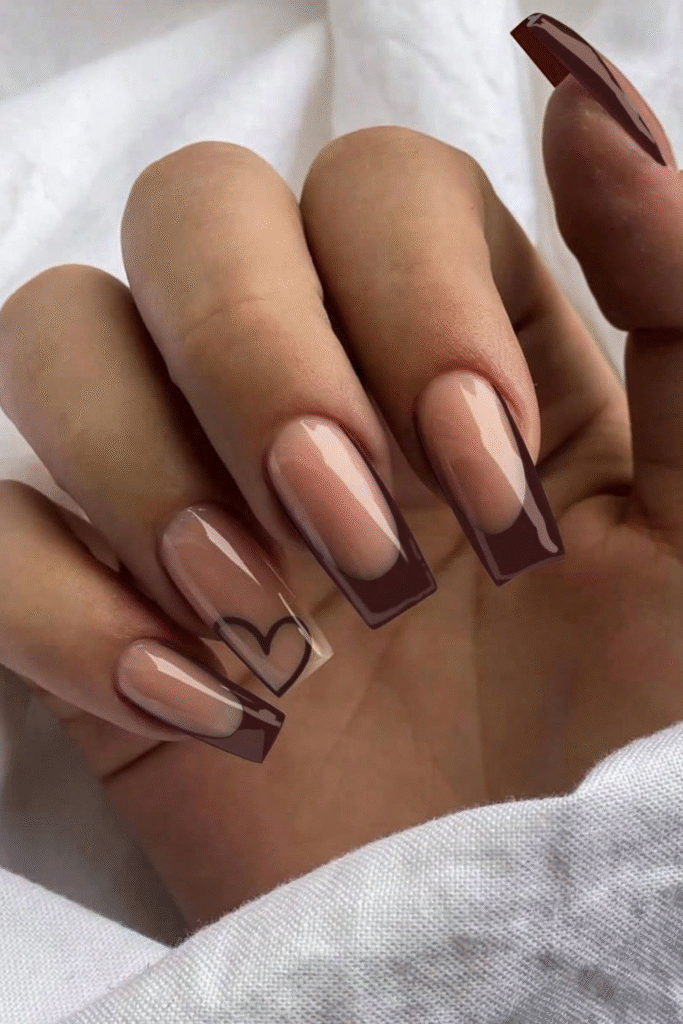
This twist on a classic French tip? Obsessed. It’s got that elevated, minimalist feel but with a little cut-out heart that keeps things fun and flirty. Bonus points if you add a matte finish for extra fall feels.

Square Brown Nails

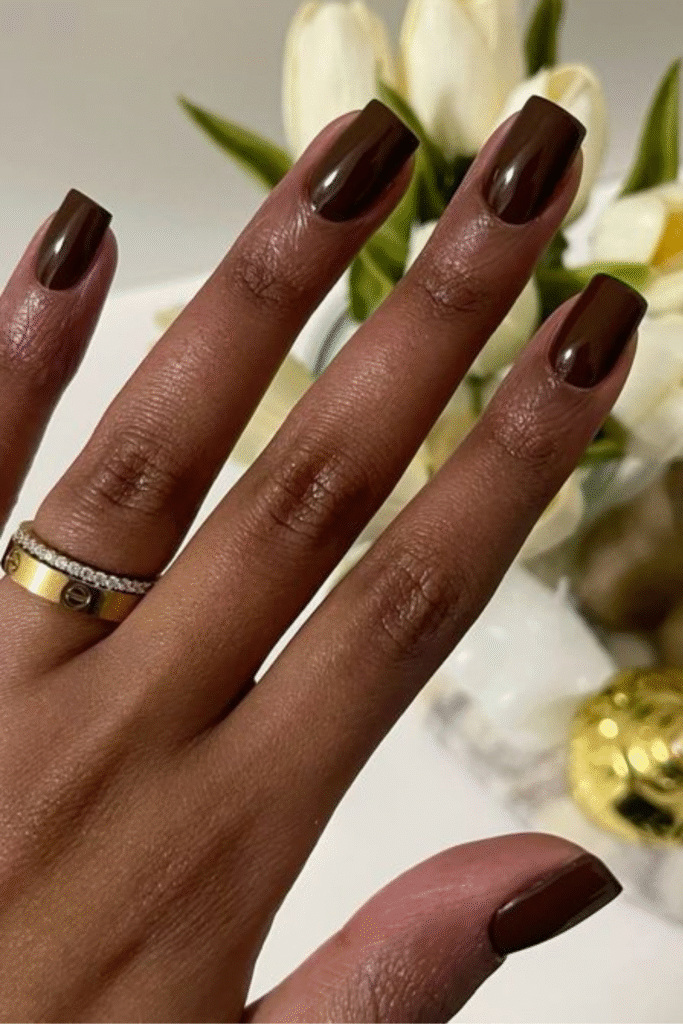
You can never go wrong with a sleek square shape. Pick one rich shade or do a monochromatic mix of brown tones. These are perfect if you’re into a clean, polished look without all the extra fuss.

Groovy 80s-Inspired Brown Nails

Think retro meets fall. These nails are giving major ‘80s vibes—but like, if the ‘80s had a muted brown filter on. Swirls, waves, dots—go wild. It’s funky, it’s fun, and it’s totally unexpected.
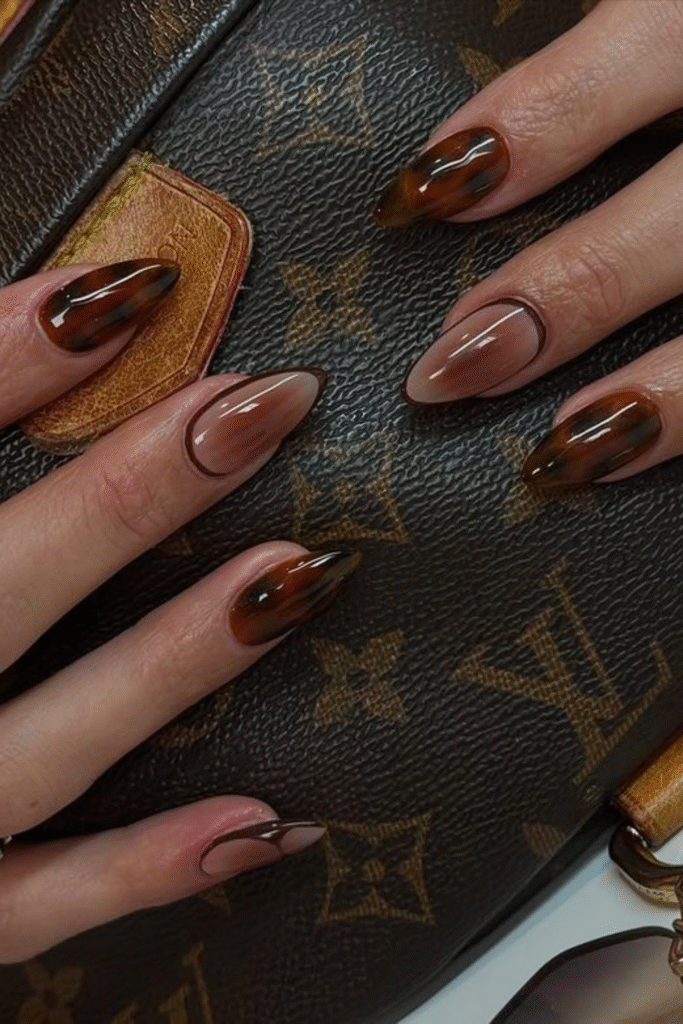
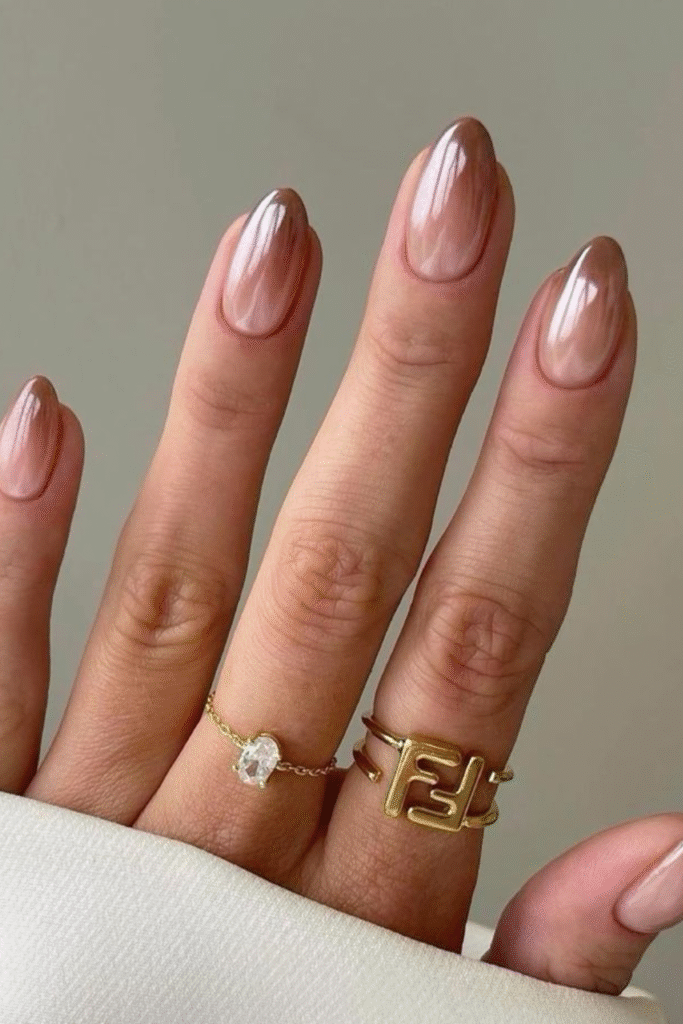
Brown Chrome Nails

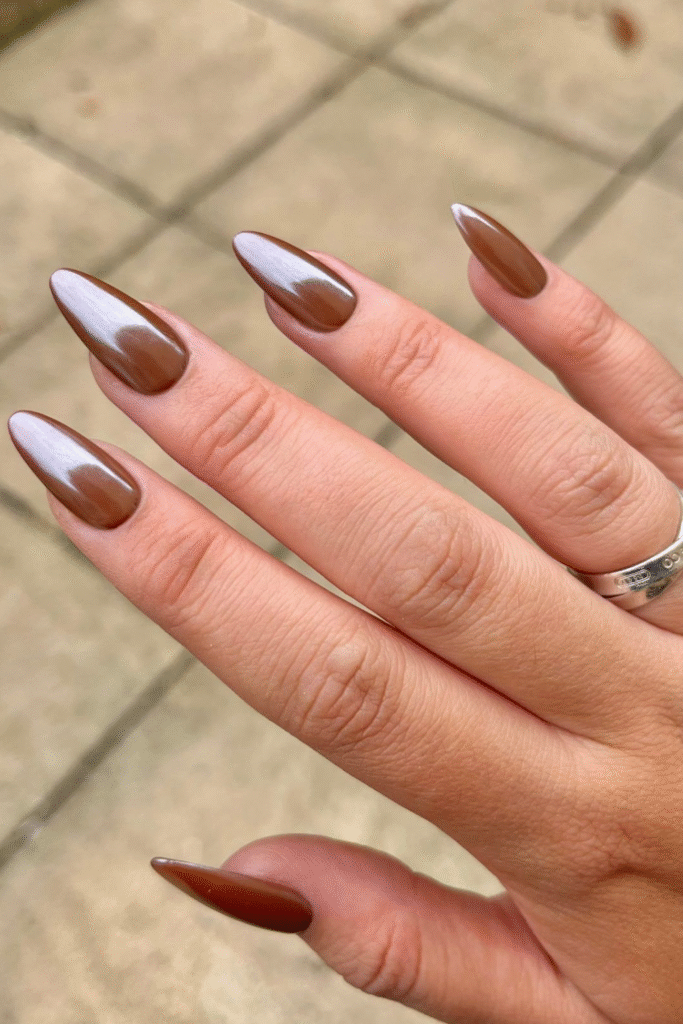
Hello, shine! These brown chrome nails are straight-up mesmerizing. They catch the light just right, giving your hands that metallic, futuristic touch—but still super cozy thanks to the warm brown tones.

Long Round Nails with Swirls

These swirly babies are an art piece on your fingertips. Mix different brown shades—latte, caramel, espresso—and create a swirling masterpiece. The longer length gives you plenty of room to play.

Chrome French Tip Nails

Want something edgy and elegant? Enter: chrome French tips. The sleek silver-brown metallic edge over a neutral base is everything. It’s giving “modern fall goddess,” and honestly, we’re here for it.

Shiny Round Chrome Nails

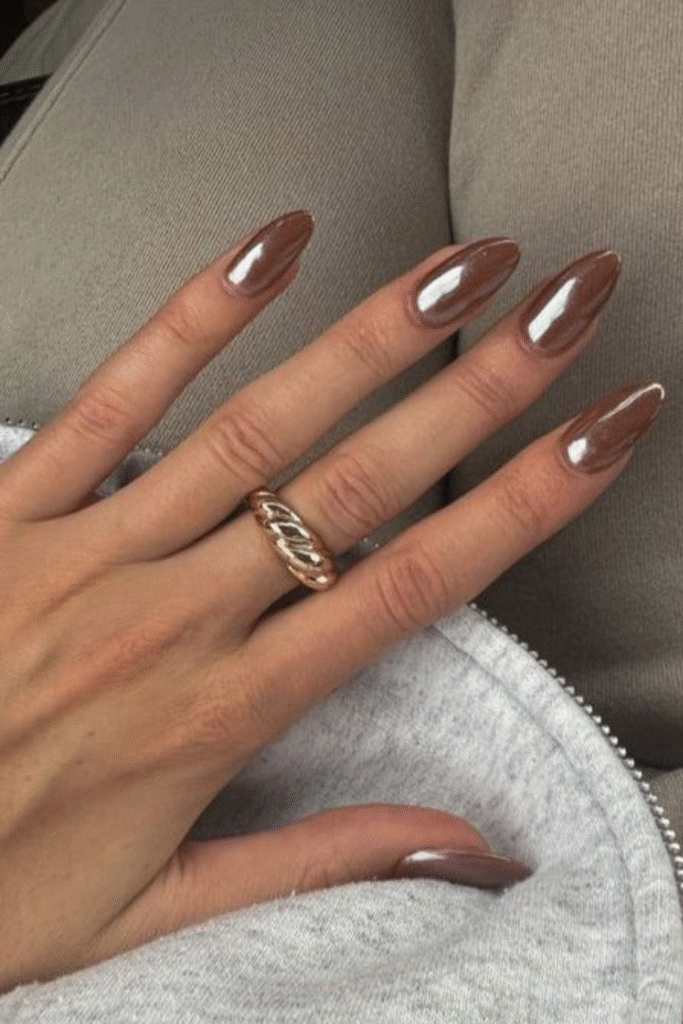
Sometimes, simplicity with a side of shimmer is all you need. These shiny round chrome nails are effortlessly chic and look like molten chocolate in the best way. Pair them with gold rings and you’re ready to slay fall.

So, whether you’re heading to a pumpkin patch, sipping hot cider on your porch, or just vibing through the season with your favorite chunky knit, these brown nail ideas will keep your hands looking as fabulous as your fall wardrobe.

Bookmark this post, send it to your nail tech, or just screenshot your fave—because these fall brown nail designs are too cute not to try at least once.

Get ready to fall in love with brown nails this season. You’ve been warned.

[jetpack-related-posts]

21+ Cozy and Fresh Fall Salad Ideas to Savor the Season

Filed Under: Fall, Food & Drink // 07/27/2025

fall salad ideas

Fall is that magical time when crisp air meets comfort food, but that doesn’t mean you have to ditch your greens. With the harvest season in full swing, fall salads are the perfect way to enjoy the flavors of autumn while keeping things light, wholesome, and incredibly satisfying. Think roasted veggies, crunchy apples, toasted nuts, and warm grains all tossed together in a colorful, hearty bowl. Whether you need a side dish for your fall dinner party or a wholesome lunch to power you through the day, these fall salad ideas are anything but boring.

Fall Salad Ideas To Try

Delicious Roasted Grape Salad with Arugula, Figs, and Blue Cheese

Roasted Grape Salad

Looking for a unique and delicious salad that will dazzle your taste buds? Look no further than this Roasted Grape Salad with Arugula, Figs, and Blue Cheese! This vibrant salad combines sweet roasted grapes, peppery arugula, juicy figs, and creamy blue cheese to create a mouth-watering dish that’s perfect for any occasion.

Whether it’s a fancy dinner party or a casual lunch, this salad will surely impress. Plus, it’s quick to prepare—ready in just 30 minutes!

Crisp Apple-Celery Salad with Toasted Hazelnuts

Apple Celery Salad

This isn’t your average “lettuce and tomato” salad. Nope. This apple celery salad is packed with peppery arugula, tart and sweet red apples, crunchy celery, a little bite from red onions, and golden toasted hazelnuts that bring just the right amount of warmth and texture to the mix. And the vinaigrette? Oh, it’s dreamy. That honey-Dijon blend is tangy, a little sweet, and totally addictive.

Roasted Sweet Potato & Arugula Salad with Pear & Blue Cheese

Sweet Potato Arugula Pear Blue Cheese

This roasted sweet potato salad is everything I want when I’m in the mood for something fresh but comforting. It has warm, spiced sweet potatoes, peppery baby arugula, sweet juicy pears, sharp blue cheese, and the crunch of toasted hazelnuts. Plus, the whole thing gets tossed in a zingy Dijon-honey vinaigrette that pulls it all together like the cozy sweater you never want to take off.

Couscous & Fresh Green Apple Salad

Imagine a bright, herby, zesty salad tossed together with sweet-tart Granny Smith apples, fluffy pearl couscous, and a medley of fresh herbs. This couscous apple salad is just that. It’s the kind of dish you throw together when you want something quick and easy but still a little fancy—like, “I didn’t spend all day in the kitchen, but yes, I am basically a salad goddess, thank you very much.”

Lentil Salad with Cucumber, Radish, Feta, and Mint

lentil salad recipe

Whether you’re trying to eat more plant-based meals, jazz up your lunch routine, or want something quick and satisfying that doesn’t taste like cardboard, this lentil salad is about to be your new favorite.

Apple Walnut Salad with White Balsamic Vinaigrette

If there’s one salad I could happily eat on repeat—whether it’s the crisp days of fall, a sunny spring afternoon, or a laid-back summer lunch—it’s this Apple Walnut Salad with White Balsamic Vinaigrette.

With peppery arugula, sweet and tart apple slices, warm honey-cinnamon toasted walnuts (yes, homemade candied walnuts—you’ll thank me later), tangy crumbles of blue cheese, and a simple but oh-so-satisfying white balsamic vinaigrette that ties it all together in the most delicious bow.

Roasted Fennel Salad with Lemon Tahini Dressing

fennel salad

If you’re craving a salad that feels fancy enough for a dinner party but easy enough for your Tuesday night dinner, this Roasted Fennel Salad with Lemon Tahini Dressing is calling your name. It’s light, zesty, and just the right mix of sweet, savory, and a little earthy. Basically, it’s everything you want in a salad — with a little roasted magic thrown in for good measure.

Crunchy Apple-Celery Salad with Maple-Dijon Vinaigrette

If you’ve been stuck in a salad rut lately—you know, the kind that’s just greens, cucumbers, and the same ol’ bottled ranch dressing—this Crunchy Apple-Celery Salad with Maple-Dijon Vinaigrette is here to change everything. It’s crisp, it’s tangy, it’s sweet, and it packs a serious crunch in every bite. Even better? It’s super simple to make and feels a little bit fancy without any actual fuss.

Red Cabbage and Carrot Salad with Lemon Tahini Dressing

Red Cabbage Carrot Salad (coleslaw)

If you’re like me, you know that sometimes you just crave a salad that’s not boring. You know what I mean — not another plain lettuce situation that leaves you hungry an hour later. I want crunch, I want color, I want flavor that pops. And that’s exactly why this Red Cabbage and Carrot Salad with Lemon Tahini Dressing has become one of my go-to recipes whenever I’m craving something light yet satisfying.

Easy Broccoli Salad with Feta and Toasted Almonds

broccoli feta salad

If you’ve been on the hunt for a quick, crunchy, and totally delicious salad that’s not just your average pile of greens—this Easy Broccoli Salad with Feta and Toasted Almonds is about to become your new go-to. It’s vibrant, loaded with texture, and tossed in a tangy, creamy dressing that ties every bite together perfectly.

Tortellini Antipasto Salad

tortellini antipasto salad

This antipasto salad is like the cool cousin of pasta salad and antipasto platter—wrapped up into one irresistible bowl. Creamy cheese tortellini? Yes. Spicy pepperoni? Double yes. Sharp cheeses, briny olives, juicy tomatoes, peppery arugula, and a homemade balsamic vinaigrette that’s equal parts tangy and sweet? You’re about to be the MVP of any gathering.

Antipasto Pasta Salad

spiral antipasto pasta salad

If there’s one dish that always shows up and shows out at a summer get-together, it’s Antipasto Pasta Salad. But not just any pasta salad—I’m talking about one that checks all the boxes: hearty, fresh, tangy, salty, crunchy, and just plain satisfying. Colorful antipasto salad is refreshing and flavorful, and almost too pretty to eat.

Broccoli Apple Salad

This Broccoli Apple Salad is a healthy and delicious version of classic broccoli salad. The crispy textures and vibrant colors make it a tantalizing side dish. 

Summer Apple and Strawberry Salad

This Apple Strawberry Salad is sweet, crisp, and tangy—fancy-looking but effortless, perfect for warm days or whenever you want something fresh and easy.

Goat Cheese Apple Salad

Experience a burst of flavors with this Goat Cheese Apple Salad! Crisp apples, creamy goat cheese, and crunchy walnuts come together in this delightful mix, all tossed in a light and tangy vinaigrette. Perfect for a light lunch or a refreshing side dish, this salad is as delicious as it is beautiful. Let’s get started on this tasty and elegant recipe!

Apple Gorgonzola Salad

Apple Gorgonzola Salad is a perfect fall salad, ideal for lunch, dinner, or side. It combines crisp apples, peppery arugula, toasted walnuts, rich gorgonzola cheese, sliced red onions, and a touch of sweet cranberries. Each bite offers a mix of textures and flavors that’s simply delicious.

Apple-Potato Salad

This easy apple-potato salad is the perfect side dish for a BBQ on a hot summer day. Not surprisingly, the main ingredients are apples and potatoes.

Roast Beetroot Salad with Apple and Smoked Mackerel

This roast beetroot salad is high on flavour; tossed together with tart apple, smoked mackerel, nuts and seeds for the crunch and bound together with a lightly spiced orange dressing.

Fall Harvest Salad with Apple and Butternut Squash

A colorful fall harvest salad that combines the best seasonal fall flavors! Mixed greens, Honeycrisp apples, roasted butternut squash, goat cheese, candied nuts, and a pop of pomegranate seeds drizzled with a sweet and tangy apple cider vinaigrette.

Apple Pasta Salad

Savor fall flavors with this apple Pasta Salad, a hearty blend of roasted butternut squash, crisp green apples, grapes, dried cranberries, baby kale, pecans, vegan feta, and a choice of two vinaigrettes.

Apple Cucumber Salad

This Apple Cucumber Salad is the ultimate refreshing side for summer. Crisp, juicy red apples are combined with cool, hydrating cucumbers in this light and tasty salad.

Fall salads are proof that healthy and hearty can go hand in hand. With ingredients like roasted squash, crisp apples, toasted nuts, and earthy greens, each bowl brings the cozy flavors of the season to your table. Whether you’re craving something sweet and savory or light and refreshing, there’s a fall salad idea here to match your mood. So go ahead, mix and match ingredients, get creative with textures and dressings, and let your salad be just as exciting as any fall comfort food.

[jetpack-related-posts]

Delightful Brown Sugar Baked Pears with Pecans

Filed Under: Food & Drink, Fall // 07/25/2025

As the weather turns crisp and the leaves start to dapple the ground with shades of gold and crimson, it’s time to embrace the comforting flavors of fall and winter. One of my favorite desserts that seems to perfectly encapsulate this cozy atmosphere is Brown Sugar Baked Pears with Pecans.

This delightful treat combines the sweetness of ripe pears, the warm embrace of cinnamon, and the crunch of fresh pecans, creating a dish that is as easy to make as it is divine to enjoy. Whether you’re hosting a gathering, or simply indulging on a quiet evening, this dessert will make your heart sing.

More Fall Desserts:

  • Delightful Baked Cinnamon Apple Crisp
  • Super Easy & Delicious Coffee & Walnut Pumpkin Bread
  • Classic Apple Pie à la Mode

Why This Recipe is Special

What I adore about this recipe is its simplicity. With just a few ingredients—pears, brown sugar, honey, and pecans—you can create a gourmet dessert that feels utterly indulgent. It’s also incredibly adaptable; you can serve it as a warm dessert after dinner, or as a beautiful breakfast option paired with yogurt or vanilla bean ice cream. And let’s not forget the health benefits of pears! Packed with dietary fiber and vitamin C, they’re not just tasty but good for you too!

The Appeal of Brown Sugar Baked Pears

Baked pears are tender, juicy, and caramelized to perfection. The brown sugar and honey create a lovely glaze that drips into the dish, while the cinnamon introduces warmth, grounding this sweet treat. Each bite offers a satisfying crunch from the pecans, which pair beautifully with the soft, baked fruit. Plus, the combination of flavors evokes all the best feelings of the season.

Ready to Dive In? Here’s How to Make it!

Now, let’s get into making this scrumptious dessert at home!

PrintPrint

Ingredients

  • 4 medium pears, firm and not too ripe

  • 1 Tbs. coconut oil, melted

  • 1/4 cup. light brown sugar

  • 2 Tbs. honey, preferably local

  • 2 tsp. pure vanilla extract

  • 1 tsp. ground cinnamon

  • 1/2 cup. pecans, roughly chopped

  • A pinch of sea salt

Step-By-Step Directions

1. Preheat the oven to 350°F.

2. Halve the pears and remove the core with a small spoon.

3. Transfer the prepped pears to a large casserole dish.

4. Toss the pears with coconut oil, honey, vanilla extract, cinnamon, pecans, and salt.

5. Using your hands, gently massage the pears until lightly coated with the oil and sugar mixture.

6. Transfer into the oven and bake until the pears are golden and fork-tender, approximately 25-30 minutes.

7. Serve immediately. Enjoy!

Want to switch things up? Try swapping out the pecans for walnuts or hazelnuts. You can also add a hint of nutmeg for an even more aromatic flavor. And for a little zing, consider adding a splash of lemon juice to the mixture before baking—it complements the sweetness of the pears perfectly.

Serving Suggestions

For an even more decadent experience, serve your baked pears with a scoop of vanilla bean ice cream. The melting creaminess of the ice cream balances the warm, caramelized flavors of the pears beautifully. You could also consider adding a drizzle of extra honey or a sprinkle of whipped cream on top for that extra touch of indulgence.

Tips & Tricks

For the creaminess of your baked pears, ensure they are firm but ripe. Overripe pears can become mushy and lose their appeal. You also want to pay attention to your baking time; every oven varies, so keep an eye on your pears to make sure they don’t overcook.

Common Mistakes to Avoid

Don’t rush the baking process. It’s crucial to let the pears become golden and fork-tender rather than cooking them too quickly. Also, make sure to coat them evenly in the oil and sugar mixture; you want every bite to be filled with flavor!

Have you tried this recipe? Share your experience in the comments!

Delightful Brown Sugar Baked Pears with Pecans
Print

Delightful Brown Sugar Baked Pears with Pecans

Recipe by AdviceFromNobodyCourse: DessertCuisine: AmericanDifficulty: Easy
Servings

4

servings
Prep time

10

minutes
Cooking time

30

minutes

A few simple ingredients create a delightful dessert perfect for any fall or winter gathering. The cinnamon adds just a hint of spicy warmth, and the pecans give it just the right crunch and texture. To make it extra special serve with a scoop of vanilla bean ice cream on the side.

Ingredients

  • 4 medium pears, firm and not too ripe

  • 1 Tbs. coconut oil, melted

  • 1/4 cup. light brown sugar

  • 2 Tbs. honey, preferably local

  • 2 tsp. pure vanilla extract

  • 1 tsp. ground cinnamon

  • 1/2 cup. pecans, roughly chopped

  • A pinch of sea salt

Directions

  • Preheat the oven to 350°F.
  • Halve the pears and remove the core with a small spoon.
  • Transfer the prepped pears to a large casserole dish.
  • Toss the pears with coconut oil, honey, vanilla extract, cinnamon, pecans, and salt.
  • Using your hands, gently massage the pears until lightly coated with the oil and sugar mixture.
  • Transfer into the oven and bake until the pears are golden and fork-tender, approximately 25-30 minutes.
  • Serve immediately. Enjoy!
[jetpack-related-posts]

Deliciously Sweet and Savory: Apple and Walnut Stuffed Pork Tenderloin

Filed Under: Food & Drink, Fall // 07/25/2025

Apple Walnut Tenderloin

Looking for a quick and delicious weeknight meal that will make your taste buds dance? Say hello to this incredible Apple and Walnut Stuffed Pork Tenderloin! This dish serves up a delightful balance of sweet and savory flavors, making it perfect for cozy dinners, special occasions, or simply to impress your family. Let me take you on a delicious journey with this recipe, as I share why it’s such a fantastic addition to your meal rotation.

This flavor-packed dish features tender pork seasoned to perfection with a rich filling of apples, walnuts, and fresh thyme. The mild sweetness of the apples pairs beautifully with the earthy crunch of walnuts, while the pork melts in your mouth. Plus, it’s a breeze to prepare! Butterflying your pork tenderloin not only allows it to cook evenly but also transforms it into an impressive centerpiece for your table.

More Apple Recipes For Fall:

  • Delightful Baked Cinnamon Apple Crisp Recipe
  • Deliciously Easy Instant Pot Apple Cinnamon Cheesecake
  • Delicious Cinnamon Apple Blondies: A Fall Favorite

Why You’ll Love This Recipe

Prepping the Apple and Walnut Stuffed Pork Tenderloin takes just 15 minutes, and with a cook time of only 20-30 minutes, you’ll have a delightful meal ready in no time! The dish is highly versatile, so you can easily adapt it to include your favorite ingredients or ones on hand, making it a fantastic go-to recipe.

Not only is this dish delicious, but it’s packed with nutrients as well. Apples add a dose of dietary fiber and vitamin C, while walnuts provide healthy fats and protein. This makes it not just a delicious choice, but a healthy one too—perfect for those who are mindful of their dietary choices!

More Pork Recipes To Try:

  • Slow Cooker Pulled Pork Lettuce Wraps
  • Instant Pot Pork Lo Mein, A Takeout Favorite Made Easy

Now, Let’s Get Cooking!

Whether you’re a seasoned chef or a kitchen novice, crafting this Apple and Walnut Stuffed Pork Tenderloin is straightforward. You’ll love how simple it is to create this dish, so let’s dive into the recipe!

PrintPrint

Ingredients

  • 3 Tbs. olive oil, divided

  • 1 small red onion, diced

  • 2 medium apples, peeled and diced

  • ¼ cup. walnuts, roughly chopped

  • 2 Tbs. breadcrumbs

  • 2 tsp. fresh thyme

  • 2 lb. pork tenderloin, butterflied

  • Salt and pepper to taste

Step-By-Step Directions

Tip Before You Begin: Butterflying pork tenderloin allows it to cook quickly and evenly, making it a simple, easy weeknight meal choice. To butterfly, place tenderloin on a large piece of plastic wrap on cutting board. Make a slit, cutting lengthwise down the middle, being careful not to cut all the way through. Best results are achieved by cutting 2/3 of the way through, leaving 1/3 of the overall thickness of tenderloin. Open the tenderloin like a book. Cover with a 2nd sheet of plastic wrap and pound it out with the flat side of a meat mallet or press it out with a rolling pin to an even thickness. 

1. Preheat the oven to 350°F.

2. Soak 6-8 toothpicks in a bowl of water to prevent them from burning.

3. Heat a tablespoon of olive oil in a large skillet, then add the diced onion and apples. Cook for 3-4 minutes until the onions are slightly soft and translucent.

4. Remove from heat and mix in walnuts, breadcrumbs, and fresh thyme. Season with salt and pepper to taste and set aside.

5. Lay the pork tenderloin on a flat surface and cover with plastic wrap. Pound the meat with a mallet until around 1/2 inch thick.

6. Spread the apple-walnut mixture over the pork and roll it up tightly like a jellyroll. Secure with soaked toothpicks.

7. Brush the rolled tenderloin with the remaining olive oil and season generously with salt and pepper.

8. Heat a skillet on high and sear the tenderloin until golden on all sides, approximately 5-6 minutes.

9. Transfer the tenderloin to the preheated oven and roast for 20-30 minutes, or until an internal temperature of 155°F is reached.

10. Remove from the oven, cover with foil, and let it rest for at least 15 minutes before slicing.

11. Enjoy your homemade Apple and Walnut Stuffed Pork Tenderloin!

    Serving Suggestions & Tips

    This stuffed tenderloin pairs wonderfully with roasted vegetables or a creamy potato mash. A crisp side salad rounds out the meal perfectly. For wine lovers, consider serving it with a light-bodied red or a crisp white.

    Feel free to get creative with the filling. You can swap in different nuts or dried fruits, or even toss in some cheese for added creaminess. For a vegetarian-friendly option, try stuffing portobello mushrooms with a similar mixture!

    Common Mistakes to Avoid

    Avoid rushing the broiling or roasting process; cooking it through is key to enjoying its flavors. Remember, letting the meat rest is essential for a juicy slice!

    Have you tried this Apple and Walnut Stuffed Pork Tenderloin recipe? I’d love to hear your thoughts or any personal twists you’ve added! Share your experience in the comments below!

    Apple and Walnut Stuffed Pork Tenderloin
    Print

    Apple and Walnut Stuffed Pork Tenderloin

    Recipe by AdviceFromNobodyCourse: DinnerCuisine: AmericanDifficulty: Medium
    Servings

    4

    servings
    Prep time

    15

    minutes
    Cooking time

    20

    minutes

    Apple and Walnut Stuffed Pork Tenderloin serves up a delightful balance of sweet and savory flavors, making it perfect for cozy dinners, special occasions, or simply to impress your family.

    Ingredients

    • 3 Tbs. olive oil, divided

    • 1 small red onion, diced

    • 2 medium apples, peeled and diced

    • ¼ cup. walnuts, roughly chopped

    • 2 Tbs. breadcrumbs

    • 2 tsp. fresh thyme

    • 2 lb. pork tenderloin, butterflied

    • Salt and pepper to taste

    Directions

    • Preheat the oven to 350°F.
    • Soak 6-8 toothpicks in a bowl of water to prevent them from burning.
    • Heat a tablespoon of olive oil in a large skillet, then add the diced onion and apples. Cook for 3-4 minutes until the onions are slightly soft and translucent.
    • Remove from heat and mix in walnuts, breadcrumbs, and fresh thyme. Season with salt and pepper to taste and set aside.
    • Lay the pork tenderloin on a flat surface and cover with plastic wrap. Pound the meat with a mallet until around 1/2 inch thick.
    • Spread the apple-walnut mixture over the pork and roll it up tightly like a jellyroll. Secure with soaked toothpicks.
    • Brush the rolled tenderloin with the remaining olive oil and season generously with salt and pepper.
    • Heat a skillet on high and sear the tenderloin until golden on all sides, approximately 5-6 minutes.
    • Transfer the tenderloin to the preheated oven and roast for 20-30 minutes, or until an internal temperature of 155°F is reached.
    • Remove from the oven, cover with foil, and let it rest for at least 15 minutes before slicing.
    • Enjoy your homemade Apple and Walnut Stuffed Pork Tenderloin!
    [jetpack-related-posts]

    Warm Up with Spirited Hot Apple Punch

    Filed Under: Food & Drink, Fall // 07/25/2025

    Hot Apple Punch

    As the leaves start to turn and the chilly winds begin to blow, there’s nothing quite like a warm, cozy drink to make you feel right at home. Enter the Spirited Hot Apple Punch—a delightful concoction that’s perfect for those crisp autumn evenings or festive holiday gatherings. This drink is not just a beverage; it’s a hug in a mug that brings people together around the fire.

    More Apple Recipes For Fall:

    • Delightful Baked Cinnamon Apple Crisp Recipe
    • Deliciously Easy Instant Pot Apple Cinnamon Cheesecake
    • Delicious Cinnamon Apple Blondies: A Fall Favorite

    What Makes This Recipe Special?

    This punch is incredibly easy to whip up—prep and cook time total a mere 20 minutes, making it accessible even for those who might not consider themselves kitchen wizards. What makes it truly special, though, is its warm, inviting mix of flavors. The combination of cinnamon, cloves, and fresh apple slices creates a fragrant aroma that fills your home, making every sip feel like a celebration of the season.

    Moreover, you can easily customize it! Want it to be an adult-only delight? Just add a splash of dark rum! Prefer a family-friendly version? Stick to the sweet and spiced apple juice base. Polished off with a decorative garnish of apple slices and cinnamon sticks, it’ll look as good as it tastes.

    The first sip of this Spirited Hot Apple Punch is like walking into a cozy cabin on a cold day. The taste is a seamless blend of sweet apple juice and aromatic spices, punctuated by the bright citrus of fresh orange slices. The texture is warm and inviting, making each sip deeply satisfying and even a little nostalgic.

    For those who enjoy a touch of creativity, consider using a mix of apples. By choosing a variety of crisp apples, the punch gains depth in flavor and a vibrant appearance, enhancing both the taste and the visual appeal.

    Let’s Dive into the Recipe!

    Hot Apple Punch

    Now that your mouth is watering, let’s jump into making this delicious Spiced Hot Apple Punch!

    PrintPrint

    Ingredients For Spirited Hot Apple Punch

    • 4 cups apple juice

    • 3 cinnamon sticks

    • 6 whole cloves

    • 2 oranges, sliced 1/4” thick

    • 3 assorted apples, cored and sliced into wedges

    • 1 cup dark rum (optional)

    Step-By-Step Directions

    1. In a medium pot, combine the apple juice, cinnamon sticks, cloves, orange slices, and apple wedges.

    2. Heat over medium heat until the mixture reaches a gentle simmer. Allow it to simmer for 10 minutes to blend the flavors beautifully.

    3. After simmering, remove from heat. If you’re feeling spirited, stir in the dark rum at this point.

    4. Serve the hot punch immediately. For a festive touch, garnish with extra apple slices and cinnamon sticks. Enjoy!

    If you’re looking to mix things up, try substituting the dark rum with apple brandy or bourbon for a slightly different take. You can also play around with the spices; a pinch of nutmeg or ginger can add an exciting twist!

    Did you know that cinnamon can help lower blood sugar levels and has anti-inflammatory properties? Apples are packed with fiber and vitamin C, making this punch not just delicious but a bit healthier, too. So you can sip away with a little less guilt during those festive celebrations.

    Serving Suggestions

    This drink pairs wonderfully with hearty dishes such as roasted chicken or vegetable potpie, making your dinner table feel warm and inviting. For dessert, consider serving it alongside spiced cookies or vanilla ice cream for a delightful contrast of temperatures and flavors.

    There you have it—a wonderful recipe that’s bound to warm your heart and home. Making this Spirited Hot Apple Punch will not only fill your kitchen with delightful aromas but also create memories with every cherished sip. So gather your loved ones, share this punch, and let the good times roll!

    Have you tried making this recipe? Share your experience in the comments below! We’d love to hear how your punch turned out and any creative twists you added!

    Warm Up with Spirited Hot Apple Punch
    Print

    Warm Up with Spirited Hot Apple Punch

    Recipe by AdviceFromNobodyCourse: DrinksCuisine: AmericanDifficulty: Easy
    Servings

    4

    servings
    Prep time

    10

    minutes
    Cooking time

    10

    minutes

    This makes a beautiful hot drink great for chilly fall evenings and holiday entertaining. For best visual appeal, use an assortment of crisp apples in this drink.

    Ingredients

    • 4 cups apple juice

    • 3 cinnamon sticks

    • 6 whole cloves

    • 2 oranges, sliced 1/4” thick

    • 3 assorted apples, cored and sliced into wedges

    • 1 cup dark rum (optional)

    Directions

    • In a medium pot, combine the apple juice, cinnamon sticks, cloves, orange slices, and apple wedges.
    • Heat over medium heat until the mixture reaches a gentle simmer. Allow it to simmer for 10 minutes to blend the flavors beautifully.
    • After simmering, remove from heat. If you’re feeling spirited, stir in the dark rum at this point.
    • Serve the hot punch immediately. For a festive touch, garnish with extra apple slices and cinnamon sticks. Enjoy!
    [jetpack-related-posts]

    30+ Pumpkin Recipes You Will Want to Make Again and Again

    Filed Under: Food & Drink, Fall // 07/25/2025

    pumpkin recipes

    If you wait all year just for pumpkin season, you’re in for a seriously delicious treat. This roundup has everything your fall-loving heart could want—from rich and creamy pumpkin mousse recipes to warm, spiced pumpkin bread that makes your whole kitchen smell like heaven. And if you’re craving something cozy to sip on, there’s even a pumpkin twist on classic Irish coffee. But don’t worry, we didn’t forget the savory side—there are bold and flavorful dishes like spicy pumpkin chicken casserole that’ll totally surprise your taste buds.

    30+ Pumpkin Recipes To Try This Fall

    Whether you’re baking for brunch, whipping up a fall dinner, or just looking for a new pumpkin treat to obsess over, these 30 pumpkin recipes are here to make your season extra tasty.

    Coffee Walnut Pumpkin Bread

    1. Coffee & Walnut Pumpkin Bread

    There’s something magical about the scent of fresh-baked bread wafting through the house, and when that bread includes the warm, inviting flavors of coffee and pumpkin, you’ve got a treat that’s simply irresistible!

    This Coffee and Walnut Pumpkin Bread isn’t just any loaf; it’s a delightful fusion of flavors that can brighten up any autumn afternoon.

    Try This Recipe
    Pumpkin Mousse

    2. Creamy Pumpkin Mousse with Maple Whipped Cream

    This delightful treat is not only creamy and rich, but it also captures the essence of fall with its warm spices and sweet maple syrup.

    Try This Recipe
    Spicy Pumpkin Chicken Casserole

    3. Spicy Pumpkin Chicken Casserole

    This delightful dish combines the earthy sweetness of fresh pumpkin with tender chicken thighs, creating a casserole that’s as comforting as it is flavorful. The medley of spices adds just the right amount of kick, making it a fantastic choice for those who crave a bit of heat in their meals.

    Plus, it’s straightforward to whip up, so you can spend less time in the kitchen and more time enjoying the cozy vibes with friends and family.

    Try This Recipe
    pumpkin spice Irish coffee

    4. Pumpkin Spice Irish Coffee

    This delightful drink is more than just your average coffee; it’s a cozy embrace in a cup! A rich, freshly brewed coffee infused with homemade pumpkin pie spice, paired with the creamy sweetness of Irish cream.

    Top it all off with a cloud of homemade whipped cream, and you have a decadent dessert drink that’s perfect for chilly autumn nights.

    Try This Recipe
    Paleo Pumpkin Spice Pancakes

    5. Fluffy Paleo Pumpkin Spice Pancakes

    If you’re looking for a breakfast that captures the essence of the season while still aligning with your health goals, then look no further than these Paleo Pumpkin Spice Pancakes.

    They’re fluffy, flavorful, and incredibly easy to whip up in no time! Plus, they make for an awesome start to your day.

    Try This Recipe
    CREAM CHEESE PUMPKIN PIE

    6. Cream Cheese Pumpkin Pie

    Cream Cheese Pumpkin Pie is a perfect blend of fall flavors in a flaky, all-butter crust.

    With swirls of sweetened cream cheese and velvety pumpkin custard, this Pumpkin pie promises pure dessert bliss.

    Try This Recipe
    classic pumpkin pie recipe without evaporated milk

    7. Classic Pumpkin Pie Recipe

    We can’t make a list about pumpkin pie, and not talk about a classic pumpkin pie.

    This treat captures the essence of fall in every velvety bite.

    This classic pumpkin pie recipe uses no evaporated milk. 

    Try This Recipe
    No Bake Pumpkin Mousse Pie with Salted Caramel

    8. No-Bake Pumpkin Mousse Pie with Salted Caramel

    This no-bake recipe features a fluffy pumpkin mousse filling, whipped cream, Sweet & Salty Pretzel Pie Crust, and a generous drizzle of Homemade Salted Caramel Sauce!

    It’s the perfect fall dessert and is easy to make a day or two ahead of your Thanksgiving gatherings!

    If you want more make-ahead dishes for fall, give these a try.

    Try This Recipe
    PECAN PUMPKIN PIE BARS

    9. Pecan Pumpkin Pie Bars

    These Pecan Pumpkin Pie Bars are the perfect mix of a buttery shortbread crust on the bottom and a soft, perfectly spiced pumpkin center.

    Topped with brown sugar and toasted pecans, these bars will give you all the cozy fall feels.

    These are simple to put together and perfect for dessert or as a sweet treat!

    Try This Recipe
    pumpkin pie cookies

    10. pumpkin pie cookies

    Ok I know, you’re wondering what are cookies doing on this list. Well, these are pumpkin pie cookies!

    Sweetly spiced whole-wheat snickerdoodles sandwich a dreamy pumpkin filling in these delightful Pumpkin Pie Cookies. 

    Get your fall-flavored dessert fix with just 11 easy-to-find ingredients and 25 minutes of kitchen time!

    Try This Recipe
    Pumpkin Lemonade

    11. Pumpkin Lemonade

    I know it sounds a little whacky, but don’t knock it til you try it.

    Homemade pumpkin lemonade with a kiss of cinnamon will make those taste buds dance. 

    For those of you who love pumpkin, bottoms up!

    Try This Drink!
    Pumpkin Cheesecake

    12. Pumpkin Cheesecake

    A rich pumpkin-infused cheesecake is in an easy graham cracker crust and baked until set (no water bath needed).

    This recipe has just a few easy steps and can be made ahead and refrigerated or frozen.

    Top with whipped cream or a drizzle of caramel sauce.

    Try This Recipe
    Pumpkin Spiced Iced Latte

    13. Pumpkin Spiced Iced Latte

    This pumpkin spice iced latte is homemade with almond milk and real pumpkin, making it so much healthier than the Starbucks pumpkin spice latte.

    This recipe is dairy-free, refined sugar-free, and vegan!

    It has the best pumpkin pie flavor and is only 175 calories.

    Try This Drink!
    Pumpkin Pie Bars

    14. Pumpkin Pie Bars

    Pumpkin pie bars are just what they sound like, pumpkin pie in bar form.

    These bars have spiced pumpkin filling on top of a simple homemade pie crust.

    These bars are the perfect end to any Thanksgiving dinner! 

    Try This Recipe
    Pumpkin Juice Recipe (Pumpkin Cider)

    15. Pumpkin Cider

    Pumpkin juice includes all the wonderful flavors of fall!

    Featuring canned pumpkin, apple cider, orange juice, and spices, this fall drink recipe is amazing served hot or cold.

    Whether you are searching for Harry Potter pumpkin juice specifically or would love a warm pumpkin cider, this recipe is for you!

    Try This Drink!
    Mini Pumpkin Pies

    16. Mini Pumpkin Pies

    Want individual-sized treats for your holiday gatherings? Here is how to make mini pumpkin pies for your holiday guests.

    Individual pumpkin pies are the perfect fall dessert. They’re small, bite-sized, and full of delicious pumpkin flavor.

    No silverware is even needed. You can eat them like a cookie!

    Try This Recipe
    Dunkin Copycat Pumpkin Cream Cold Brew

    17. Dunkin Copycat Pumpkin Cream Cold Brew

    This easy recipe for Dunkin copycat pumpkin cream cold brew is the perfect fall drink!

    It’s simple to make this iced coffee at home.

    Using pumpkin puree to make the cold foam and brown sugar cinnamon syrup gives the coffee a delicious pumpkin spice flavor.

    Try This Drink!
    AMISH PUMPKIN WHOOPIE PIES

    18. Amish Pumpkin Whoopie Pies

    If you love the whoopie pies from Amish bake sales or at farmer’s markets, then you’ll love this recipe for Amish pumpkin whoopie pies!

    They’re the perfect fall treat.

    Try This Recipe
    ICED PUMPKIN CREAM CHAI TEA LATTE (STARBUCKS COPYCAT)

    19. Iced Pumpkin Cream Chai Tea Latte (Starbucks Copycat)

    Introducing the Iced Pumpkin Cream Chai Tea Latte!

    Imagine your favorite iced chai latte recipe, except adorned with a pillowy dollop of pumpkin cream cold foam.

    Try This Drink!
    Pumpkin Pie Bars

    20. Pumpkin Pie Bars

    Easier than baking a whole pie, these pumpkin pie bars are made with a homemade pumpkin filling layered between a flour and pecan crust and a sweet crumble topping.

    They’re the ultimate no-fuss dessert for fall! 

    Try This Recipe
    Marshmallow Pumpkin Spice Smoothie

    21. Marshmallow Pumpkin Spice Smoothie

    When you combine the flavors of marshmallows, pumpkin and pumpkin pie spice, you end up with a delicious creamy pumpkin fluff smoothie. 

    Try This Drink!
    EASY PUMPKIN SPICE MARGARITA

    22. Pumpkin Spice Margarita

    Calling all pumpkin spice lattes and margarita fans! This Pumpkin Spice Margarita recipe has all of the flavors of fall rolled into one perfect cocktail. 

    Try This Drink!
    PUMPKIN MUDSLIDE COCKTAIL WITH CARAMEL

    23. Pumpkin Mudslide Cocktail With Caramel

    This Pumpkin Mudslide Cocktail is a fall-inspired take on classic mudslides that will be your new favorite cocktail.

    It’s perfect for everything from cozy fall nights to holiday parties and everything in between.

    Try This Drink!

    Whether you’re sipping on a creamy pumpkin spice latte, digging into a savory pumpkin chicken casserole, or treating yourself to a slice of decadent pumpkin pie, there’s no denying that pumpkin truly is the star of fall.

    With these delicious recipes—ranging from sweet to savory to sippable—you’ll be set to enjoy all the cozy, comforting flavors the season has to offer. So stock up on your pumpkin stash and get ready to cook, bake, and sip your way through fall like never before!

    [jetpack-related-posts]

    Delightful Baked Cinnamon Apple Crisp Recipe

    Filed Under: Food & Drink, Fall // 07/22/2025

    There’s something undeniably comforting about a warm dessert, especially when it’s made with fresh fruit and delightfully fragrant spices. Today, I am excited to share with you an amazing recipe for Baked Cinnamon Apple Crisp! This isn’t just any apple crisp, though. One taste of this delightful dessert, and you won’t believe it’s both gluten and refined sugar-free! The surprising addition of fresh thyme gives it a unique twist, adding a subtle savory note that beautifully complements the sweetness of the apples.

    Imagine sinking your fork into a warm, bubbling dish, with tender slices of apple enveloped in a crisp, golden topping. It’s a treat that not only pleases the palate but also brings back nostalgic memories of family gatherings and cozy evenings at home. Perfect for serving after dinner or as a sweet afternoon snack, this dessert will quickly become a staple in your recipe repertoire.

    More Apple Recipes:

    • Classic Apple Pie A La Mode
    • Quick & Easy Granola Stuffed Baked Apples
    • Delicious Cinnamon Apple Blondies
    • Deliciously Easy Instant Pot Apple Cinnamon Cheesecake

    Why You’ll Love This Recipe

    Before we dive into the recipe, let’s talk about why this apple crisp stands out. Not only is it easy to whip up in under an hour, but it also uses wholesome ingredients. I recommend using firm apples like Granny Smith or Pink Lady because they hold up beautifully in the oven without turning to mush. Plus, this recipe is perfect for anyone looking to reduce their sugar intake while still indulging in a sweet treat!

    About Thyme

    The addition of fresh thyme might seem unusual, but trust me on this! It elevates the flavor profile, creating a delicious balance that will have your taste buds dancing.

    How To Make This Cinnamon Apple Crisp

    To prepare this beauty, you will need:

    PrintPrint

    Ingredients

    • For The Apple Crisp:
    • 6 large apples, cored, peeled, and sliced

    • 1 tablespoon fresh lemon juice

    • 1/3 cup real maple syrup

    • 2 tablespoons 100% apple juice (sugar-free)

    • 1 teaspoon ground cinnamon

    • 1/2 teaspoon ground allspice

    • 1 1/2 teaspoons fresh thyme leaves

    • 1/4 teaspoon salt

    • Topping Ingredients:
    • 1 cup old-fashioned rolled oats

    • 1/3 cup almond flour

    • 1/3 cup sliced almonds

    • 1/3 cup honey (preferably local)

    • 3 tablespoons unsalted butter, melted

    Step-By-Step Directions

    Now, let’s get into making this delightful dessert:

    1. Preheat your oven to 350°F and place the top oven rack in the center position. Grease an 8” x 8” or a 7” x 10” baking dish and set it aside.

    2. In a large non-reactive bowl, toss the sliced apples with fresh lemon juice. Next, add maple syrup, apple juice, cinnamon, allspice, thyme leaves, and salt. Toss everything together and set aside.

    3. In a separate bowl, combine the topping ingredients and stir until the oats are thoroughly coated and everything is well combined.

    4. Pour the apple mixture into your prepared baking dish and spread it evenly. Layer the topping on top so that it covers the apples completely.

    5. Place your dish in the oven and bake for 30 minutes. Once the topping is nicely browned, cover the dish loosely with aluminum foil to prevent over-browning. Bake for an additional 15-20 minutes, or until the apple crisp is bubbling.

    6. Remove from the oven and let cool for 5-10 minutes before serving.

      For the ultimate indulgence, serve your warm Baked Cinnamon Apple Crisp with a scoop of vanilla bean ice cream or a dollop of freshly whipped cream. Your taste buds will thank you!

      Make It Your Own

      If you want to customize this recipe, feel free to experiment with different types of apples or toss in a few berries for an added pop of flavor. You can also substitute coconut oil in place of butter for a dairy-free option.

      Health Benefits Of This Apple Crisp

      Beyond being delicious, the ingredients in this apple crisp offer several health benefits. Apples are rich in fiber and antioxidants, while oats provide essential vitamins and minerals, making this dessert a delectable and guilt-free indulgence.

      Common Mistakes to Avoid

      While making your Baked Cinnamon Apple Crisp, it’s essential not to rush the process. Allowing the apples to soak in the lemon juice and maple syrup enhances the flavor. Also, remember to cover the dish with foil after the initial baking time to prevent burning the topping.

      Have you tried making this Baked Cinnamon Apple Crisp? I’d love to hear your experience! Share your thoughts in the comments, and let’s swap tips and stories.

      Delightful Baked Cinnamon Apple Crisp Recipe
      Print

      Delightful Baked Cinnamon Apple Crisp Recipe

      Recipe by AdviceFromNobodyCourse: DessertCuisine: AmericanDifficulty: Easy
      Servings

      4-6

      servings
      Prep time

      20

      minutes
      Cooking time

      50

      minutes

      There’s something undeniably comforting about a warm dessert, especially when it’s made with fresh fruit and delightfully fragrant spices. Today, I am excited to share with you an amazing recipe for Baked Cinnamon Apple Crisp!

      Ingredients

      • 6 large apples, cored, peeled, and sliced

      • 1 tablespoon fresh lemon juice

      • 1/3 cup real maple syrup

      • 2 tablespoons 100% apple juice (sugar-free)

      • 1 teaspoon ground cinnamon

      • 1/2 teaspoon ground allspice

      • 1 1/2 teaspoons fresh thyme leaves

      • 1/4 teaspoon salt

      • Topping Ingredients:
      • 1 cup old-fashioned rolled oats

      • 1/3 cup almond flour

      • 1/3 cup sliced almonds

      • 1/3 cup honey (preferably local)

      • 3 tablespoons unsalted butter, melted

      Directions

      • Preheat your oven to 350°F and place the top oven rack in the center position. Grease an 8” x 8” or a 7” x 10” baking dish and set it aside.
      • In a large non-reactive bowl, toss the sliced apples with fresh lemon juice. Next, add maple syrup, apple juice, cinnamon, allspice, thyme leaves, and salt. Toss everything together and set aside.
      • In a separate bowl, combine the topping ingredients and stir until the oats are thoroughly coated and everything is well combined.
      • Pour the apple mixture into your prepared baking dish and spread it evenly. Layer the topping on top so that it covers the apples completely.
      • Place your dish in the oven and bake for 30 minutes. Once the topping is nicely browned, cover the dish loosely with aluminum foil to prevent over-browning. Bake for an additional 15-20 minutes, or until the apple crisp is bubbling.
      • Remove from the oven and let cool for 5-10 minutes before serving.

      [jetpack-related-posts]

      Deliciously Easy Instant Pot Apple Cinnamon Cheesecake

      Filed Under: Food & Drink, Fall // 07/22/2025

      Apple Cinnamon Cheesecake

      If you’re looking for a delectable dessert that’s both easy to make and impressively scrumptious, you’re in for a treat! Today, we’re diving into the world of Instant Pot® desserts with a delightfully creamy Apple Cinnamon Cheesecake. This recipe does not only taste divine, but it also has a shortcut that will save you valuable baking time. Whether you’re hosting a holiday get-together or just indulging in a sweet treat on a cozy evening, this cheesecake will definitely steal the spotlight.

      More Apple Recipes:

      • Classic Apple Pie A La Mode
      • Quick & Easy Granola Stuffed Baked Apples
      • Delicious Cinnamon Apple Blondies
      • Baked Cinnamon Apple Crisp

      Why This Cheesecake is Special

      This Instant Pot® Apple Cinnamon Cheesecake is special for so many reasons. First, it combines the warm flavors of cinnamon and apple with the creamy texture of cheesecake, creating a perfect balance that’s reminiscent of fall but delightful all year round. Furthermore, using the Instant Pot® means you can have a perfectly cooked cheesecake without the need for a water bath, making this recipe a breeze even for beginner bakers.

      Moreover, there’s a sweet and simple health twist as we’re using monk fruit sweetener instead of regular sugar, letting you satisfy your sweet tooth while keeping things a little lighter. Trust me, once you taste this mouthwatering cheesecake, you’re going to want to make it again and again!

      I remember the first time I had a cheesecake with an apple topping at a family get-together. The delightful combination left me in awe, and ever since then, I’ve been experimenting with different versions. This Instant Pot® recipe is a culmination of those efforts, providing a fresh take on a classic dessert that’s sure to become a family favorite.

      What Is Instant Pot Cheesecake?

      The first bite of this cheesecake is pure bliss. The rich and creamy filling melts in your mouth while the apple cinnamon topping adds a perfect crunch alongside a gooey sweetness from the syrup. Each forkful offers a wonderful contrast between the smooth cheesecake and caramelized apples, enticing your taste buds with layers of warm, comforting flavors. And let’s not forget the buttery almond crust, which ties the entire dish together with its nutty, crunchy profile.

      If you’re looking to customize your cheesecake experience, consider swapping in other fruits like pears or peaches for the topping or even adding a drizzle of caramel sauce. The possibilities are really endless!

      Let’s Make This Cheesecake!

      Now, let’s dive into making this creamy, heavenly Apple Cinnamon Cheesecake in your Instant Pot®!

      PrintPrint

      Ingredients

      • Crust Ingredients:
      • 1 cup. almond flour

      • 1 tsp. real vanilla extract

      • 3 Tbs. powdered monk fruit sweetener

      • 3 Tbs. unsalted butter, melted

      • Batter Ingredients:
      • 2 8-oz. blocks cream cheese, room temperature

      • 1 tsp. real vanilla extract

      • ¼ cup. powdered monk fruit sweetener

      • 1 tsp. ground cinnamon

      • 2 large eggs, room temperature

      • ¼ cup. heavy cream, room temperature

      • Apple Cinnamon Topping:
      • 2 Tbs. unsalted butter

      • 1 large McIntosh apple, cored and cut into equal-sized wedges

      • 1 tsp. ground cinnamon

      • ½ tsp. allspice

      • 3 Tbs. maple syrup

      • ½ cup. water

      • Pinch salt

      • ¼ cup. pecans, chopped

      Directions For Making This Apple Cinnamon Cheesecake

      1. Coat the inside of the springform pan with the non-stick cooking spray and set aside.

      2. In a medium bowl, combine all the crust ingredients. Press the mixture into the bottom of the prepared springform pan and freeze for at least one hour.

      3. In a large mixing bowl, beat the batter ingredients one at a time, blending for 10-15 seconds each. Remember not to overmix!

      4. Remove the crust from the freezer, pour the batter over it, and smooth it out before tapping the pan on the counter to release air bubbles.

      5. Pour water into the Instant Pot® and place the springform pan on the trivet. Lock the lid and set to cook on “Manual” for 30 minutes.

      6. After cooking, allow pressure to release naturally for up to 10 minutes before removing the lid.

      7. Cool the cheesecake on the counter for 10-15 minutes, then chill in the refrigerator for at least 4 hours or overnight.

      8. For the topping, use the Sauté function to melt butter, then add apple wedges, cinnamon, allspice, maple syrup, water, and salt. Cook until apples are tender but not mushy.

      9. Transfer cooled apple mixture to atop the cheesecake, sprinkle with pecans, and enjoy!

      Serving Suggestions & Tips

      Serve this cheesecake as the star of your dessert table, alongside a hot cup of coffee or chai for an incredible pairing. You could also consider a scoop of vanilla ice cream on the side for a decadent treat!

      Pro Tip: Ensure that your batter ingredients are at room temperature for optimal blending. This simple step can make all the difference for achieving that perfectly creamy texture.

      Have you tried this Instant Pot® Apple Cinnamon Cheesecake? We’d love to hear your thoughts! Share your twists or how it turned out for you in the comments below. Happy baking!

      Deliciously Easy Instant Pot Apple Cinnamon Cheesecake
      Print

      Deliciously Easy Instant Pot Apple Cinnamon Cheesecake

      Recipe by AdviceFromNobodyCourse: DessertCuisine: AmericanDifficulty: Easy
      Servings

      4-6

      servings
      Prep time

      30

      minutes
      Cooking time

      50

      minutes

      If you’re looking for a delectable dessert that’s both easy to make and impressively scrumptious, you’re in for a treat! Today, we’re diving into the world of Instant Pot® desserts with a delightfully creamy Apple Cinnamon Cheesecake.

      Ingredients

      • Crust Ingredients:
      • 1 cup. almond flour

      • 1 tsp. real vanilla extract

      • 3 Tbs. powdered monk fruit sweetener

      • 3 Tbs. unsalted butter, melted

      • Batter Ingredients:
      • 2 8-oz. blocks cream cheese, room temperature

      • 1 tsp. real vanilla extract

      • ¼ cup. powdered monk fruit sweetener

      • 1 tsp. ground cinnamon

      • 2 large eggs, room temperature

      • ¼ cup. heavy cream, room temperature

      • Apple Cinnamon Topping:
      • 2 Tbs. unsalted butter

      • 1 large McIntosh apple, cored and cut into equal-sized wedges

      • 1 tsp. ground cinnamon

      • ½ tsp. allspice

      • 3 Tbs. maple syrup

      • ½ cup. water

      • Pinch salt

      • ¼ cup. pecans, chopped

      Directions

      • Coat the inside of the springform pan with the non-stick cooking spray and set aside.
      • In a medium bowl, combine all the crust ingredients. Press the mixture into the bottom of the prepared springform pan and freeze for at least one hour.
      • In a large mixing bowl, beat the batter ingredients one at a time, blending for 10-15 seconds each. Remember not to overmix!
      • Remove the crust from the freezer, pour the batter over it, and smooth it out before tapping the pan on the counter to release air bubbles.
      • Pour water into the Instant Pot® and place the springform pan on the trivet. Lock the lid and set to cook on “Manual” for 30 minutes.
      • After cooking, allow pressure to release naturally for up to 10 minutes before removing the lid.
      • Cool the cheesecake on the counter for 10-15 minutes, then chill in the refrigerator for at least 4 hours or overnight.
      • For the topping, use the Sauté function to melt butter, then add apple wedges, cinnamon, allspice, maple syrup, water, and salt. Cook until apples are tender but not mushy.
      • Transfer cooled apple mixture to atop the cheesecake, sprinkle with pecans, and enjoy!
      [jetpack-related-posts]

      Delicious Cinnamon Apple Blondies: A Fall Favorite

      Filed Under: Food & Drink, Fall // 07/22/2025

      As the leaves start to turn and the air takes on a crispness that signals the arrival of autumn, there’s an undeniable craving for warm, cozy treats. One such delight that perfectly encapsulates the flavors of fall is the Cinnamon Apple Blondies. These scrumptious treats blend the sweet, tangy freshness of apples with the warm, inviting spice of cinnamon, creating an irresistible dessert that’s hard to resist any time of the year.

      What makes these blondies truly special isn’t just their flavor but their ease of preparation. With just ten minutes of prep time and a wonderfully simple ingredient list, you can whip up a batch of these delicious bars without spending hours in the kitchen. Plus, they’re a fantastic way to incorporate seasonal produce into your diet. When selecting apples for your blondies, look for varieties that maintain their texture during baking, like Braeburns, Honeycrisp, Pink Lady, or Jonagold. These apples contribute not only to the flavor but also to the delightful texture of the blondies.

      Imagine biting into a gooey blondie, where the sweetness of the apples meets the richness of butter and sugar, all while having that lovely hint of cinnamon swirling around. Not only are these blondies deliciously moist and chewy, but they can also serve as a delightful treat for any occasion—whether it’s a family gathering, a cozy evening at home, or as a surprise dessert for unexpected guests.

      If you’re pondering what makes these blondies stand out from your typical dessert, let’s take a closer look. The combination of brown sugar and butter creates a rich base that perfectly complements the tartness of the apples. Adding white chocolate chips can introduce a creamy contrast, turning these blondies into an extraordinary dessert that will have everyone asking for seconds.

      More Apple Recipes:

      • Classic Apple Pie A La Mode
      • Quick & Easy Granola Stuffed Baked Apples
      • Baked Cinnamon Apple Crisp
      • Deliciously Easy Instant Pot Apple Cinnamon Cheesecake

      Let’s Make Some Cinnamon Apple Blondies!

      Now that you’re hungry and ready to dive into this delightful recipe, let’s gather our ingredients!

      PrintPrint

      Ingredients

      • 2 sticks butter, softened at room temperature

      • 1 ½ cups + 2 tablespoons light brown sugar, packed (divided)

      • 2 eggs, at room temperature

      • 2 teaspoons pure vanilla extract

      • 1 ½ cups all-purpose flour

      • 1 teaspoon baking powder

      • 2 teaspoons ground cinnamon

      • ½ teaspoon salt

      • 2 large apples, peeled and chopped

      • ½ cup white chocolate chips (optional)

      Step-By-Step Directions

      1. Preheat the oven to 350 degrees F and line a 9×9-inch square baking pan with parchment paper.

      2. In a large mixing bowl, combine the softened butter and 1 ½ cups of brown sugar. Whisk until the mixture is smooth and lightly fluffy.

      3. Add the eggs and vanilla extract to the bowl, continuing to whisk until the ingredients are well combined.

      4. Now it’s time to add the dry ingredients! Mix in the flour, baking powder, cinnamon, and salt, folding gently until the batter is smooth. Be careful not to overmix!

      5. In a separate small bowl, toss the chopped apples with the remaining 2 tablespoons of brown sugar. Gently fold the apple mixture and the white chocolate chips (if using) into the batter.

      6. Transfer the blondie batter into your prepared baking pan and place it in the oven. Bake for 30-40 minutes, or until the top is lightly browned and a toothpick inserted into the center comes out mostly clean.

      7. Once baked, allow the blondies to cool to room temperature before slicing and serving. Enjoy!

        How To Make It Your Own:

        These delectable blondies can stand alone, but if you want to elevate their deliciousness even further, serve them warm with a scoop of vanilla ice cream or a drizzle of caramel sauce. For a nutty twist, consider adding chopped walnuts or pecans into the batter—this not only enhances the flavor but also adds a delightful crunch.

        These blondies are perfect for pairing with a hot cup of spiced cider or a rich cup of coffee, making them an excellent choice for your next cozy gathering. And here’s a fun idea: for a twist, try swapping the apples for ripe pears or a combination of seasonal fruits!

        Tips & Tricks

        • For the creamiest blondies, make sure your butter is softened but not melted. Softened butter creates a fluffy batter.
        • Don’t rush the baking process; allow the blondies to set as they cool down for optimal texture.
        • If you’d like a more pronounced cinnamon flavor, feel free to increase the amount of ground cinnamon to 2 ½ teaspoons.

        Have you tried making these Cinnamon Apple Blondies? I’d love to hear your thoughts and any tweaks you tried! Share your experience in the comments below!

        Delicious Cinnamon Apple Blondies: A Fall Favorite
        Print

        Delicious Cinnamon Apple Blondies: A Fall Favorite

        Recipe by AdviceFromNobodyCourse: DessertCuisine: AmericanDifficulty: Easy
        Servings

        9

        servings
        Prep time

        10

        minutes
        Cooking time

        40

        minutes

        Cinnamon Apple Blondies are a scrumptious treat in the autumn or any time of the year! The combination of beautiful fall apples and cinnamon are a match made in heaven and SO hard to resist!

        Ingredients

        • 1 ½ cups all-purpose flour

        • 2 teaspoons pure vanilla extract

        • 2 eggs, at room temperature

        • 1 ½ cups + 2 tablespoons light brown sugar, packed (divided)

        • 2 sticks butter, softened at room temperature

        • 1 teaspoon baking powder

        • 2 teaspoons ground cinnamon

        • ½ teaspoon salt

        • 2 large apples, peeled and chopped

        • ½ cup white chocolate chips (optional)

        Directions

        • Preheat the oven to 350 degrees F and line a 9×9-inch square baking pan with parchment paper.
        • In a large mixing bowl, combine the softened butter and 1 ½ cups of brown sugar. Whisk until the mixture is smooth and lightly fluffy.
        • Add the eggs and vanilla extract to the bowl, continuing to whisk until the ingredients are well combined.
        • Now it’s time to add the dry ingredients! Mix in the flour, baking powder, cinnamon, and salt, folding gently until the batter is smooth. Be careful not to overmix!
        • In a separate small bowl, toss the chopped apples with the remaining 2 tablespoons of brown sugar. Gently fold the apple mixture and the white chocolate chips (if using) into the batter.
        • Transfer the blondie batter into your prepared baking pan and place it in the oven. Bake for 30-40 minutes, or until the top is lightly browned and a toothpick inserted into the center comes out mostly clean.
        • Once baked, allow the blondies to cool to room temperature before slicing and serving. Enjoy!
        [jetpack-related-posts]

        Quick & Easy Granola Stuffed Baked Apples, A Delicious Fall Treat

        Filed Under: Food & Drink, Fall // 07/22/2025

        As autumn settles in and the air grows crisp, there’s nothing quite like cozying up with a warm dessert that celebrates the flavors of the season. Enter the delightful Granola Stuffed Baked Apples. Not only are these beauties a fantastic way to enjoy fresh apples, but they also give you the chance to get creative with your ingredients. Picture this: soft, warm apples stuffed to the brim with crunchy granola, sweet dried fruits, and a hint of cinnamon, all baked to perfection. It’s a luscious combination that captures the essence of fall!

        What makes baked apples so special is their comforting, homey nature. Growing up, my favorite part of fall was winding down the evenings with homemade baked apples floating in a warm syrup, often after a rambunctious day of apple picking. This recipe brings back those sweet memories while being incredibly straightforward. With just 10 minutes of prep and a little time in the oven, you’ll have a warm, gooey dessert perfect for family gatherings or a quiet night in.

        More Apple Recipes:

        • Classic Apple Pie A La Mode
        • Baked Cinnamon Apple Crisp
        • Delicious Cinnamon Apple Blondies
        • Deliciously Easy Instant Pot Apple Cinnamon Cheesecake

        Why You’ll Love These Granola Stuffed Baked Apples

        Not only are these apples incredibly delicious, but they also pack a nutritional punch. Apples are a fantastic source of dietary fiber and vitamin C. When filled with granola, dried fruits, and nuts, you get added protein and a variety of other nutrients. The versatility of this recipe allows you to customize it. Swap out the granola with your favorite flavors, toss in some chocolate chips for a decadent twist, or use maple syrup instead of honey for a unique sweetness!

        These baked apples can be served warm, as they are, or topped off with a scoop of creamy ice cream or a dollop of crème fraîche to take it to the next level. Imagine taking that first bite and savoring the warm spices combined with the crunch of granola all wrapped around the soft, sweet apple. It’s heaven!

        Let’s Get Cooking!

        Now, let’s dive into making these delightful granola-stuffed baked apples.

        PrintPrint

        Ingredients For Granola Stuffed Baked Apples

        • 4 small to medium baking apples, tops cut off and reserved, apples cored and hollowed out to make room for the granola.

        • 5 tablespoons granola (use more if necessary based on the size of the apple)

        • 2 tablespoons raisins plus dried fruit as desired (think cranberries, apricots, figs, mangos, and prunes)

        • 2 tablespoons nuts, chopped, optional

        • 1 teaspoon ground cinnamon

        • 4 teaspoons unsalted butter

        • Drizzle of honey, optional

        • Optional: Crème fraîche or ice cream for serving

        Step-By-Step Directions

        1. Preheat your oven to 375°F.

        2. In a medium bowl, combine the granola, raisins, nuts, dried fruit, and cinnamon. Mix well. If your granola is unsweetened, drizzle in a bit of honey for sweetness.

        3. Place your cored apples in an oven-proof baking dish.

        4. Generously fill each apple with the granola mixture.

        5. Top each apple with 1 teaspoon of unsalted butter.

        6. Bake in the preheated oven for 30-40 minutes or until the apples are soft and sticky.

        7. Remove from the oven and allow to cool briefly before serving.

        8. Serve as is or add a scoop of your favorite ice cream or crème fraîche on top. Enjoy!

        Tips & Tricks

        Here are a few tips to elevate your baked apples:

        • Choose the Right Apples: Look for firm apples like Honeycrisp or Granny Smith that hold their shape well when baked.
        • Mix It Up: Feel free to experiment with different types of granola or dried fruit based on what you have. You might discover a new favorite!
        • Go Easy on the Honey: If you prefer less sweetness, the natural sugars from the apples and dried fruits will be plenty.
        • Don’t Rush the Process: Allow the apples to cool briefly after baking. This prevents burns from the hot filling!

        So, what are you waiting for? Gather your ingredients, preheat that oven, and treat yourself to these Granola Stuffed Baked Apples. Your taste buds will thank you! Have you tried this recipe? Share your experience in the comments below!

        Delicious Granola Stuffed Baked Apples
        Print

        Delicious Granola Stuffed Baked Apples

        Recipe by AdviceFromNobodyCourse: Breakfast, Brunch, DessertCuisine: AmericanDifficulty: Easy
        Servings

        4

        servings
        Prep time

        10

        minutes
        Cooking time

        40

        minutes

        Baked apples are a delicious satisfying fall treat. This recipe is really more of a method and amounts and ingredients will vary based on personal preference

        Ingredients

        • 4 small to medium baking apples, tops cut off and reserved, apples cored and hollowed out to make room for the granola.

        • 5 tablespoons granola (use more if necessary based on the size of the apple)

        • 2 tablespoons raisins plus dried fruit as desired (think cranberries, apricots, figs, mangos, and prunes)

        • 2 tablespoons nuts, chopped, optional

        • 1 teaspoon ground cinnamon

        • 4 teaspoons unsalted butter

        • Drizzle of honey, optional

        • Optional: Crème fraîche or ice cream for serving

        Directions

        • Preheat your oven to 375°F.
        • In a medium bowl, combine the granola, raisins, nuts, dried fruit, and cinnamon. Mix well. If your granola is unsweetened, drizzle in a bit of honey for sweetness.
        • Place your cored apples in an oven-proof baking dish.
        • Generously fill each apple with the granola mixture.
        • Top each apple with 1 teaspoon of unsalted butter.
        • Bake in the preheated oven for 30-40 minutes or until the apples are soft and sticky.
        • Remove from the oven and allow to cool briefly before serving.
        • Serve as is or add a scoop of your favorite ice cream or crème fraîche on top. Enjoy!
        [jetpack-related-posts]
        • « Previous Page
        • 1
        • 2
        • 3
        • 4
        • 5
        • Next Page »

        Copyright © 2026 · Theme by Marketing Templates Co.

        We use cookies on our website to give you the most relevant experience by remembering your preferences and repeat visits.Read More By clicking “Accept All”, you consent to the use of ALL the cookies. However, you may visit "Cookie Settings" to provide a controlled consent.
        Cookie SettingsAccept All
        Manage consent

        Privacy Overview

        This website uses cookies to improve your experience while you navigate through the website. Out of these, the cookies that are categorized as necessary are stored on your browser as they are essential for the working of basic functionalities of the website. We also use third-party cookies that help us analyze and understand how you use this website. These cookies will be stored in your browser only with your consent. You also have the option to opt-out of these cookies. But opting out of some of these cookies may affect your browsing experience.
        Necessary
        Always Enabled
        Necessary cookies are absolutely essential for the website to function properly. These cookies ensure basic functionalities and security features of the website, anonymously.
        CookieDurationDescription
        cookielawinfo-checkbox-analytics11 monthsThis cookie is set by GDPR Cookie Consent plugin. The cookie is used to store the user consent for the cookies in the category "Analytics".
        cookielawinfo-checkbox-functional11 monthsThe cookie is set by GDPR cookie consent to record the user consent for the cookies in the category "Functional".
        cookielawinfo-checkbox-necessary11 monthsThis cookie is set by GDPR Cookie Consent plugin. The cookies is used to store the user consent for the cookies in the category "Necessary".
        cookielawinfo-checkbox-others11 monthsThis cookie is set by GDPR Cookie Consent plugin. The cookie is used to store the user consent for the cookies in the category "Other.
        cookielawinfo-checkbox-performance11 monthsThis cookie is set by GDPR Cookie Consent plugin. The cookie is used to store the user consent for the cookies in the category "Performance".
        viewed_cookie_policy11 monthsThe cookie is set by the GDPR Cookie Consent plugin and is used to store whether or not user has consented to the use of cookies. It does not store any personal data.
        Functional
        Functional cookies help to perform certain functionalities like sharing the content of the website on social media platforms, collect feedbacks, and other third-party features.
        Performance
        Performance cookies are used to understand and analyze the key performance indexes of the website which helps in delivering a better user experience for the visitors.
        Analytics
        Analytical cookies are used to understand how visitors interact with the website. These cookies help provide information on metrics the number of visitors, bounce rate, traffic source, etc.
        Advertisement
        Advertisement cookies are used to provide visitors with relevant ads and marketing campaigns. These cookies track visitors across websites and collect information to provide customized ads.
        Others
        Other uncategorized cookies are those that are being analyzed and have not been classified into a category as yet.
        SAVE & ACCEPT