• HOME
  • RELATIONSHIPS
  • HOLIDAYS
  • WELLNESS
  • CAREER & FINANCE
  • FASHION
  • BEAUTY
  • LIVING

Advice From Nobody

You are here: Home / Archives for LIVING

Super Easy Buffalo Chicken Lettuce Wraps

Filed Under: Food & Drink // 06/01/2025

buffalo chicken lettuce wraps

Okay, real talk—some nights you just don’t want to cook an elaborate dinner. You want something quick, easy, and maybe even a little healthy. But you also want it to taste like it came from your favorite neighborhood pub. If you’re nodding your head yes, then let me introduce you to your new go-to: Buffalo Chicken Lettuce Wraps.

These are everything you love about buffalo wings—spicy, tangy, and just a little messy—but with a fresh, light twist thanks to the crisp Bibb lettuce. And the best part? They’re made with rotisserie chicken, so there’s almost no actual cooking involved. Just a bit of sautéing, a whole lot of flavor, and boom—you’ve got dinner in under 30 minutes.

Also Read: 21 Light & Fresh Lettuce Wrap Recipes

Why You’ll Love These Buffalo Chicken Lettuce Wraps

Let’s start with what makes these wraps absolutely crave-worthy:

  • Fast and fuss-free: Using pre-cooked rotisserie chicken is a major time saver. Just shred, heat, and go.
  • Healthier than takeout: These wraps are low-carb and full of veggies, but still totally satisfying.
  • Packed with flavor: Between the sautéed veggies, hot sauce, and seasonings, you won’t miss the bun (or the guilt).
  • Totally customizable: Want to add ranch or blue cheese crumbles? Go for it. Prefer a different hot sauce? Do your thing.

How To Make These Buffalo Chicken Lettuce Wraps

PrintPrint

Ingredients For These Buffalo Chicken Lettuce Wrapsu003cspan id=u0022docs-internal-guid-d72b4a2d-7fff-2c4a-bf5b-2ca4a586771cu0022 style=u0022font-weight:normal;u0022u003eu003cdivu003eu003cspan style=u0022font-size: 12pt; font-family: Arial, sans-serif; color: rgb(0, 0, 0); background-color: transparent; font-weight: 700; font-variant-numeric: normal; font-variant-east-asian: normal; font-variant-alternates: normal; font-variant-position: normal; font-variant-emoji: normal; vertical-align: baseline;u0022u003eu003c/spanu003eu003c/divu003eu003c/spanu003e

  • 2 tablespoons coconut oil

  • 1 green bell pepper, finely diced

  • 2 celery stalks, diced

  • 1½ lbs. rotisserie chicken breast, shredded (hello, time saver!)

  • 2 teaspoons onion powder

  • 1 teaspoon garlic powder

  • Salt and pepper, to taste

  • ½ cup Frank’s hot sauce (or your favorite buffalo-style sauce)

  • 2 green onions, sliced

  • To Serve
  • 1 head Bibb or butter lettuce, leaves removed, washed, and patted dry

Step-By-Step Guide

Step 1: Sauté the Veggies

Start by heating the coconut oil in a large sauté pan over medium heat. Once it’s melted, toss in your diced green bell pepper and celery. You’ll want to sauté these for about 5 minutes, or until they’re tender but still have a slight bite. They add a nice crunch and flavor that balance out the spicy chicken later on.

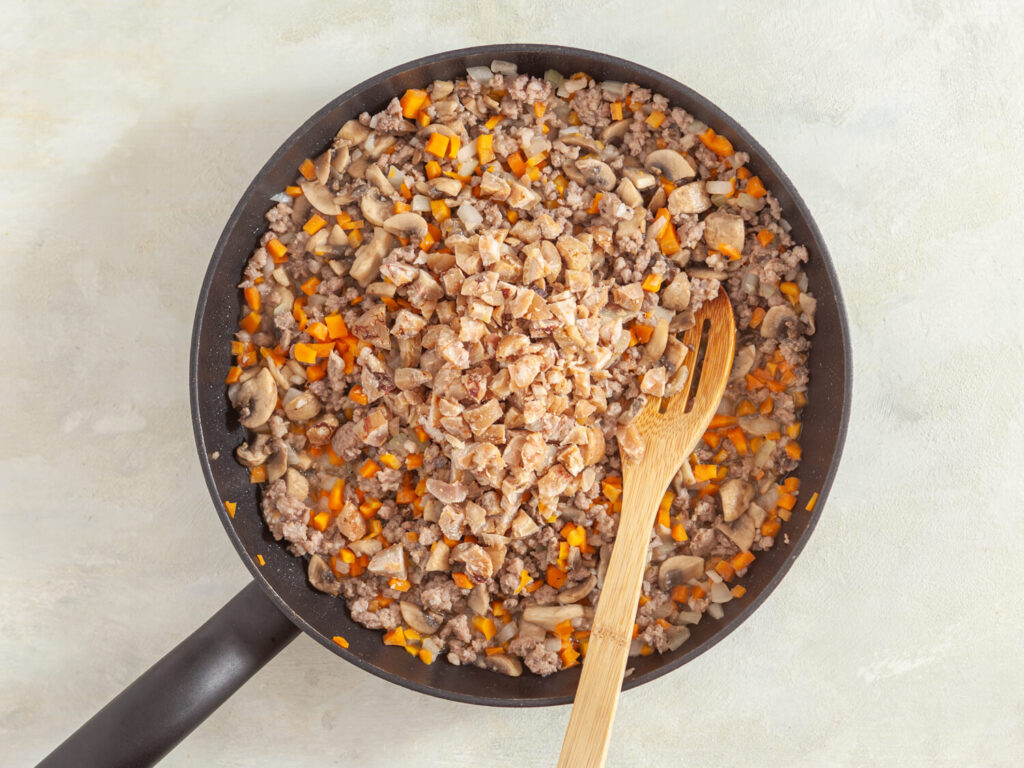
Step 2: Add the Chicken and Seasoning

Now it’s time to toss in your shredded rotisserie chicken—seriously, how easy is that? Sprinkle in the onion powder and garlic powder, and season with a bit of salt and pepper. Stir everything well and let it cook for 2 to 3 minutes, just until the chicken is heated through and infused with all those lovely spices.

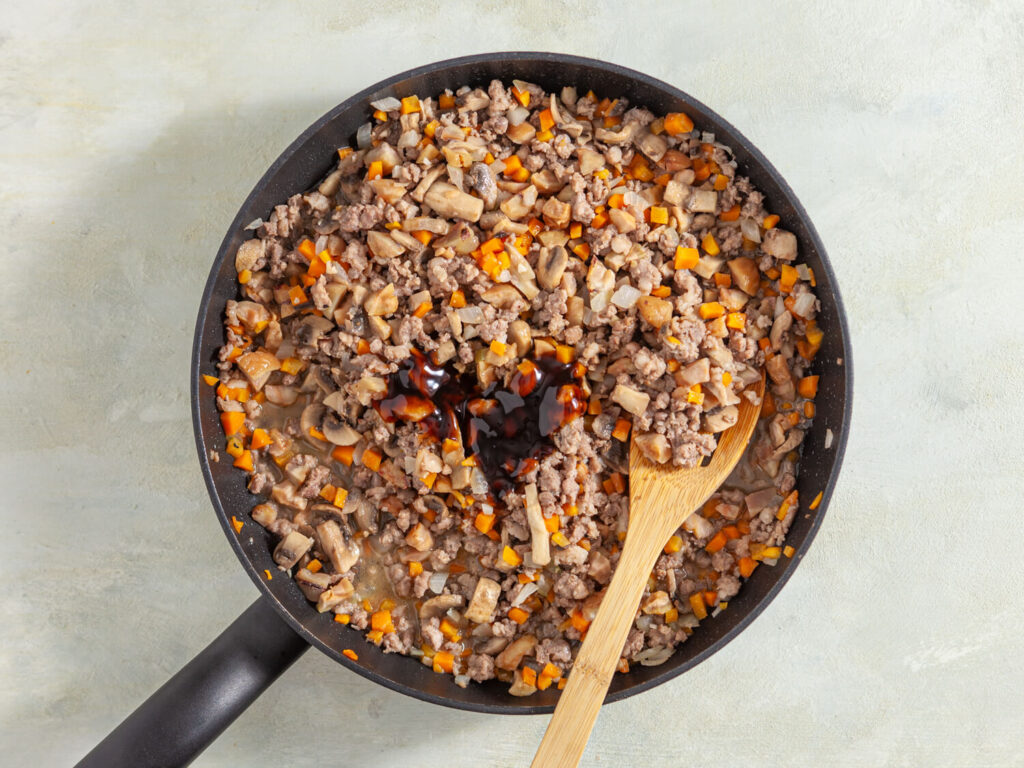
Step 3: Bring the Heat

Here’s where things get fun. Pour in the hot sauce (Frank’s is the classic, but feel free to get spicy with your favorite brand). Stir it all together and let it cook for another minute or two. The sauce should coat everything beautifully and be piping hot by the time you’re done.

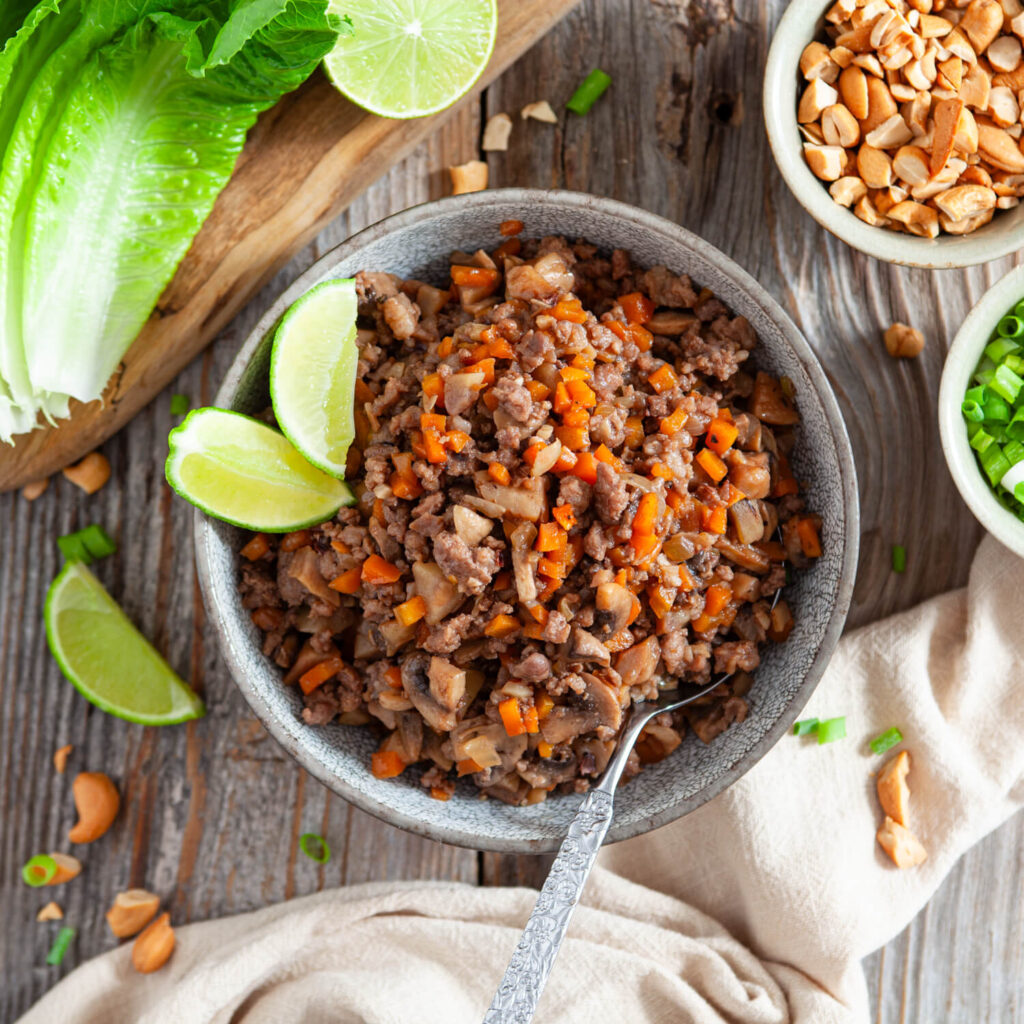
Step 4: Add the Green Onions

Turn off the heat and stir in the sliced green onions for a little fresh, peppery bite. That’s it—you’re done!

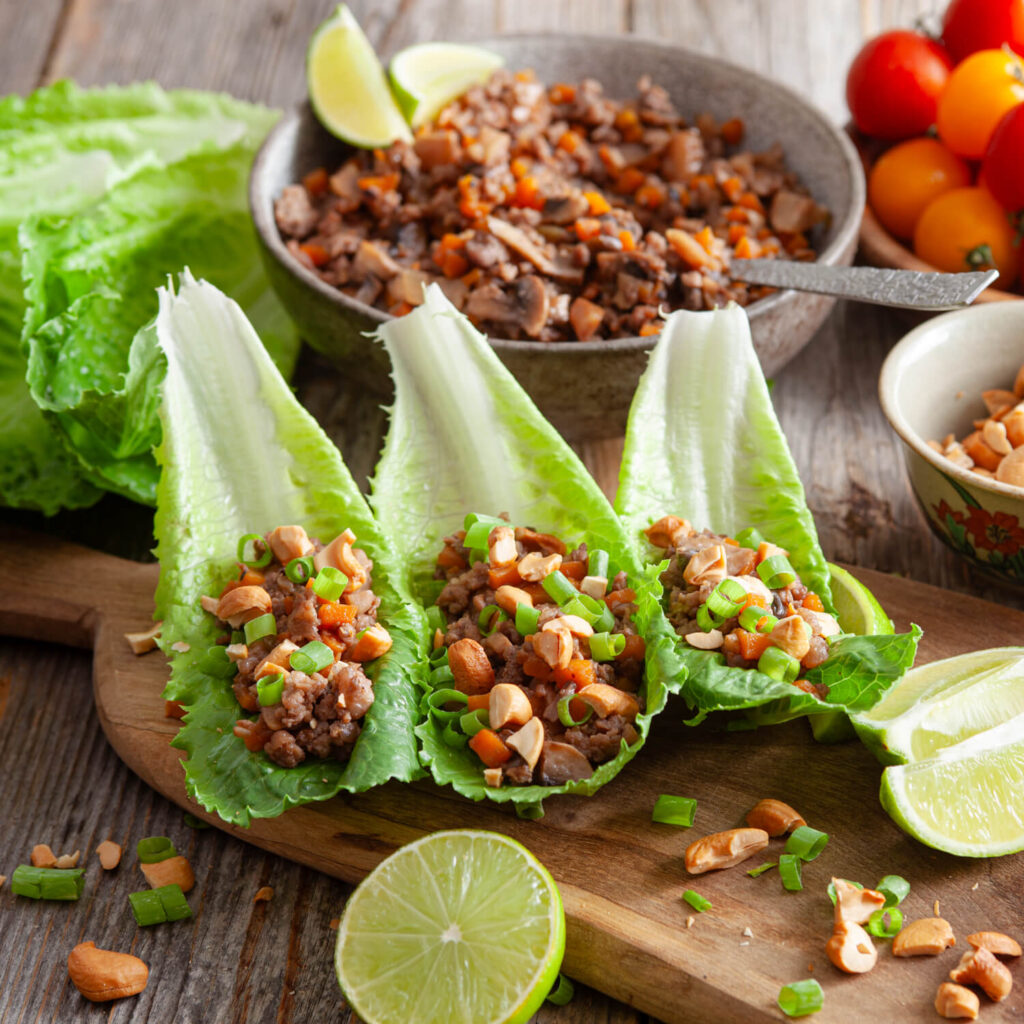
Now comes the fun part: assembling your wraps.

Grab your Bibb or butter lettuce leaves (the softer, cuppier ones work best), and scoop in a few tablespoons of the buffalo chicken mixture. Don’t be shy—it’s okay if things get a little messy. These are finger foods, after all.

If you want to get extra with it, add a drizzle of ranch or blue cheese dressing, a sprinkle of shredded carrots, or even some avocado slices for a creamy twist.

Buffalo Chicken Lettuce Wraps are proof that healthy meals don’t have to be boring. They’re spicy, satisfying, and totally hit the spot—especially when you’re short on time but still want something homemade and delicious.

So the next time you’re tempted to grab takeout, remember this recipe. With a few simple ingredients and barely any cooking, you’ll have a flavor-packed meal that tastes like game-day eats but feels like a clean, fresh dinner. Total win-win.

Let me know if you try them out—tag me with your lettuce wrap creations or drop your own twist in the comments. Happy cooking

Buffalo Chicken Lettuce Wraps
Print

Buffalo Chicken Lettuce Wraps

Recipe by AdviceFromNobodyCourse: Appetizers, LunchCuisine: AmericanDifficulty: Easy
Servings

4

servings
Prep time

10

minutes
Cooking time

15

minutes
Calories

331

kcal

Ingredients

  • 2 Tbs coconut oil

  • 1 green bell pepper, finely diced

  • 2 celery stalks, diced

  • 1½ lbs. rotisserie chicken breast, shredded

  • 2 tsp onion powder

  • 1 tsp garlic powder

  • Salt and pepper, to taste

  • ½ cup Frank’s hot sauce

  • 2 green onions, sliced

  • To Serve
  • 1 head Bibb or butter lettuce, leaves removed, washed and patted dry

Directions

  • Melt the coconut oil in a large sauté pan over medium heat. Add the diced pepper and celery, and sauté until tender, around 5 minutes.
  • Add the chicken, onion powder, and garlic powder. Stir well and season with salt and pepper, to taste. Cook for 2-3 minutes, or until the chicken is heated through.
  • Add the hot sauce and sauté while stirring for another minute or two, until the sauce is heated through and everything is well coated. Remove from heat and stir in the sliced green onions.
  • To serve, fill Bibb lettuce cups with a few tablespoons of the chicken mixture and enjoy!
[jetpack-related-posts]

Easy & Flavor-Packed Chinese Pork Lettuce Wraps You’ll Want on Repeat

Filed Under: Food & Drink // 06/01/2025

If you’re looking for a quick, delicious, and better-than-takeout dinner idea, Chinese pork lettuce wraps are about to become your new obsession. Packed with savory ground pork, crunchy water chestnuts, and a mouthwatering hoisin-soy sauce combo, these wraps are the perfect balance of flavor and freshness.

Whether you’re throwing together a weeknight meal or hosting a fun appetizer night, these lettuce wraps are a total crowd-pleaser—and way easier to make than you might think. Grab some crisp lettuce leaves and let’s get cooking!

Also Read: 21 Light & Fresh Lettuce Wrap Recipes

How To Make These Chinese Pork Lettuce Wraps

PrintPrint

Ingredients For This Recipe

  • 1 Tbs coconut oil

  • 1 small onion, diced

  • 2 garlic cloves, minced

  • 2 medium carrots, finely diced

  • 8 oz. mushrooms, chopped

  • 1 lb. ground pork

  • 1 8-oz. can water chestnuts, drained and chopped

  • 3 Tbs low-sodium soy sauce

  • 2 Tbs oyster sauce

  • 1 Tbs sesame oil

  • 2 Tbs rice vinegar

  • 8-10 lettuce leaves

  • 2 scallions, sliced

  • 1/4 cup roasted salted cashews, roughly chopped

  • lime wedges, for serving

  • salt and pepper to taste

Step-By-Step Guide

1. Heat coconut oil in a large deep skillet over medium heat. 

2. Add onion, garlic, carrots, mushrooms, and pork; lightly season with salt and pepper. Cook, stirring occasionally, until the vegetables soften and the pork begins to brown, approximately 4-5 minutes.

3. Add water chestnuts and continue cooking until the pork is cooked through, another 2-3 minutes. 

4. Reduce heat to medium-low and add soy sauce, oyster sauce, sesame oil, and rice vinegar. Cook, stirring occasionally, until the sauce thickens, 6-7 minutes.

5. Spoon the pork mixture into lettuce wraps and top with sliced scallions and roasted cashews. Serve with a lime wedge and enjoy!

How to Cook Fresh Water Chestnuts

  1. Scratch chestnuts with a knife.
  2. Add chestnuts to a small pan with 2 cups of water.
  3. Add 1/2 tsp salt and 1/2 tsp sugar.
  4. Boil for 20 minutes or until soft. Note – check at 15 minutes with a knife. When cooked, chestnuts will be walnut soft.  
  5. Once cooked, drain the black water and wash the chestnuts.
  6. Let cool, peel, and slice or chop as the recipe requires.

Also Read: All About Water Chestnuts and How to Cook With Them

And there you have it—easy, flavorful Chinese pork lettuce wraps that are light, satisfying, and totally crave-worthy. They’re perfect for busy weeknights, casual get-togethers, or anytime you want something a little different (and a lot delicious).

Plus, they’re super customizable, so feel free to add your favorite toppings or spice it up to your liking. Once you try them, don’t be surprised if they end up on repeat in your kitchen. Enjoy!

Chinese Pork Lettuce Wraps
Print

Chinese Pork Lettuce Wraps

Recipe by AdviceFromNobodyCourse: Lunch, AppetizersCuisine: ChineseDifficulty: Easy
Servings

4

servings
Prep time

10

minutes
Cooking time

15

minutes
Calories

370

kcal

Ingredients

  • 1 Tbs coconut oil

  • 1 small onion, diced

  • 2 garlic cloves, minced

  • 2 medium carrots, finely diced

  • 8 oz. mushrooms, chopped

  • 1 lb. ground pork

  • 1 8-oz. can water chestnuts, drained and chopped

  • 3 Tbs low-sodium soy sauce

  • 2 Tbs oyster sauce

  • 1 Tbs sesame oil

  • 2 Tbs rice vinegar

  • 8-10 lettuce leaves

  • 2 scallions, sliced

  • 1/4 cup roasted salted cashews, roughly chopped

  • lime wedges, for serving

  • salt and pepper to taste

Directions

  • Heat coconut oil in a large deep skillet over medium heat.
  • Add onion, garlic, carrots, mushrooms, and pork; lightly season with salt and pepper. Cook, stirring occasionally, until the vegetables soften and the pork begins to brown, approximately 4-5 minutes.
  • Add water chestnuts and continue cooking until the pork is cooked through, another 2-3 minutes.
  • Reduce heat to medium-low and add soy sauce, oyster sauce, sesame oil, and rice vinegar. Cook, stirring occasionally, until the sauce thickens, 6-7 minutes.
  • Spoon the pork mixture into lettuce wraps and top with sliced scallions and roasted cashews. Serve with a lime wedge and enjoy!
  • How To Cook Fresh Water Chestnuts
  • Scratch chestnuts with a knife.
  • Add chestnuts to a small pan with 2 cups of water.
  • Add 1/2 tsp salt and 1/2 tsp sugar.
  • Boil for 20 minutes or until soft. Note – check at 15 minutes with a knife. When cooked, chestnuts will be walnut soft.
  • Once cooked, drain the black water and wash the chestnuts.
  • Let cool, peel, and slice or chop as the recipe requires.
[jetpack-related-posts]

Classic Cherries Jubilee: A Flambé Dessert That Never Goes Out of Style

Filed Under: Food & Drink // 05/31/2025

If you’ve ever wanted to add a little drama to dessert, Classic Cherries Jubilee is your showstopper. This old-school delight is elegant, fruity, and famously flambéed—literally! Made with juicy cherries, a splash of liqueur, and a warm, boozy flame, it’s the kind of dessert that turns an ordinary dinner into a celebration.

Whether you’re whipping it up for a dinner party or just treating yourself to something special, this timeless treat is surprisingly simple to make and absolutely unforgettable. Let’s bring a bit of vintage charm to your kitchen with this fiery favorite!

Also Read: Decadent Cherry & Chocolate Puff Pastry Tart You’ll Love

How To Make Cherries Jubilee

PrintPrint

Ingredients For Cherries Jubilee

  • 3 cups fresh or frozen cherries, pitted

  • 3 Tbs granulated sugar

  • 1 Tbs fresh lemon juice

  • 1/4 cup kirsch or rum

  • vanilla ice cream, for serving

  • chopped almonds or crushed cookies, for serving

Also Read: 39 Creative and Delicious Fresh Cherry Recipes

Step-By-Step Guide

1. Combine cherries, sugar, and lemon juice in a medium skillet over medium heat. 

2. Cook, stirring occasionally, until the sugar is dissolved and the cherries release their juices, approximately 6-7 minutes.

3. Remove the skillet from the heat and pour in the rum. Carefully ignite the alcohol with a utility lighter and return the skillet back to medium heat. 

4. Gently shake the pan with the cherries until the flame extinguishes itself. 

5. Stir the cherries and continue cooking for another minute. 

6. If you prefer to skip flambéing, you could just cook out the alcohol on the stovetop or skip the alcohol altogether and add a splash of cherry juice and vanilla extract in its place.

7. Spoon the cherry jubilee over vanilla ice cream and top with almonds or cookies, if desired. 

8. Serve immediately and enjoy!

Classic Cherries Jubilee proves that some desserts truly never go out of style. With its rich cherry flavor, stunning presentation, and just the right touch of boozy flair, it’s the perfect way to end a meal on a high note.

Whether you’re impressing guests or indulging in a little nostalgic treat for yourself, this fiery favorite is always a crowd-pleaser. So grab your cherries, light the flame, and enjoy a taste of timeless elegance—one delicious spoonful at a time.

Classic Cherries Jubilee
Print

Classic Cherries Jubilee

Recipe by AdviceFromNobodyCourse: DessertCuisine: FrenchDifficulty: Easy
Servings

4

servings
Prep time

10

minutes
Cooking time

10

minutes
Calories

320

kcal

Ingredients

  • 3 cups fresh or frozen cherries, pitted

  • 3 Tbs granulated sugar

  • 1 Tbs fresh lemon juice

  • 1/4 cup kirsch or rum

  • vanilla ice cream, for serving

  • chopped almonds or crushed cookies, for serving

Directions

  • Combine cherries, sugar, and lemon juice in a medium skillet over medium heat. 
  • Cook, stirring occasionally, until the sugar is dissolved and the cherries release their juices, approximately 6-7 minutes.
  • Remove the skillet from the heat and pour in the rum. Carefully ignite the alcohol with a utility lighter and return the skillet back to medium heat. 
  • Gently shake the pan with the cherries until the flame extinguishes itself. 
  • Stir the cherries and continue cooking for another minute. 
  • If you prefer to skip flambéing, you could just cook out the alcohol on the stovetop or skip the alcohol altogether and add a splash of cherry juice and vanilla extract in its place.
  • Spoon the cherry jubilee over vanilla ice cream and top with almonds or cookies, if desired. 
  • Serve immediately and enjoy!

    [jetpack-related-posts]

    Decadent Cherry & Chocolate Puff Pastry Tart You’ll Want to Make on Repeat

    Filed Under: Food & Drink // 05/29/2025

    Cherry Chocolate Puff Pastry Tart

    If you’re craving something that’s equal parts fancy and fuss-free, this Cherry & Chocolate Puff Pastry Tart is about to become your go-to dessert. Think crispy, golden layers of puff pastry topped with rich, melted chocolate and juicy cherries—all coming together in one dreamy bite.

    Also Read: 39 Creative and Delicious Fresh Cherry Recipes

    How To Make This Cherry & Chocolate Puff Pastry Tart

    Whether you’re hosting a brunch, looking for a last-minute sweet treat, or just want an excuse to indulge (no judgment here), this tart is as easy to make as it is impressive.

    PrintPrint

    Ingredients For This Cherry Tart

    • 1 frozen puff pastry sheet, thawed

    • 2 cups fresh or frozen cherries, pitted

    • 6 Tbs sugar

    • 1 Tbs cornstarch

    • 1/4 c. water

    • 4 oz. dark chocolate, melted

    • 2 tsp coconut oil

    • Additional fresh cherries, for serving

    • Flaky sea salt, for sprinkling

    Step-By-Step Guide

    1. Preheat the oven to 400°F and line a rimmed baking sheet with a piece of parchment paper. 

    2. Roll out the puff pastry sheet into a rectangle onto the prepared baking sheet. Using a knife, score a 1/2-inch border on the sides of the puff pastry, making sure not to cut all the way through. Using a fork, prick the puff pastry inside the border. 

    3. Place the puff pastry into the oven and bake for 15 minutes or until lightly browned.

    4. In the meantime, combine the cherries and sugar in a small saucepan and place over medium heat.

    5. In a small bowl, whisk the cornstarch with the water until smooth and set aside.

    6. Allow the cherries to simmer for 5-6 minutes, then stir in the cornstarch slurry and continue cooking until lightly thickened, around 3-4 minutes. Remove from heat. 

    7. Remove the puff pastry sheet from the oven and spread the cherry mixture inside the border of the puff pastry. 

    8. Return the tart into the oven and bake until the edges are deeply golden-brown and the cherry filling is bubbly, another 15 minutes.

    9. Stir the coconut oil into the melted chocolate and drizzle the chocolate all over the cherry tart. Top with flaky sea salt and additional fresh cherries. Enjoy!

    And there you have it—your new favorite dessert that’s as effortless as it is impressive! This Cherry & Chocolate Puff Pastry Tart is the perfect blend of flaky, fruity, and chocolaty goodness that looks bakery-worthy without the stress.

    Serve it warm with a scoop of vanilla ice cream or enjoy it chilled with a cup of coffee—it’s a win either way. Whether you’re treating yourself or sharing with friends, this tart is sure to steal the show. Don’t be surprised if you find yourself making it again (and again)!

    Cherry & Chocolate Puff Pastry Tart
    Print

    Cherry & Chocolate Puff Pastry Tart

    Recipe by AdviceFromNobodyCourse: DessertCuisine: FrenchDifficulty: Easy
    Servings

    10

    servings
    Prep time

    30

    minutes
    Cooking time

    40

    minutes
    Calories

    196

    kcal

    Ingredients

    • 1 frozen puff pastry sheet, thawed

    • 2 cups fresh or frozen cherries, pitted

    • 6 Tbs sugar

    • 1 Tbs cornstarch

    • 1/4 cup water

    • 4 oz. dark chocolate, melted

    • 2 tsp coconut oil

    • Additional fresh cherries, for serving

    • Flaky Sea salt, for sprinkling

    Directions

    • Preheat the oven to 400°F and line a rimmed baking sheet with a piece of parchment paper. 
    • Roll out the puff pastry sheet into a rectangle onto the prepared baking sheet. Using a knife, score a 1/2-inch border on the sides of the puff pastry, making sure not to cut all the way through. Using a fork, prick the puff pastry inside the border. 
    • Place the puff pastry into the oven and bake for 15 minutes or until lightly browned.
    • In the meantime, combine the cherries and sugar in a small saucepan and place over medium heat.
    • In a small bowl, whisk the cornstarch with the water until smooth and set aside.
    • Allow the cherries to simmer for 5-6 minutes, then stir in the cornstarch slurry and continue cooking until lightly thickened, around 3-4 minutes. Remove from heat. 
    • Remove the puff pastry sheet from the oven and spread the cherry mixture inside the border of the puff pastry. 
    • Return the tart into the oven and bake until the edges are deeply golden-brown and the cherry filling is bubbly, another 15 minutes.
    • Stir the coconut oil into the melted chocolate and drizzle the chocolate all over the cherry tart. Top with flaky sea salt and additional fresh cherries. 
    [jetpack-related-posts]

    Peaches & Cream Buttermilk Waffles: A Sweet Summer Breakfast You’ll Crave All Year

    Filed Under: Food & Drink // 05/28/2025

    peaches and cream waffles

    If you’re looking for a breakfast that tastes like sunshine on a plate, these Peaches & Cream Buttermilk Waffles are about to become your new favorite. Think golden, crispy-edged waffles with a tender, fluffy center—soaked in juicy peaches and finished with a dreamy dollop of whipped cream.

    It’s the perfect balance of tangy, sweet, and indulgent, all wrapped up in one gorgeous, summery bite. Whether you’re hosting brunch, treating yourself on a slow Sunday morning, or need an excuse to use those ripe peaches, this recipe delivers pure comfort (and a little wow factor).

    Also Read: 47+ Peach Recipes To Make This Summer

    How To Make Peaches & Cream Buttermilk Waffles

    Topped with fresh peaches and delicious sweetened yogurt, these waffles make breakfast or brunch extra special! These can be made in a traditional waffle iron or baked in a silicone mold.

    PrintPrint

    Ingredients For This Recipe

    • 2 cups all-purpose flour

    • 3 Tbs white sugar

    • 1 Tbs baking powder

    • 1/4 tsp salt

    • 1-3/4 cups buttermilk

    • 3 Tbs butter, melted

    • 2 tsp pure vanilla extract

    • 1 cup Greek yogurt

    • 2 Tbs honey or maple syrup

    • 2-3 large peaches, sliced

    • Maple syrup, for serving

    Step-By-Step Guide

    1. Preheat the oven to 400°F or preheat an electric waffle iron per the manufacturer’s instruction manual.

    2. In a large bowl, whisk together the flour, sugar, baking powder, and salt. Set aside.

    3. In a separate small bowl or container, whisk the buttermilk, butter, and vanilla.

    4. Pour the wet ingredients into the dry ingredients and whisk until a smooth batter forms.

    5. If using a silicone mold, pour one-fourth of the batter into the mold and bake until puffed and golden brown, approximately 10-15 minutes. Repeat for all 4 waffles. I used these waffle molds to get the cute shape.

    6. If using a waffle iron, lightly oil the waffle iron. When iron is hot, fill per manufacturer’s instructions and cook until set, repeating until batter is gone.

    7. In the meantime, mix the Greek yogurt with the honey or maple syrup.

    8. Top the warm waffles with sweetened yogurt, fresh peaches, and a drizzle of maple syrup. Enjoy!

    There’s just something magical about the combo of warm, fluffy waffles, juicy peaches, and silky whipped cream—it’s like summer wrapped in comfort food. These Peaches & Cream Buttermilk Waffles aren’t just breakfast, they’re a full-on moment.

    Whether you’re making them for a weekend treat, brunch with friends, or a sweet way to start the day, this recipe is guaranteed to impress. So go ahead, pour another cup of coffee, stack those waffles high, and savor every peachy, creamy bite. You deserve it.

    Peaches & Cream Buttermilk Waffles
    Print

    Peaches & Cream Buttermilk Waffles

    Recipe by AdviceFromNobodyCourse: BreakfastCuisine: AmericanDifficulty: Easy
    Servings

    4

    servings
    Prep time

    10

    minutes
    Cooking time

    20

    minutes
    Calories

    554

    kcal

    Ingredients

    • 2 cups all-purpose flour

    • 3 Tbs white sugar

    • 1 Tbs baking powder

    • 1/4 tsp salt

    • 1-3/4 cups buttermilk

    • 3 Tbs butter, melted

    • 2 tsp pure vanilla extract

    • 1 cup Greek yogurt

    • 2 Tbs honey or maple syrup

    • 2-3 large peaches, sliced

    • Maple syrup, for serving

    Directions

    • Preheat the oven to 400°F or preheat an electric waffle iron per the manufacturer’s instruction manual.
    • In a large bowl, whisk together the flour, sugar, baking powder, and salt. Set aside.
    • In a separate small bowl or container, whisk the buttermilk, butter, and vanilla.
    • Pour the wet ingredients into the dry ingredients and whisk until a smooth batter forms. 
    • If using a silicone mold, pour one-fourth of the batter into the mold and bake until puffed and golden brown, approximately 10-15 minutes. Repeat for all 4 waffles.
    • If using a waffle iron, lightly oil the waffle iron. When iron is hot, fill per manufacturer’s instructions and cook until set, repeating until batter is gone.
    • In the meantime, mix the Greek yogurt with the honey or maple syrup.
    • Top the warm waffles with sweetened yogurt, fresh peaches, and a drizzle of maple syrup. Enjoy!
    [jetpack-related-posts]

    Irresistible Peaches & Cream Crumble Bars That Taste Like Summer in Every Bite

    Filed Under: Food & Drink // 05/28/2025

    One taste of this delicious dessert and you’ll be hooked!  It is very easy to make, travels well, and can be prepared using any flavor of jam you prefer. If you’re craving a dessert that’s equal parts fruity, creamy, and downright dreamy, these Peaches and Cream Crumble Bars are about to become your new go-to treat.

    With a buttery crumble base, a luscious cream cheese layer, and juicy peaches baked right in, every bite is like a little taste of summer, no matter the season. Whether you’re whipping these up for a backyard BBQ, a cozy brunch, or just because you deserve something sweet, they’re simple to make and impossible to resist. Let’s get baking!

    Also Read: 47+ Peach Recipes To Make This Summer

    How To Make Peaches & Cream Crumble Bars

    PrintPrint

    Ingredients You'll Need For This Recipeu003cul class=u0022ingredients-listu0022 style=u0022color: black; font-family: u0026quot;Cormorant Garamondu0026quot;, sans-serif; font-size: 17px; font-style: italic; font-weight: 500; letter-spacing: 0.5px; white-space-collapse: collapse;u0022u003eu003c/ulu003e

    • 3/4 cups sugar, divided

    • 2 cups all-purpose flour

    • 1/2 tsp baking powder

    • 1/4 tsp salt

    • 12 oz. cream cheese, softened at room temperature

    • 3/4 cups butter, melted

    • 1/4 cups sour cream

    • 2 tsp pure vanilla extract

    • 1 large egg

    • 10 oz. peach jam

    Step-By-Step Guide

    1. Preheat the oven to 375°F. Line a 9×13-inch baking pan with a piece of parchment paper.

    2. In a large bowl, combine 1/2 cup sugar, flour, baking powder, and salt.

    3. Pour in the melted butter and stir until a crumbly dough forms.

    4. Press 2/3 of the dough on the bottom of the prepared baking pan.

    5. In a smaller bowl, whisk together the cream cheese, sour cream, vanilla, egg, and remaining sugar.

    6. Pour the cream cheese mixture on top of the crumble base and spread the peach jam on top of the cream cheese layer.

    7. Crumble the reserved crumble topping on top of the peach jam and transfer into the oven to bake until lightly golden and puffed, approximately 35-40 minutes.

    Allow to cool completely before slicing and serving. Enjoy!

    And there you have it—peaches and cream crumble bars that are as easy to make as they are delicious to eat. Whether you serve them warm with a scoop of vanilla ice cream or enjoy them chilled straight from the fridge, these bars are guaranteed to be a hit.

    Perfectly sweet, a little tangy, and totally comforting, they’re the kind of dessert you’ll want to make on repeat. So go ahead, grab those ripe peaches and treat yourself—you’ve earned it!

    Peaches & Cream Crumble Bars
    Print

    Peaches & Cream Crumble Bars

    Recipe by AdviceFromNobodyCourse: DessertCuisine: AmericanDifficulty: Easy
    Servings

    12

    servings
    Prep time

    10

    minutes
    Cooking time

    40

    minutes
    Calories

    404

    kcal

    Ingredients

    • 3/4 cups sugar, divided

    • 2 cups all-purpose flour

    • 1/2 tsp baking powder

    • 1/4 tsp salt

    • 3/4 cups butter, melted

    • 12 oz. cream cheese, softened at room temperature

    • 1/4 cups sour cream

    • 2 tsp pure vanilla extract

    • 1 large egg

    • 10 oz. peach jam

    Directions

    • Preheat the oven to 375°F. Line a 9×13-inch baking pan with a piece of parchment paper.
    • In a large bowl, combine 1/2 cup sugar, flour, baking powder, and salt. 
    • Pour in the melted butter and stir until a crumbly dough forms. 
    • Press 2/3 of the dough on the bottom of the prepared baking pan.
    • In a smaller bowl, whisk together the cream cheese, sour cream, vanilla, egg, and remaining sugar.
    • Pour the cream cheese mixture on top of the crumble base and spread the peach jam on top of the cream cheese layer.
    • Crumble the reserved crumble topping on top of the peach jam and transfer into the oven to bake until lightly golden and puffed, approximately 35-40 minutes.
    • Allow to cool completely before slicing and serving. Enjoy!

    [jetpack-related-posts]

    30th Birthday Photoshoot Ideas to Capture Your Milestone in Style

    Filed Under: Party Ideas // 03/21/2025

    birthday photoshoot ideas

    Turning 30 is a major milestone, and what better way to celebrate than with a photoshoot that screams confidence, fun, and a whole lot of style? Whether you’re feeling glamorous, playful, or downright bold, these 30th birthday photoshoot ideas will have you looking back at your pictures with zero regrets.

    So, grab your cutest outfit, pop the champagne, and let’s dive into these stunning ideas that will make your birthday photos look like they belong on a magazine cover!

    Also Read: 30th Birthday Ideas to Celebrate Your Big 3-0

    30th Birthday Photoshoot Ideas

    1. Mini Cake & Balloons

    Channel effortless birthday glam by lying on the ground with a mini cake in hand while the number 30 helium balloons float behind you. This shot is playful, sweet, and gives off major celebratory vibes.

    Bonus points if you go for a bold outfit that pops against the background! It’s the perfect mix of fun and fabulous—just like you.

    Also Read: 30th Birthday Party Themes To Bring In The Big 3-0

    2. Little Black Dress & Confetti Explosion

    Slip into your chicest little black dress, get those number 30 balloons in place, and let the confetti fly as you blow out your candles. This high-energy shot screams “I’m here, I’m fabulous, and I’m celebrating in style!” It’s an effortless way to capture the excitement of stepping into a new decade with flair.

    3. Spotlight & Shadow Magic

    A dark-lit room, a spotlight on you, and the soft glow of cake candles—this dramatic setup is pure cinematic magic. With your shadow cast elegantly behind you, this shot captures a moody, reflective moment, making it a stunning way to honor your journey so far and the adventure ahead.

    Also Read: 30th Birthday Cake Ideas That Are As Fabulous

    4. Glamorous Spotlight Moment

    Dim lighting, a luxurious dress, and a single spotlight highlighting your glow—this is how you step into your 30s like a star. This striking and elegant setup makes for an unforgettable birthday photo, with a little bit of mystery and a whole lot of sophistication.

    5. Balloons & Confetti Chaos

    Surround yourself with balloons, toss some confetti in the air, and strike a pose in your fancy dress! This vibrant and celebratory moment is all about joy, movement, and capturing the sheer excitement of turning 30. It’s giving main character energy, and we love it.

    6. Holding a “Today is My Birthday” Sign

    Let the world know it’s your special day by holding up a cute sign that says, “Today is My Birthday.” Whether you go for a handwritten touch or a bold, graphic sign, this shot is simple, classic, and makes a statement—because you deserve all the attention today!

    7. Old-Time Glam

    Step back in time with an old-Hollywood-inspired look—think a vintage outfit, a cigar (for the aesthetic, of course!), and your birthday cake in hand. This edgy, retro take on birthday photography adds a unique twist to your celebration and oozes sophistication with a hint of rebellion.

    8. 30 Candles

    Keep it artsy by holding up number 30 candles in the foreground while your blurred-out figure sits in the background. This creative composition is simple but stunning, giving your photos a stylish and modern feel.

    9. Breakfast in Bed, Birthday Edition

    Imagine waking up to the dreamiest birthday scene—30 balloons floating above you, a bouquet of flowers nearby, and someone pouring champagne into your glass while you’re still cozied up under the covers. This relaxed yet glamorous shot is all about celebrating in luxury.

    10. Sparklers for a Fiery Shot

    Hold up number 30 sparklers as they burn bright, while you shine in the background. This idea is effortlessly cool, capturing both the excitement and magic of stepping into a brand-new decade.

    11. “Hello, 30”

    Go all out with helium balloons that spell out “Hello, 30” while rocking a fun, playful dress. This setup is lighthearted and festive, perfect for a vibrant birthday shoot that exudes joy and confidence.

    12. PJ Set & Balloon Fun

    Keep it cozy and cute by throwing on a fun pajama set and holding 30 balloons in front of your face. This laid-back yet celebratory shot feels like the perfect way to capture a birthday morning moment in style.

    13. Polaroid Magic

    Hold up two separate polaroids—one with a 3, one with a 0—and snap a shot of them together. This artsy and unique take on birthday photography is a must for anyone who loves a creative touch in their photos.

    14. Martini Glasses & Cheers to 30

    A pyramid of martini glasses on a table, 30 stamped all over, and you raising a glass in celebration. With balloons floating around and a glamorous vibe, this shot is a toast to the fabulousness of turning 30!

    15. Red Dress, Red Lights, Red Balloons

    Dramatic, bold, and full of wow factor—this shot features you in a red dress, surrounded by red light, with a spotlight shining solely on you. It’s giving powerful, confident, and completely unforgettable.

    16. Little Black Dress, Red Cake & Red Lips

    A little black dress never fails, and when paired with a bold red cake and matching red lips, it’s the perfect blend of classic and modern birthday glam.

    17. Black & White Elegance

    Capture a timeless moment in a black-and-white shot, where you’re in a white dress holding a gorgeous cake. This monochrome aesthetic is effortlessly chic and undeniably elegant.

    18. Newspaper Birthday Headline

    Plaster a wall with newspapers, then hold up a front-page headline that reads, “News Flash: It’s My Birthday!” This editorial-inspired look is playful, creative, and totally Instagram-worthy.

    19. Birthday Call Alert

    Write “Happy Birthday” on the wall, hold up your phone to the camera, and display an incoming call from “30.” This fun and modern twist is perfect for capturing the excitement of stepping into a new era.

    20. Mirror Selfie with Birthday Glam

    Snap a mirror selfie with a cake, flowers, and “Hello, 30” written across the mirror. It’s a stylish and candid way to capture the birthday girl vibes.

    No matter what vibe you’re going for—glam, playful, or totally extra—your 30th birthday photoshoot should be all about you. This is your moment to shine, so embrace the celebration, strike a pose, and create memories you’ll cherish forever.

    So, go ahead—book that photoshoot, grab those balloons, and get ready to welcome 30 in the most fabulous way possible. Happy Birthday, gorgeous!

    [jetpack-related-posts]

    30th Birthday Cake Ideas That Are As Fabulous As You Are

    Filed Under: Party Ideas // 03/07/2025

    30th birthday cake ideas

    Turning 30 is a whole vibe. It’s the sweet spot where you’ve survived your chaotic 20s, gained a bit of wisdom (we hope), and now you’re stepping into this confident, thriving era. And what better way to celebrate this milestone than with a show-stopping cake?

    Whether you’re planning a big bash or an intimate gathering, your cake needs to be as iconic as you are. So, let’s dive into the most fabulous 30th birthday cake ideas that scream fun, flirty, and full of personality!

    Also Read: 30th Birthday Ideas to Celebrate Your Big 3-0

    Fun 30th Birthday Cake Ideas

    Golden Heart Glam

    30th birthday cake ideas

    A vintage white heart-shaped cake, decked out with golden pearls and dazzling disco balls on top, is the definition of classy-meets-party. The number “30” shimmering in gold pearls adds just the right touch of elegance. It’s giving sophisticated birthday queen energy, and we’re here for it!

    Also Read: 30th Birthday Party Themes To Bring In The Big 3-0

    Cherry Bombshell

    Picture a retro red, pink, and white heart cake, topped with big, bold cherries and the playful words “Thirty, Flirty, and Thriving.” This cake is fun, flirty, and packed with personality — the perfect centerpiece for a birthday bash that’s all about embracing your fabulous new decade.

    Also Read: Super Fun Birthday Photoshoot Ideas For Your 30th

    Blooming Into 30

    This cute round cake with pastel purple and pink flowers has “Hello, I’m 30” scrolled across the top. It’s soft, sweet, and perfect for a garden party or a cozy celebration. Like you, it’s effortlessly beautiful and full of charm.

    Classic Heartbeat

    A white vintage heart cake with “Thirty, Flirty, and Thriving” written in delicate icing — simple, chic, and timeless. It’s the kind of cake that whispers elegance but still lets everyone know you’re stepping into your 30s with flair.

    Ribbon & Romance

    A white vintage cake tied up with dainty ribbon bows, crowned with the words “Hello, I’m 30.” It’s sweet, stylish, and screams soft glam — a dream cake for anyone who loves a touch of romance.

    Pink Bow Perfection

    Soft pink vintage cake with delicate ribbon bows and “Hello 30” iced on top, finished with tiny hearts. This cake is all about celebrating your birthday with grace, a sprinkle of nostalgia, and a whole lot of love.

    Pastel Party

    A square cake wrapped in pastel frosting with “So Happy I’m Thirty” proudly written on it. It’s playful, lighthearted, and just the right amount of bold — because turning 30 deserves a little extra flair.

    Bikini Bottom Bliss

    For the fun-loving birthday star, a SpongeBob-themed cake featuring “30 Years Later” is pure genius. It’s quirky, nostalgic, and bound to get a few laughs. If you grew up quoting SpongeBob, this is your cake!

    Friends Forever

    A pastel cake featuring Joey’s iconic line, “Why God Why,” because let’s be real — sometimes turning 30 comes with a little existential crisis. It’s a cake for every die-hard Friends fan who’s still figuring it all out.

    Sparkler Celebration

    A white cake covered in sprinkles with sparklers lighting up the big “30” on top. Bold, bright, and absolutely Instagram-worthy — perfect for making a statement.

    Sweetheart Simplicity

    A vintage white heart cake with “Hello 30” delicately written across it — soft, classic, and oh-so-pretty. Sometimes, simple is the most stunning.

    Cherry on Top

    A vintage purple and pink heart cake, finished with bold cherries and the cheeky words “Talk Thirty to Me.” It’s sassy, playful, and perfect for a flirty birthday bash.

    Farewell 20s

    A bold, split design heart cake — half black with “RIP 20s” and half white with “Hello 30s.” Dramatic and daring, it’s the ultimate cake for anyone who’s ready to bury their wild 20s and welcome a new era with a bang.

    Pearl Perfection

    A white vintage heart cake with a delicate “Thirty” iced in the center, surrounded by soft, edible pearls. It’s classic, graceful, and effortlessly beautiful — just like you.

    Mini but Mighty

    A small cake with “Hello 30” and cute hearts all around it. Perfect for a cozy celebration or as an extra treat alongside a bigger cake. Because sometimes, less really is more.

    Pink Dream

    A vintage pink heart cake with “Thirty” iced on top and pearls scattered along the edges. It’s dreamy, dainty, and ideal for anyone who loves a little soft-glam magic.

    Birthday Year Beauty

    A red, pink, and white vintage heart cake with bold cherries and your birth year front and center. It’s a bold, fun way to celebrate not just turning 30 — but the year you were born.

    Marble Magic

    A pink marble cake topped with a golden “Thirty” topper. Chic, modern, and effortlessly cool — this cake is a head-turner, just like you.

    Goodbye 20s, Hello 30s

    A white vintage cake with “30s kicking 20s off the cake.” It’s playful, symbolic, and lets everyone know you’re stepping into your next chapter in style.

    Rachel Green Moment

    A simple white cake with Rachel’s iconic line: “Can I keep the presents and still be 29?” Perfect for Friends fans who are turning 30 but still holding onto a bit of their 20s humor.

    Season Premiere

    A mini cake with “Season 30, Episode 1” written on it — because your life is basically a hit TV show, and this new season is just getting started.

    Turning 30 doesn’t mean the party’s over — it’s just getting started. Whether you want a cake that’s soft and elegant, bold and fun, or full of pop culture references, there’s a design that’s perfect for your big day. Your 30th birthday cake is more than just dessert — it’s a statement, a celebration, and a little slice of the fabulous person you’ve become.

    So go ahead, pick a cake that speaks to you, grab a glass of champagne, and let the celebrations begin. Here’s to 30 — flirty, thriving, and absolutely unforgettable!

    [jetpack-related-posts]

    30th Birthday Ideas to Celebrate Your Big 3-0 in Style!

    Filed Under: Party Ideas // 03/07/2025

    30th birthday party ideas

    Turning 30 is a BIG deal. It’s the age where you’re fully stepping into your power, embracing everything that makes you, YOU — and let’s be real, it’s the perfect excuse to throw a party that’s as fabulous as you are.

    Whether you want to go all out with a glamorous bash or keep it low-key with a cozy celebration, there’s a perfect way to ring in this milestone year.

    So grab a glass of bubbly, put on your party heels (or slippers — no judgment), and let’s dive into 23 unforgettable 30th birthday ideas that’ll have you counting down the days till the big event!

    Also Read: 30th Birthday Party Themes To Bring In The Big 3-0

    30th Birthday Ideas To Bring In The Big 3-0

    Glamorous Gatsby Party

    30th Birthday Ideas

    Step into the roaring ’20s with a Gatsby-inspired bash! Think sequins, feathers, champagne towers, and jazz music. Encourage your guests to dress to the nines in flapper dresses and dapper suits. It’s all about opulence, so go big on gold and black decorations!

    Also Read: 30th Birthday Cake Ideas

    Wine and Cheese Night

    30th birthday ideas

    Channel your inner sommelier with a chic wine and cheese tasting. Set up a gorgeous grazing table with a variety of wines, artisanal cheeses, and fancy crackers. Add candles and floral accents for a cozy yet classy vibe.

    Costume Party

    Why wait for Halloween? Pick a fun theme — like Hollywood icons or favorite movie characters — and have everyone dress up. Add a photo booth with props for some hilarious memories.

    Also Read: Super Fun Birthday Photoshoot Ideas For Your 30th

    Spa Day with Your Besties

    Nothing says “I’m 30 and thriving” like a day of pampering. Book a luxurious spa day with massages, facials, and mani-pedis. You can even create a DIY spa night at home with face masks, bath bombs, and fluffy robes.

    Boho Picnic Party

    Create a dreamy boho picnic with floor cushions, macrame decor, and a charcuterie spread. Add twinkle lights and floral garlands for that effortless, Instagram-worthy vibe.

    Travel-Themed Party

    For the wanderlust queen, a travel-themed bash is a must. Decorate with vintage suitcases, globes, and maps. Serve foods from around the world and have a polaroid station so guests can create “passport photos” as keepsakes.

    90s Throwback Party

    Time to get nostalgic! Throw a party straight out of the ’90s with classic hits, scrunchies, and neon decor. Encourage everyone to come dressed as their favorite ’90s icon — think Spice Girls, Clueless, or Fresh Prince!

    Cooking Class Party

    Love food? Book a cooking class for you and your friends! From pasta-making to cake decorating, it’s a hands-on way to bond — and eat something delicious at the end.

    Backyard Movie Night

    Transform your backyard into a dreamy outdoor cinema. Set up a projector, string fairy lights, and offer cozy blankets. Popcorn, candy, and themed cocktails are a must. Bonus points if you show one of your all-time favorite movies!

    Brunch and Bubbly

    Why wait until the evening to celebrate? Host a fabulous brunch with mimosas, avocado toast, and pancakes stacked sky-high. Add floral centerpieces and a DIY mimosa bar for extra flair.

    Book Club Bash

    If you’re a bookworm, turn your love of reading into a birthday event. Pick a book you love, have a discussion, and pair it with themed snacks and drinks. Cozy and intellectual!

    Tropical Luau Party

    Bring the beach to you with a Hawaiian-themed celebration! Bright colors, tiki torches, fruity cocktails, and a limbo contest will keep the party lively. Grass skirts and flower crowns encouraged!

    Paint and Sip Night

    Unleash your inner artist with a paint and sip night. Hire an instructor or follow a fun tutorial. Set up easels, provide canvases, and, of course, pour the wine generously. Let those creative juices flow!

    Pajama and Pizza Party

    Throw it back to childhood with a cozy pajama party. Order a ton of pizza, pop some champagne, and binge-watch your favorite rom-coms. Bonus points for fluffy slippers and face masks!

    Chic Rooftop Party

    Celebrate in style with a rooftop soirée. Think sleek decor, string lights, and a killer playlist. Serve signature cocktails and small bites while watching the city lights twinkle.

    Game Night Extravaganza

    Keep it fun and competitive with a game night! Set up board games, card games, and even some nostalgic games from childhood. Create a snack bar and hand out fun prizes for the winners.

    Elegant Dinner Party

    For a more sophisticated vibe, host an intimate dinner party. Set a stunning tablescape with candles, flowers, and personalized place cards. Serve a three-course meal or hire a private chef for extra luxe.

    Wellness Retreat Weekend

    Go all out with a weekend getaway focused on self-care. Yoga sessions, meditation, healthy meals, and journaling workshops will leave you feeling refreshed and ready for this new chapter.

    Disco Dance Party

    Channel your inner dancing queen with a disco-themed bash. Glittery decor, a shiny disco ball, and a playlist full of ABBA, Donna Summer, and Bee Gees hits — what’s not to love?

    Karaoke Night

    Unleash your inner diva with a karaoke night! Rent a karaoke machine or head to a local karaoke bar. Prepare a playlist of your favorite hits and let everyone take the stage.

    Adventure Day

    For the thrill-seeker, plan an adrenaline-pumping day. Zip-lining, rock climbing, or even skydiving — whatever gets your heart racing and makes for an unforgettable birthday.

    Garden Tea Party

    Host a classy garden tea party with vintage teacups, finger sandwiches, and scones. Add pastel decorations and floral arrangements for a dainty, elegant feel.

    Charity Birthday Party

    Celebrate your big day by giving back. Organize a charity fundraiser or volunteer with your friends. Set up a donation station and make your birthday about making a positive impact.

    Turning 30 isn’t about “getting older” — it’s about stepping into your prime and celebrating how far you’ve come. Whether you’re planning a chic rooftop bash, a cozy spa day, or a full-on disco party, this milestone birthday deserves to be unforgettable.

    So, gather your besties, pop the champagne, and get ready to make memories that’ll have you smiling all year long. Here’s to 30 fabulous years — and many more to come!

    [jetpack-related-posts]

    Stuffed Bell Peppers That’ll Make You the Star of Dinner Time

    Filed Under: Food & Drink // 01/27/2025

    When it comes to dinner recipes that scream comfort food while still looking absolutely fancy, stuffed bell peppers are the MVPs of the kitchen. These colorful little pockets of goodness are a total showstopper, and the best part? They’re super easy to whip up with just a handful of ingredients you probably already have.

    So, pour yourself a cup of something cozy and settle in, because we’re diving into a recipe that’s equal parts hearty, healthy, and downright delicious. By the time we’re done, you’ll have a dish that’s just as Instagram-worthy as it is satisfying. Let’s get started!

    First things first—let’s talk about why stuffed bell peppers are such a dinner game-changer. They’re versatile, they’re packed with flavor, and they’re basically a meal all wrapped up in a cute edible bowl. And with this recipe, you’ll be packing them with a savory mix of rice, chicken, veggies, and spices that’ll have everyone coming back for seconds (and thirds!).

    Ready to wow your taste buds? Let’s dive into the ingredients and get cooking!

    Also Read: The Easiest Pizza Dough Recipe Ever

    How To Make Stuffed Peppers

    PrintPrint

    Ingredients You'll Need For This Recipe

    • 4 boneless, skinless chicken thighs

    • 1/2 cup round grain rice (such as Arborio or Jasmine)

    • 6 bell peppers

    • 5 mushrooms

    • 1 onion

    • 1 carrot

    • 2 cloves of garlic

    • 1 teaspoon paprika

    • 1 teaspoon cumin

    • Salt, to taste

    • Black pepper, to taste

    Also Read: 32+ Delicious One-Pot Dinner Ideas

    Step-by-Step Guide

    1. Wash the bell peppers, cut off the tops, and remove the seeds.

    2. Wash and peel the carrot and onion. Cut the onion into small cubes and grate the carrot.

    3. Finely chop the garlic and cut the chicken breasts into small pieces.

    4. Heat a skillet over medium heat and add a little olive oil. Add the chopped vegetables and chicken pieces to the skillet and cook until the chicken is no longer pink.

    Add the paprika, cumin, salt, and pepper to the skillet and mix well.

    5. In a separate pot, boil the rice for 7-10 minutes until it’s slightly undercooked. Rinse the rice and set it aside.

    6. In a large mixing bowl, combine the cooked rice with the chicken and vegetable mixture. Mix everything thoroughly and season with salt and pepper to taste.

    7. Preheat your oven to 350°F (180°C).

    8. Stuff each bell pepper with the chicken and rice mixture and replace the tops. Place the stuffed peppers in a baking dish. You can add a little water or tomato juice to the bottom of the dish.

    9. Cover the dish with foil and bake for 30 minutes. After 30 minutes, remove the foil and continue baking until the tops of the peppers are lightly browned.

    10. Enjoy your delicious stuffed peppers with chicken and rice!

    And there you have it—stuffed bell peppers that are bursting with flavor, color, and a whole lot of love! Whether you’re serving them up for a cozy weeknight dinner or impressing friends at your next gathering, this recipe has all the right moves.

    Not only are these little flavor-packed gems easy to make, but they’re also the perfect balance of hearty and healthy. Plus, they’re totally customizable, so you can switch up the fillings and spices to match your cravings.

    So, go ahead, pat yourself on the back for this culinary masterpiece, and don’t forget to grab a fork because these stuffed bell peppers are too good to wait. Dinner just got a whole lot more exciting—enjoy!

    Stuffed Bell Peppers
    Print

    Stuffed Bell Peppers

    Recipe by AdviceFromNobodyCourse: Lunch, DinnerCuisine: AmericanDifficulty: Easy
    Servings

    6

    servings
    Prep time

    20

    minutes
    Cooking time

    40

    minutes
    Calories

    240

    kcal

    These colorful little pockets of goodness are a total showstopper and the best part? They’re super easy to whip up with just a handful of ingredients you probably already have.

    Ingredients

    • 4 boneless, skinless chicken thighs

    • 1/2 cup round grain rice (such as Arborio or Jasmine)

    • 6 bell peppers

    • 5 mushrooms

    • 1 onion

    • 1 carrot

    • 2 cloves of garlic

    • 1 teaspoon paprika

    • 1 teaspoon cumin

    • Salt, to taste

    • Black pepper, to taste

    Directions

    • Wash the bell peppers, cut off the tops, and remove the seeds.
    • Wash and peel the carrot and onion. Cut the onion into small cubes and grate the carrot.
    • Finely chop the garlic and cut the chicken breasts into small pieces.
    • Heat a skillet over medium heat and add a little olive oil. Add the chopped vegetables and chicken pieces to the skillet and cook until the chicken is no longer pink. Add the paprika, cumin, salt, and pepper to the skillet and mix well
    • In a separate pot, boil the rice for 7-10 minutes until it’s slightly undercooked. Rinse the rice and set it aside.
    • In a large mixing bowl, combine the cooked rice with the chicken and vegetable mixture. Mix everything thoroughly and season with salt and pepper to taste.
    • Preheat your oven to 350°F (180°C).
    • Stuff each bell pepper with the chicken and rice mixture and replace the tops. Place the stuffed peppers in a baking dish. You can add a little water or tomato juice to the bottom of the dish.
    • Cover the dish with foil and bake for 30 minutes. After 30 minutes, remove the foil and continue baking until the tops of the peppers are lightly browned.
    • Enjoy your delicious stuffed peppers with chicken and rice!
    [jetpack-related-posts]
    • « Previous Page
    • 1
    • …
    • 5
    • 6
    • 7
    • 8
    • 9
    • …
    • 15
    • Next Page »

    Copyright © 2026 · Theme by Marketing Templates Co.

    We use cookies on our website to give you the most relevant experience by remembering your preferences and repeat visits.Read More By clicking “Accept All”, you consent to the use of ALL the cookies. However, you may visit "Cookie Settings" to provide a controlled consent.
    Cookie SettingsAccept All
    Manage consent

    Privacy Overview

    This website uses cookies to improve your experience while you navigate through the website. Out of these, the cookies that are categorized as necessary are stored on your browser as they are essential for the working of basic functionalities of the website. We also use third-party cookies that help us analyze and understand how you use this website. These cookies will be stored in your browser only with your consent. You also have the option to opt-out of these cookies. But opting out of some of these cookies may affect your browsing experience.
    Necessary
    Always Enabled
    Necessary cookies are absolutely essential for the website to function properly. These cookies ensure basic functionalities and security features of the website, anonymously.
    CookieDurationDescription
    cookielawinfo-checkbox-analytics11 monthsThis cookie is set by GDPR Cookie Consent plugin. The cookie is used to store the user consent for the cookies in the category "Analytics".
    cookielawinfo-checkbox-functional11 monthsThe cookie is set by GDPR cookie consent to record the user consent for the cookies in the category "Functional".
    cookielawinfo-checkbox-necessary11 monthsThis cookie is set by GDPR Cookie Consent plugin. The cookies is used to store the user consent for the cookies in the category "Necessary".
    cookielawinfo-checkbox-others11 monthsThis cookie is set by GDPR Cookie Consent plugin. The cookie is used to store the user consent for the cookies in the category "Other.
    cookielawinfo-checkbox-performance11 monthsThis cookie is set by GDPR Cookie Consent plugin. The cookie is used to store the user consent for the cookies in the category "Performance".
    viewed_cookie_policy11 monthsThe cookie is set by the GDPR Cookie Consent plugin and is used to store whether or not user has consented to the use of cookies. It does not store any personal data.
    Functional
    Functional cookies help to perform certain functionalities like sharing the content of the website on social media platforms, collect feedbacks, and other third-party features.
    Performance
    Performance cookies are used to understand and analyze the key performance indexes of the website which helps in delivering a better user experience for the visitors.
    Analytics
    Analytical cookies are used to understand how visitors interact with the website. These cookies help provide information on metrics the number of visitors, bounce rate, traffic source, etc.
    Advertisement
    Advertisement cookies are used to provide visitors with relevant ads and marketing campaigns. These cookies track visitors across websites and collect information to provide customized ads.
    Others
    Other uncategorized cookies are those that are being analyzed and have not been classified into a category as yet.
    SAVE & ACCEPT