• HOME
  • RELATIONSHIPS
  • HOLIDAYS
  • WELLNESS
  • CAREER & FINANCE
  • FASHION
  • BEAUTY
  • LIVING

Advice From Nobody

You are here: Home / Archives for LIVING / Food & Drink

Tasty Turkey and Sun-Dried Tomato Pinwheels

Filed Under: Food & Drink // 06/02/2025

Okay, let’s talk about one of my absolute favorite no-fuss, flavor-packed recipes: Turkey and Sun-Dried Tomato Pinwheels. These little rolled-up bites of deliciousness are everything you want in a snack—creamy, savory, a little tangy, and 100% crowd-pleasing. Whether you’re prepping for a picnic, throwing together a quick lunch, or just need something a little fancy-but-easy to serve at a get-together, these pinwheels totally deliver.

What I love most about them is how quickly they come together with ingredients you might already have in your fridge. And let’s be honest, anything wrapped in a tortilla and sliced into pinwheels just feels more fun to eat, right?

Also Read: 27+ Pinwheel Sandwich Recipes That Make Perfect Appetizers

How To Make These Turkey Pinwheels

PrintPrint

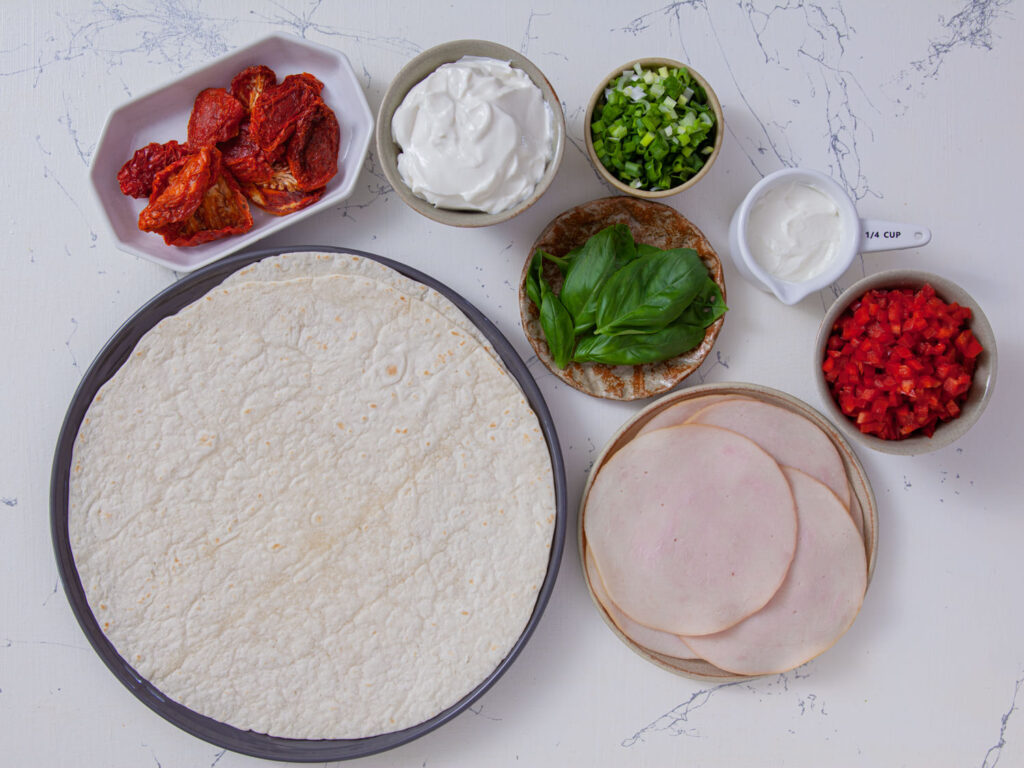
Ingredients For The Pinwheels

  • 6 oz. cream cheese, softened at room temperature

  • 1/4 cup sour cream

  • 1/2 cup sun-dried tomatoes, chopped (hello, flavor!)

  • 1 red bell pepper, seeded and finely diced

  • 2 scallions, finely diced

  • 1/4 cup fresh basil leaves, thinly sliced

  • 2 burrito-sized tortillas (the bigger the better!)

  • 8 turkey deli slices (I like to use oven-roasted, but go with your favorite)

  • Sea salt and black pepper, to taste

The combo of creamy cheese, zesty tomatoes, crunchy bell pepper, and fragrant basil is honestly what makes these so addicting.

Step-By-Step Guide

Step 1: Mix the magic

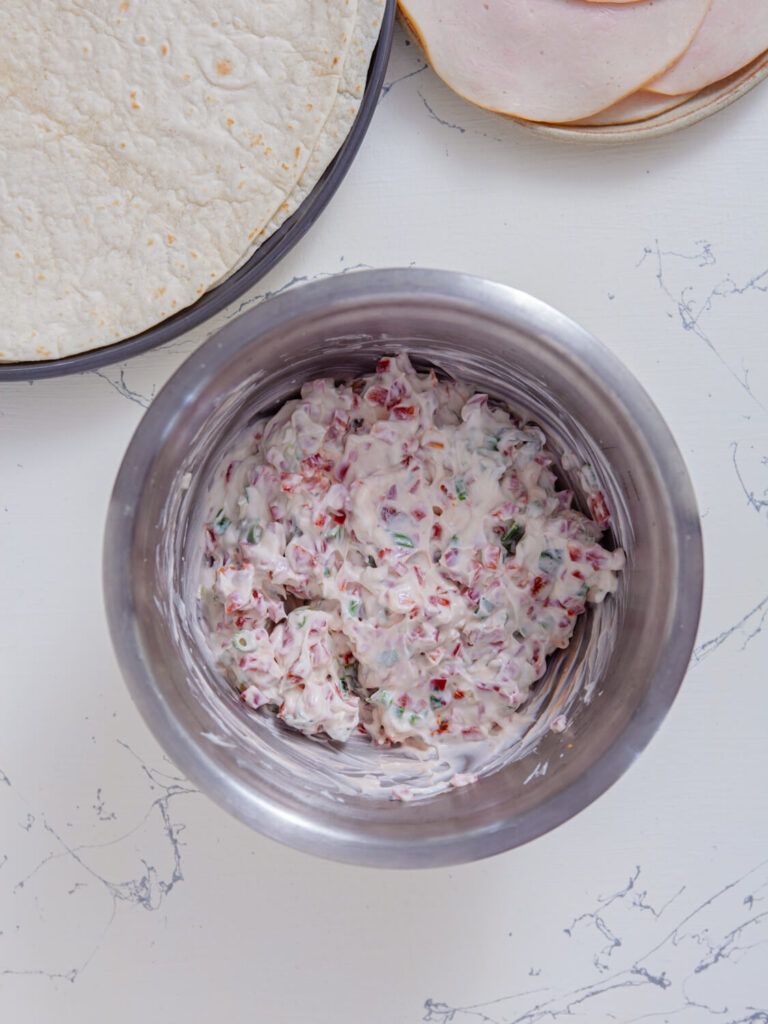
In a medium bowl, add the softened cream cheese, sour cream, chopped sun-dried tomatoes, red bell pepper, scallions, and that fresh basil. Give it a good stir until everything’s nicely combined. Season it with a little sea salt and cracked black pepper to taste. This mixture is chef’s kiss and honestly delicious enough to eat with a spoon (I won’t judge if you sneak a bite).

Step 2: Spread and layer

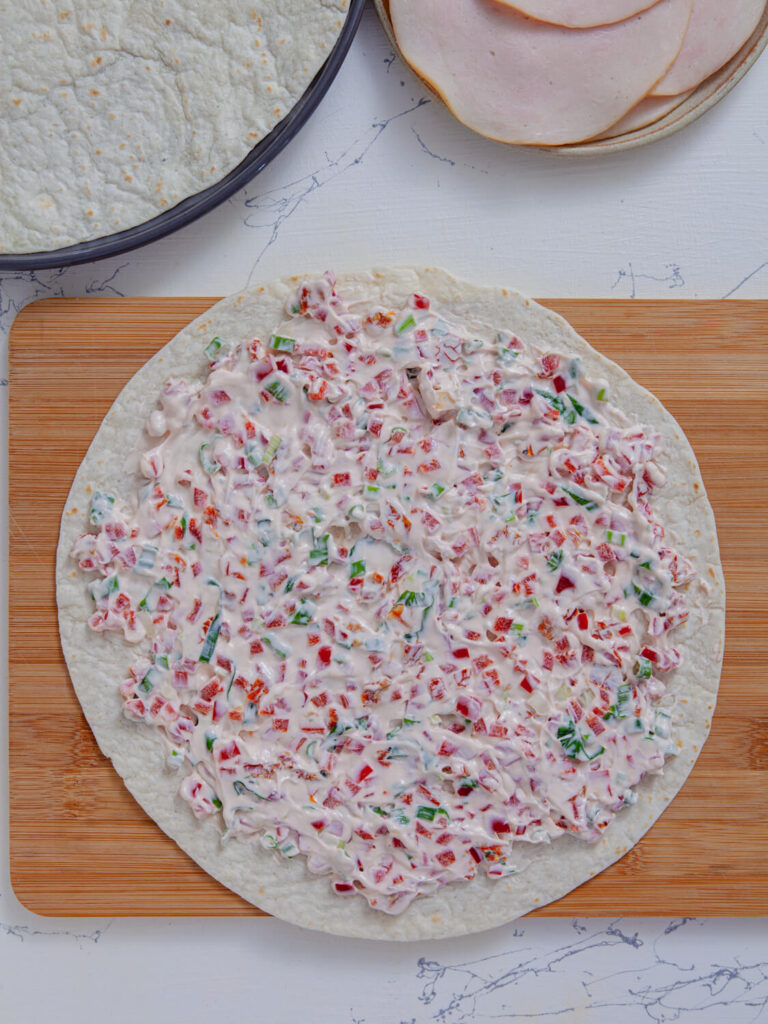
Divide the cream cheese mixture into two equal parts. Grab a tortilla and spread one half of the mixture evenly over it—an offset spatula works great here, but the back of a spoon will do the trick too. Then, layer on 4 slices of turkey, slightly overlapping to cover the whole thing.

Step 3: Roll it up!

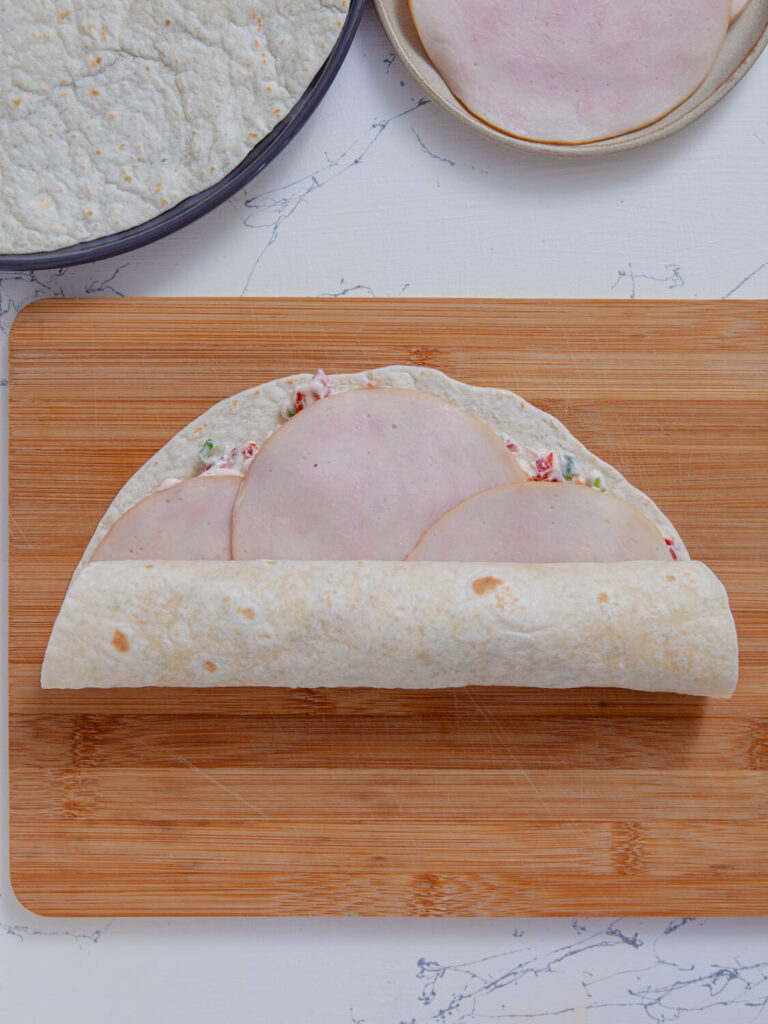
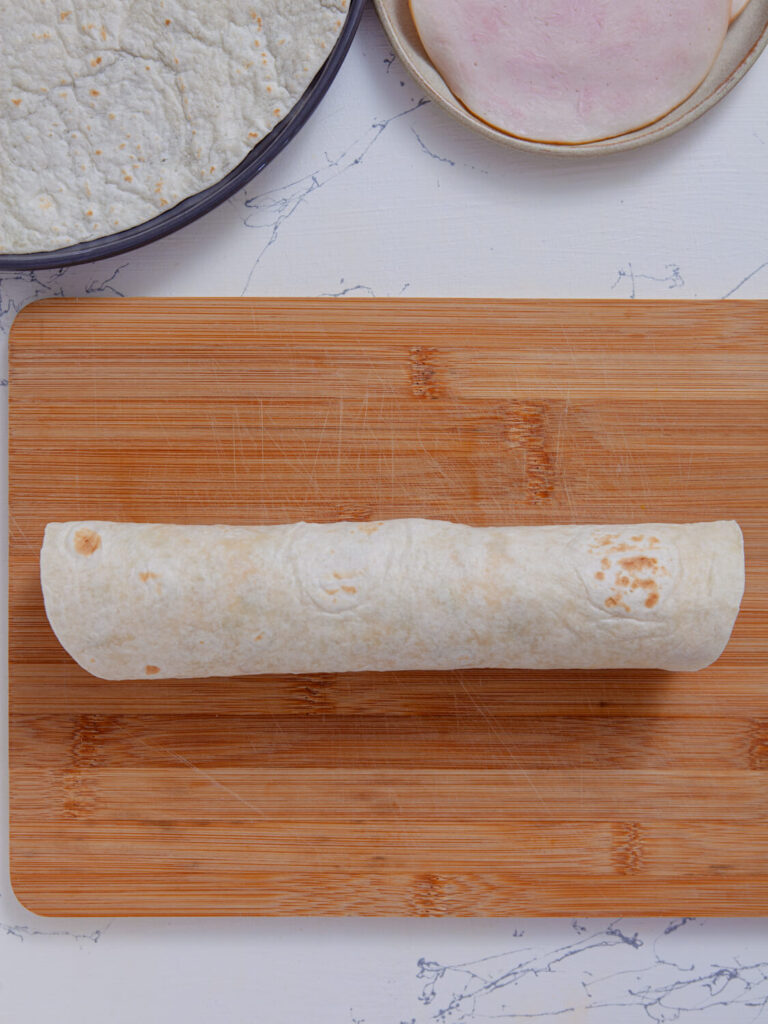
Starting from the bottom edge, roll the tortilla up nice and tight, jelly roll style. Repeat the whole thing with the second tortilla.

Step 4: Chill

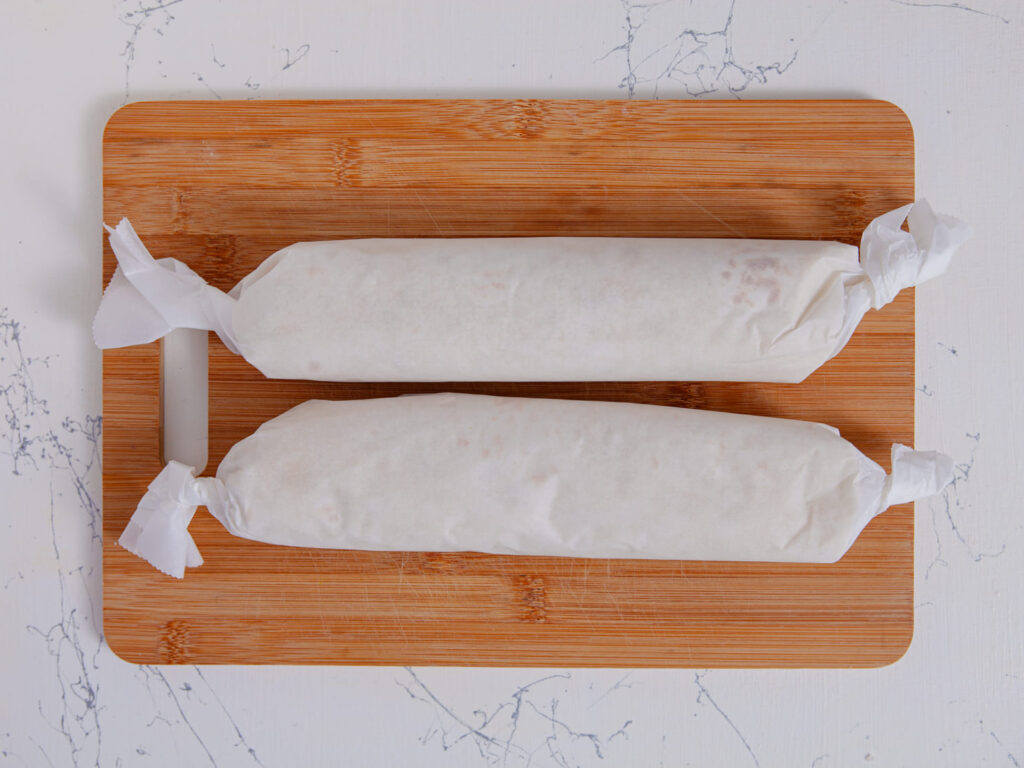
Now here’s the hard part—waiting. Wrap those rolled-up tortillas in parchment paper or plastic wrap and pop them in the fridge for at least 30 minutes. This step helps them firm up so they slice cleanly (and taste even better once everything melds together). You can also leave them overnight if you’re meal-prepping or hosting the next day. Just store them in the fridge until you’re ready.

Step 5: Slice and serve

When it’s go time, slice each roll into pinwheels—about 1-inch thick is perfect. Arrange them on a plate, or stack them neatly in a container if you’re heading out for a picnic or road trip.

Why You’ll Love These

  • They’re portable. Perfect for school lunches, meal prepping, or picnic baskets.
  • They’re make-ahead friendly. Mix, roll, chill, and you’re done.
  • They’re crowd-pleasers. Adults and kids alike can’t resist the combo of creamy, salty, crunchy, and fresh.
  • Totally customizable. Swap turkey for ham, try spinach instead of basil, or add a sprinkle of shredded cheese—these are super easy to make your own.

A Few Extra Tips:

  • Make sure your cream cheese is really soft before mixing. Cold cream cheese makes it harder to combine smoothly.
  • Want a spicy kick? Add a pinch of red pepper flakes or a few dashes of hot sauce to the cream cheese mixture.
  • These are best served cold or slightly chilled, so keep them in a cooler if you’re taking them on the go.

These Tasty Turkey and Sun-Dried Tomato Pinwheels are chef-approved snack goals. They’re elegant enough to serve at brunch or a baby shower, but easy enough to throw together for weekday lunches.

Every time I make them, I get asked for the recipe—so now it’s here for the world to see! Next time you need a reliable, tasty, and just plain fun recipe, give these pinwheels a try. You won’t regret it.

Turkey and Sun-Dried Tomato Pinwheels
Print

Turkey and Sun-Dried Tomato Pinwheels

Recipe by AdviceFromNobodyCourse: Appetizers, LunchCuisine: AmericanDifficulty: Easy
Servings

4

servings
Prep time

10

minutes
Calories

95

kcal

Ingredients

  • 6 oz. cream cheese, softened at room temperature

  • 1/4 cup sour cream

  • 1/2 cup sun-dried tomatoes, chopped

  • 1 red bell pepper, seeded and finely diced

  • 2 scallions, finely diced

  • 1/4 cup fresh basil leaves, thinly sliced

  • 2 burrito-sized tortillas

  • 8 turkey deli slices

  • Sea salt and black pepper to taste

Directions

  • In a medium bowl, combine cream cheese, sour cream, sun-dried tomatoes, bell pepper, scallions, and basil. Season to taste with salt and pepper. Mix well.
  • Divide the cream cheese mixture in half. Using an offset spatula, spread one-half of the mixture over the tortilla. Top with one-half of the turkey slices, slightly overlapping as needed.
  • Starting at the bottom edge, tightly roll up like a jelly roll.
  • Repeat with the second tortilla. 
  • Wrap the tortillas in parchment paper or plastic wrap and refrigerate for at least 30 minutes or up to 24 hours.
  • When ready to serve, slice into pinwheels and serve immediately or pack into a plastic storage container in a single layer for a picnic.
[jetpack-related-posts]

Slow Cooker Pulled Pork Lettuce Wraps (Flavor-Packed & Low-Carb!)

Filed Under: Food & Drink // 06/02/2025

Slow Cooker Pulled Pork Lettuce Wraps

This delicious low-carb pulled pork recipe takes only 10 minutes to put together. After that, you’re free to do something else while your slow cooker transforms it into a nearly effortless melt-in-your-mouth dish your family will love.

Whether you’re meal-prepping for the week, throwing together a quick weeknight dinner, or hosting a casual get-together, this recipe is a total win. The pork is slow-cooked to tender perfection, infused with a dreamy mix of spices (and a secret ingredient you probably weren’t expecting), then nestled into crisp lettuce leaves for a refreshing bite.

For even tastier results, allow pork to sit in its yummy juices once you’ve pulled it apart. This will allow it to absorb even more of that great flavor.

Also Read: 21 Light & Fresh Lettuce Wrap Recipes

How To Make These Lettuce Wraps

Nothing too fancy here—just a flavorful mix of pantry staples and fresh lettuce to wrap it all up.

PrintPrint

Ingredients For The Lettuce Wraps

  • 2 lbs. pork shoulder – This cut gets so tender and juicy in the slow cooker, it practically shreds itself.

  • 2 tsp onion powder

  • 1 tsp garlic powder

  • 2 tsp dried rosemary – Adds a hint of earthy flavor.

  • 2 tsp smoked paprika – For that rich, smoky taste.

  • ½ tsp cayenne pepper – Just enough to give it a kick (feel free to add more if you like it hot!).

  • 1 tsp ground fennel seeds – This gives the pork a subtle, sausage-y flavor that’s chef’s kiss.

  • 2 tsp unsweetened cocoa powder – Yep, you read that right. Cocoa brings depth and richness—trust the process.

  • Sea salt and black pepper, to taste

  • 1/3 cup organic sugar-free chicken broth – Keeps everything moist and flavorful as it cooks.

  • 8 iceberg or butter lettuce leaves – Your crunchy little edible cups of goodness. Butter lettuce is my personal fave, but use whatever you love.

Step-By-Step Guide

1. Spice It Up

In a small bowl, mix all the dry spices and cocoa powder together. Don’t forget to season it with a good pinch of sea salt and black pepper—don’t be shy here! Rub that spice blend alllll over your pork shoulder. Seriously, give it a good massage. This is where the magic starts.

2. Into the Slow Cooker

Place your seasoned pork in the slow cooker. Pour in the chicken broth—this helps keep things juicy and adds extra flavor while it simmers.

Pop the lid on and cook:

  • On high for 4 hours, or
  • On low for 6 hours

Your kitchen is going to smell amazing during this part, so fair warning—you’ll probably be counting down the minutes.

3. Shred It

Once the pork is tender and falling apart (and trust me, it will be), use two forks to shred it right in the slow cooker. Let the shredded pork hang out in all those juices for 20-30 more minutes on the “warm” setting. It soaks up even more flavor and becomes ultra-moist.

4. Wrap It Up

Now comes the fun part: building your lettuce wraps! Take a lettuce leaf, fill it with some crunchy broccoli slaw (optional, but highly recommended), and pile on that juicy pulled pork. Eat with your hands, napkins close by, and maybe a side of sweet potato fries if you’re feeling extra.

Why You’ll Love These Lettuce Wraps:

  • Low-carb & gluten-free – But still totally satisfying.
  • Meal prep-friendly – Make the pork ahead of time and use it throughout the week.
  • Customizable – Add avocado, a dollop of Greek yogurt, a splash of hot sauce, or whatever you’re craving.
  • Super easy – Minimal effort, major flavor. Your slow cooker does most of the work!

These Slow Cooker Pulled Pork Lettuce Wraps are the ultimate combo of bold flavor and feel-good ingredients. Whether you’re trying to cut back on carbs, eat a little cleaner, or just want something ridiculously tasty, this recipe’s got you covered.

Give it a try and let me know how you dressed yours up—did you add slaw, avocado, pickled onions? The options are endless, and I wanna hear all about it!

Slow Cooker Pulled Pork Lettuce Wraps
Print

Slow Cooker Pulled Pork Lettuce Wraps

Recipe by AdviceFromNobodyCourse: Appetizers, LunchCuisine: AmericanDifficulty: Easy
Servings

4

servings
Prep time

10

minutes
Calories

500

kcal

Ingredients

  • 2 lbs. pork shoulder

  • 2 tsp onion powder

  • 1 tsp garlic powder

  • 2 tsp dried rosemary

  • 2 tsp smoked paprika

  • ½ tsp cayenne pepper

  • 1 tsp ground fennel seeds

  • 2 tsp cocoa powder

  • Sea salt and black pepper, to taste

  • 1/3 cup organic sugar-free chicken broth

  • 8 iceberg or butter lettuce leaves

Directions

  • Combine all spices and the cocoa in a small bowl and season with salt and black pepper to taste.
  • Rub the spice mix all over the pork shoulder and transfer to a 5 or 6-quart slow cooker crock.
  • Add the chicken broth to the crock and cook on high for 4 hours or on low for 6.
  • Once the cooking time is complete, use two forks to pull the pork apart while it is still in the slow cooker crock.
  • Allow the pulled pork to remain in the juices with the slow cooker set to “warm” for 20-30 minutes to absorb more flavor.
  • To serve, fill each lettuce leaf with crunchy broccoli slaw and top with some pulled pork. Enjoy!
[jetpack-related-posts]

Super Easy Buffalo Chicken Lettuce Wraps

Filed Under: Food & Drink // 06/01/2025

buffalo chicken lettuce wraps

Okay, real talk—some nights you just don’t want to cook an elaborate dinner. You want something quick, easy, and maybe even a little healthy. But you also want it to taste like it came from your favorite neighborhood pub. If you’re nodding your head yes, then let me introduce you to your new go-to: Buffalo Chicken Lettuce Wraps.

These are everything you love about buffalo wings—spicy, tangy, and just a little messy—but with a fresh, light twist thanks to the crisp Bibb lettuce. And the best part? They’re made with rotisserie chicken, so there’s almost no actual cooking involved. Just a bit of sautéing, a whole lot of flavor, and boom—you’ve got dinner in under 30 minutes.

Also Read: 21 Light & Fresh Lettuce Wrap Recipes

Why You’ll Love These Buffalo Chicken Lettuce Wraps

Let’s start with what makes these wraps absolutely crave-worthy:

  • Fast and fuss-free: Using pre-cooked rotisserie chicken is a major time saver. Just shred, heat, and go.
  • Healthier than takeout: These wraps are low-carb and full of veggies, but still totally satisfying.
  • Packed with flavor: Between the sautéed veggies, hot sauce, and seasonings, you won’t miss the bun (or the guilt).
  • Totally customizable: Want to add ranch or blue cheese crumbles? Go for it. Prefer a different hot sauce? Do your thing.

How To Make These Buffalo Chicken Lettuce Wraps

PrintPrint

Ingredients For These Buffalo Chicken Lettuce Wrapsu003cspan id=u0022docs-internal-guid-d72b4a2d-7fff-2c4a-bf5b-2ca4a586771cu0022 style=u0022font-weight:normal;u0022u003eu003cdivu003eu003cspan style=u0022font-size: 12pt; font-family: Arial, sans-serif; color: rgb(0, 0, 0); background-color: transparent; font-weight: 700; font-variant-numeric: normal; font-variant-east-asian: normal; font-variant-alternates: normal; font-variant-position: normal; font-variant-emoji: normal; vertical-align: baseline;u0022u003eu003c/spanu003eu003c/divu003eu003c/spanu003e

  • 2 tablespoons coconut oil

  • 1 green bell pepper, finely diced

  • 2 celery stalks, diced

  • 1½ lbs. rotisserie chicken breast, shredded (hello, time saver!)

  • 2 teaspoons onion powder

  • 1 teaspoon garlic powder

  • Salt and pepper, to taste

  • ½ cup Frank’s hot sauce (or your favorite buffalo-style sauce)

  • 2 green onions, sliced

  • To Serve
  • 1 head Bibb or butter lettuce, leaves removed, washed, and patted dry

Step-By-Step Guide

Step 1: Sauté the Veggies

Start by heating the coconut oil in a large sauté pan over medium heat. Once it’s melted, toss in your diced green bell pepper and celery. You’ll want to sauté these for about 5 minutes, or until they’re tender but still have a slight bite. They add a nice crunch and flavor that balance out the spicy chicken later on.

Step 2: Add the Chicken and Seasoning

Now it’s time to toss in your shredded rotisserie chicken—seriously, how easy is that? Sprinkle in the onion powder and garlic powder, and season with a bit of salt and pepper. Stir everything well and let it cook for 2 to 3 minutes, just until the chicken is heated through and infused with all those lovely spices.

Step 3: Bring the Heat

Here’s where things get fun. Pour in the hot sauce (Frank’s is the classic, but feel free to get spicy with your favorite brand). Stir it all together and let it cook for another minute or two. The sauce should coat everything beautifully and be piping hot by the time you’re done.

Step 4: Add the Green Onions

Turn off the heat and stir in the sliced green onions for a little fresh, peppery bite. That’s it—you’re done!

Now comes the fun part: assembling your wraps.

Grab your Bibb or butter lettuce leaves (the softer, cuppier ones work best), and scoop in a few tablespoons of the buffalo chicken mixture. Don’t be shy—it’s okay if things get a little messy. These are finger foods, after all.

If you want to get extra with it, add a drizzle of ranch or blue cheese dressing, a sprinkle of shredded carrots, or even some avocado slices for a creamy twist.

Buffalo Chicken Lettuce Wraps are proof that healthy meals don’t have to be boring. They’re spicy, satisfying, and totally hit the spot—especially when you’re short on time but still want something homemade and delicious.

So the next time you’re tempted to grab takeout, remember this recipe. With a few simple ingredients and barely any cooking, you’ll have a flavor-packed meal that tastes like game-day eats but feels like a clean, fresh dinner. Total win-win.

Let me know if you try them out—tag me with your lettuce wrap creations or drop your own twist in the comments. Happy cooking

Buffalo Chicken Lettuce Wraps
Print

Buffalo Chicken Lettuce Wraps

Recipe by AdviceFromNobodyCourse: Appetizers, LunchCuisine: AmericanDifficulty: Easy
Servings

4

servings
Prep time

10

minutes
Cooking time

15

minutes
Calories

331

kcal

Ingredients

  • 2 Tbs coconut oil

  • 1 green bell pepper, finely diced

  • 2 celery stalks, diced

  • 1½ lbs. rotisserie chicken breast, shredded

  • 2 tsp onion powder

  • 1 tsp garlic powder

  • Salt and pepper, to taste

  • ½ cup Frank’s hot sauce

  • 2 green onions, sliced

  • To Serve
  • 1 head Bibb or butter lettuce, leaves removed, washed and patted dry

Directions

  • Melt the coconut oil in a large sauté pan over medium heat. Add the diced pepper and celery, and sauté until tender, around 5 minutes.
  • Add the chicken, onion powder, and garlic powder. Stir well and season with salt and pepper, to taste. Cook for 2-3 minutes, or until the chicken is heated through.
  • Add the hot sauce and sauté while stirring for another minute or two, until the sauce is heated through and everything is well coated. Remove from heat and stir in the sliced green onions.
  • To serve, fill Bibb lettuce cups with a few tablespoons of the chicken mixture and enjoy!
[jetpack-related-posts]

Easy & Flavor-Packed Chinese Pork Lettuce Wraps You’ll Want on Repeat

Filed Under: Food & Drink // 06/01/2025

If you’re looking for a quick, delicious, and better-than-takeout dinner idea, Chinese pork lettuce wraps are about to become your new obsession. Packed with savory ground pork, crunchy water chestnuts, and a mouthwatering hoisin-soy sauce combo, these wraps are the perfect balance of flavor and freshness.

Whether you’re throwing together a weeknight meal or hosting a fun appetizer night, these lettuce wraps are a total crowd-pleaser—and way easier to make than you might think. Grab some crisp lettuce leaves and let’s get cooking!

Also Read: 21 Light & Fresh Lettuce Wrap Recipes

How To Make These Chinese Pork Lettuce Wraps

PrintPrint

Ingredients For This Recipe

  • 1 Tbs coconut oil

  • 1 small onion, diced

  • 2 garlic cloves, minced

  • 2 medium carrots, finely diced

  • 8 oz. mushrooms, chopped

  • 1 lb. ground pork

  • 1 8-oz. can water chestnuts, drained and chopped

  • 3 Tbs low-sodium soy sauce

  • 2 Tbs oyster sauce

  • 1 Tbs sesame oil

  • 2 Tbs rice vinegar

  • 8-10 lettuce leaves

  • 2 scallions, sliced

  • 1/4 cup roasted salted cashews, roughly chopped

  • lime wedges, for serving

  • salt and pepper to taste

Step-By-Step Guide

1. Heat coconut oil in a large deep skillet over medium heat. 

2. Add onion, garlic, carrots, mushrooms, and pork; lightly season with salt and pepper. Cook, stirring occasionally, until the vegetables soften and the pork begins to brown, approximately 4-5 minutes.

3. Add water chestnuts and continue cooking until the pork is cooked through, another 2-3 minutes. 

4. Reduce heat to medium-low and add soy sauce, oyster sauce, sesame oil, and rice vinegar. Cook, stirring occasionally, until the sauce thickens, 6-7 minutes.

5. Spoon the pork mixture into lettuce wraps and top with sliced scallions and roasted cashews. Serve with a lime wedge and enjoy!

How to Cook Fresh Water Chestnuts

  1. Scratch chestnuts with a knife.
  2. Add chestnuts to a small pan with 2 cups of water.
  3. Add 1/2 tsp salt and 1/2 tsp sugar.
  4. Boil for 20 minutes or until soft. Note – check at 15 minutes with a knife. When cooked, chestnuts will be walnut soft.  
  5. Once cooked, drain the black water and wash the chestnuts.
  6. Let cool, peel, and slice or chop as the recipe requires.

Also Read: All About Water Chestnuts and How to Cook With Them

And there you have it—easy, flavorful Chinese pork lettuce wraps that are light, satisfying, and totally crave-worthy. They’re perfect for busy weeknights, casual get-togethers, or anytime you want something a little different (and a lot delicious).

Plus, they’re super customizable, so feel free to add your favorite toppings or spice it up to your liking. Once you try them, don’t be surprised if they end up on repeat in your kitchen. Enjoy!

Chinese Pork Lettuce Wraps
Print

Chinese Pork Lettuce Wraps

Recipe by AdviceFromNobodyCourse: Lunch, AppetizersCuisine: ChineseDifficulty: Easy
Servings

4

servings
Prep time

10

minutes
Cooking time

15

minutes
Calories

370

kcal

Ingredients

  • 1 Tbs coconut oil

  • 1 small onion, diced

  • 2 garlic cloves, minced

  • 2 medium carrots, finely diced

  • 8 oz. mushrooms, chopped

  • 1 lb. ground pork

  • 1 8-oz. can water chestnuts, drained and chopped

  • 3 Tbs low-sodium soy sauce

  • 2 Tbs oyster sauce

  • 1 Tbs sesame oil

  • 2 Tbs rice vinegar

  • 8-10 lettuce leaves

  • 2 scallions, sliced

  • 1/4 cup roasted salted cashews, roughly chopped

  • lime wedges, for serving

  • salt and pepper to taste

Directions

  • Heat coconut oil in a large deep skillet over medium heat.
  • Add onion, garlic, carrots, mushrooms, and pork; lightly season with salt and pepper. Cook, stirring occasionally, until the vegetables soften and the pork begins to brown, approximately 4-5 minutes.
  • Add water chestnuts and continue cooking until the pork is cooked through, another 2-3 minutes.
  • Reduce heat to medium-low and add soy sauce, oyster sauce, sesame oil, and rice vinegar. Cook, stirring occasionally, until the sauce thickens, 6-7 minutes.
  • Spoon the pork mixture into lettuce wraps and top with sliced scallions and roasted cashews. Serve with a lime wedge and enjoy!
  • How To Cook Fresh Water Chestnuts
  • Scratch chestnuts with a knife.
  • Add chestnuts to a small pan with 2 cups of water.
  • Add 1/2 tsp salt and 1/2 tsp sugar.
  • Boil for 20 minutes or until soft. Note – check at 15 minutes with a knife. When cooked, chestnuts will be walnut soft.
  • Once cooked, drain the black water and wash the chestnuts.
  • Let cool, peel, and slice or chop as the recipe requires.
[jetpack-related-posts]

Classic Cherries Jubilee: A Flambé Dessert That Never Goes Out of Style

Filed Under: Food & Drink // 05/31/2025

If you’ve ever wanted to add a little drama to dessert, Classic Cherries Jubilee is your showstopper. This old-school delight is elegant, fruity, and famously flambéed—literally! Made with juicy cherries, a splash of liqueur, and a warm, boozy flame, it’s the kind of dessert that turns an ordinary dinner into a celebration.

Whether you’re whipping it up for a dinner party or just treating yourself to something special, this timeless treat is surprisingly simple to make and absolutely unforgettable. Let’s bring a bit of vintage charm to your kitchen with this fiery favorite!

Also Read: Decadent Cherry & Chocolate Puff Pastry Tart You’ll Love

How To Make Cherries Jubilee

PrintPrint

Ingredients For Cherries Jubilee

  • 3 cups fresh or frozen cherries, pitted

  • 3 Tbs granulated sugar

  • 1 Tbs fresh lemon juice

  • 1/4 cup kirsch or rum

  • vanilla ice cream, for serving

  • chopped almonds or crushed cookies, for serving

Also Read: 39 Creative and Delicious Fresh Cherry Recipes

Step-By-Step Guide

1. Combine cherries, sugar, and lemon juice in a medium skillet over medium heat. 

2. Cook, stirring occasionally, until the sugar is dissolved and the cherries release their juices, approximately 6-7 minutes.

3. Remove the skillet from the heat and pour in the rum. Carefully ignite the alcohol with a utility lighter and return the skillet back to medium heat. 

4. Gently shake the pan with the cherries until the flame extinguishes itself. 

5. Stir the cherries and continue cooking for another minute. 

6. If you prefer to skip flambéing, you could just cook out the alcohol on the stovetop or skip the alcohol altogether and add a splash of cherry juice and vanilla extract in its place.

7. Spoon the cherry jubilee over vanilla ice cream and top with almonds or cookies, if desired. 

8. Serve immediately and enjoy!

Classic Cherries Jubilee proves that some desserts truly never go out of style. With its rich cherry flavor, stunning presentation, and just the right touch of boozy flair, it’s the perfect way to end a meal on a high note.

Whether you’re impressing guests or indulging in a little nostalgic treat for yourself, this fiery favorite is always a crowd-pleaser. So grab your cherries, light the flame, and enjoy a taste of timeless elegance—one delicious spoonful at a time.

Classic Cherries Jubilee
Print

Classic Cherries Jubilee

Recipe by AdviceFromNobodyCourse: DessertCuisine: FrenchDifficulty: Easy
Servings

4

servings
Prep time

10

minutes
Cooking time

10

minutes
Calories

320

kcal

Ingredients

  • 3 cups fresh or frozen cherries, pitted

  • 3 Tbs granulated sugar

  • 1 Tbs fresh lemon juice

  • 1/4 cup kirsch or rum

  • vanilla ice cream, for serving

  • chopped almonds or crushed cookies, for serving

Directions

  • Combine cherries, sugar, and lemon juice in a medium skillet over medium heat. 
  • Cook, stirring occasionally, until the sugar is dissolved and the cherries release their juices, approximately 6-7 minutes.
  • Remove the skillet from the heat and pour in the rum. Carefully ignite the alcohol with a utility lighter and return the skillet back to medium heat. 
  • Gently shake the pan with the cherries until the flame extinguishes itself. 
  • Stir the cherries and continue cooking for another minute. 
  • If you prefer to skip flambéing, you could just cook out the alcohol on the stovetop or skip the alcohol altogether and add a splash of cherry juice and vanilla extract in its place.
  • Spoon the cherry jubilee over vanilla ice cream and top with almonds or cookies, if desired. 
  • Serve immediately and enjoy!

    [jetpack-related-posts]

    Decadent Cherry & Chocolate Puff Pastry Tart You’ll Want to Make on Repeat

    Filed Under: Food & Drink // 05/29/2025

    Cherry Chocolate Puff Pastry Tart

    If you’re craving something that’s equal parts fancy and fuss-free, this Cherry & Chocolate Puff Pastry Tart is about to become your go-to dessert. Think crispy, golden layers of puff pastry topped with rich, melted chocolate and juicy cherries—all coming together in one dreamy bite.

    Also Read: 39 Creative and Delicious Fresh Cherry Recipes

    How To Make This Cherry & Chocolate Puff Pastry Tart

    Whether you’re hosting a brunch, looking for a last-minute sweet treat, or just want an excuse to indulge (no judgment here), this tart is as easy to make as it is impressive.

    PrintPrint

    Ingredients For This Cherry Tart

    • 1 frozen puff pastry sheet, thawed

    • 2 cups fresh or frozen cherries, pitted

    • 6 Tbs sugar

    • 1 Tbs cornstarch

    • 1/4 c. water

    • 4 oz. dark chocolate, melted

    • 2 tsp coconut oil

    • Additional fresh cherries, for serving

    • Flaky sea salt, for sprinkling

    Step-By-Step Guide

    1. Preheat the oven to 400°F and line a rimmed baking sheet with a piece of parchment paper. 

    2. Roll out the puff pastry sheet into a rectangle onto the prepared baking sheet. Using a knife, score a 1/2-inch border on the sides of the puff pastry, making sure not to cut all the way through. Using a fork, prick the puff pastry inside the border. 

    3. Place the puff pastry into the oven and bake for 15 minutes or until lightly browned.

    4. In the meantime, combine the cherries and sugar in a small saucepan and place over medium heat.

    5. In a small bowl, whisk the cornstarch with the water until smooth and set aside.

    6. Allow the cherries to simmer for 5-6 minutes, then stir in the cornstarch slurry and continue cooking until lightly thickened, around 3-4 minutes. Remove from heat. 

    7. Remove the puff pastry sheet from the oven and spread the cherry mixture inside the border of the puff pastry. 

    8. Return the tart into the oven and bake until the edges are deeply golden-brown and the cherry filling is bubbly, another 15 minutes.

    9. Stir the coconut oil into the melted chocolate and drizzle the chocolate all over the cherry tart. Top with flaky sea salt and additional fresh cherries. Enjoy!

    And there you have it—your new favorite dessert that’s as effortless as it is impressive! This Cherry & Chocolate Puff Pastry Tart is the perfect blend of flaky, fruity, and chocolaty goodness that looks bakery-worthy without the stress.

    Serve it warm with a scoop of vanilla ice cream or enjoy it chilled with a cup of coffee—it’s a win either way. Whether you’re treating yourself or sharing with friends, this tart is sure to steal the show. Don’t be surprised if you find yourself making it again (and again)!

    Cherry & Chocolate Puff Pastry Tart
    Print

    Cherry & Chocolate Puff Pastry Tart

    Recipe by AdviceFromNobodyCourse: DessertCuisine: FrenchDifficulty: Easy
    Servings

    10

    servings
    Prep time

    30

    minutes
    Cooking time

    40

    minutes
    Calories

    196

    kcal

    Ingredients

    • 1 frozen puff pastry sheet, thawed

    • 2 cups fresh or frozen cherries, pitted

    • 6 Tbs sugar

    • 1 Tbs cornstarch

    • 1/4 cup water

    • 4 oz. dark chocolate, melted

    • 2 tsp coconut oil

    • Additional fresh cherries, for serving

    • Flaky Sea salt, for sprinkling

    Directions

    • Preheat the oven to 400°F and line a rimmed baking sheet with a piece of parchment paper. 
    • Roll out the puff pastry sheet into a rectangle onto the prepared baking sheet. Using a knife, score a 1/2-inch border on the sides of the puff pastry, making sure not to cut all the way through. Using a fork, prick the puff pastry inside the border. 
    • Place the puff pastry into the oven and bake for 15 minutes or until lightly browned.
    • In the meantime, combine the cherries and sugar in a small saucepan and place over medium heat.
    • In a small bowl, whisk the cornstarch with the water until smooth and set aside.
    • Allow the cherries to simmer for 5-6 minutes, then stir in the cornstarch slurry and continue cooking until lightly thickened, around 3-4 minutes. Remove from heat. 
    • Remove the puff pastry sheet from the oven and spread the cherry mixture inside the border of the puff pastry. 
    • Return the tart into the oven and bake until the edges are deeply golden-brown and the cherry filling is bubbly, another 15 minutes.
    • Stir the coconut oil into the melted chocolate and drizzle the chocolate all over the cherry tart. Top with flaky sea salt and additional fresh cherries. 
    [jetpack-related-posts]

    Peaches & Cream Buttermilk Waffles: A Sweet Summer Breakfast You’ll Crave All Year

    Filed Under: Food & Drink // 05/28/2025

    peaches and cream waffles

    If you’re looking for a breakfast that tastes like sunshine on a plate, these Peaches & Cream Buttermilk Waffles are about to become your new favorite. Think golden, crispy-edged waffles with a tender, fluffy center—soaked in juicy peaches and finished with a dreamy dollop of whipped cream.

    It’s the perfect balance of tangy, sweet, and indulgent, all wrapped up in one gorgeous, summery bite. Whether you’re hosting brunch, treating yourself on a slow Sunday morning, or need an excuse to use those ripe peaches, this recipe delivers pure comfort (and a little wow factor).

    Also Read: 47+ Peach Recipes To Make This Summer

    How To Make Peaches & Cream Buttermilk Waffles

    Topped with fresh peaches and delicious sweetened yogurt, these waffles make breakfast or brunch extra special! These can be made in a traditional waffle iron or baked in a silicone mold.

    PrintPrint

    Ingredients For This Recipe

    • 2 cups all-purpose flour

    • 3 Tbs white sugar

    • 1 Tbs baking powder

    • 1/4 tsp salt

    • 1-3/4 cups buttermilk

    • 3 Tbs butter, melted

    • 2 tsp pure vanilla extract

    • 1 cup Greek yogurt

    • 2 Tbs honey or maple syrup

    • 2-3 large peaches, sliced

    • Maple syrup, for serving

    Step-By-Step Guide

    1. Preheat the oven to 400°F or preheat an electric waffle iron per the manufacturer’s instruction manual.

    2. In a large bowl, whisk together the flour, sugar, baking powder, and salt. Set aside.

    3. In a separate small bowl or container, whisk the buttermilk, butter, and vanilla.

    4. Pour the wet ingredients into the dry ingredients and whisk until a smooth batter forms.

    5. If using a silicone mold, pour one-fourth of the batter into the mold and bake until puffed and golden brown, approximately 10-15 minutes. Repeat for all 4 waffles. I used these waffle molds to get the cute shape.

    6. If using a waffle iron, lightly oil the waffle iron. When iron is hot, fill per manufacturer’s instructions and cook until set, repeating until batter is gone.

    7. In the meantime, mix the Greek yogurt with the honey or maple syrup.

    8. Top the warm waffles with sweetened yogurt, fresh peaches, and a drizzle of maple syrup. Enjoy!

    There’s just something magical about the combo of warm, fluffy waffles, juicy peaches, and silky whipped cream—it’s like summer wrapped in comfort food. These Peaches & Cream Buttermilk Waffles aren’t just breakfast, they’re a full-on moment.

    Whether you’re making them for a weekend treat, brunch with friends, or a sweet way to start the day, this recipe is guaranteed to impress. So go ahead, pour another cup of coffee, stack those waffles high, and savor every peachy, creamy bite. You deserve it.

    Peaches & Cream Buttermilk Waffles
    Print

    Peaches & Cream Buttermilk Waffles

    Recipe by AdviceFromNobodyCourse: BreakfastCuisine: AmericanDifficulty: Easy
    Servings

    4

    servings
    Prep time

    10

    minutes
    Cooking time

    20

    minutes
    Calories

    554

    kcal

    Ingredients

    • 2 cups all-purpose flour

    • 3 Tbs white sugar

    • 1 Tbs baking powder

    • 1/4 tsp salt

    • 1-3/4 cups buttermilk

    • 3 Tbs butter, melted

    • 2 tsp pure vanilla extract

    • 1 cup Greek yogurt

    • 2 Tbs honey or maple syrup

    • 2-3 large peaches, sliced

    • Maple syrup, for serving

    Directions

    • Preheat the oven to 400°F or preheat an electric waffle iron per the manufacturer’s instruction manual.
    • In a large bowl, whisk together the flour, sugar, baking powder, and salt. Set aside.
    • In a separate small bowl or container, whisk the buttermilk, butter, and vanilla.
    • Pour the wet ingredients into the dry ingredients and whisk until a smooth batter forms. 
    • If using a silicone mold, pour one-fourth of the batter into the mold and bake until puffed and golden brown, approximately 10-15 minutes. Repeat for all 4 waffles.
    • If using a waffle iron, lightly oil the waffle iron. When iron is hot, fill per manufacturer’s instructions and cook until set, repeating until batter is gone.
    • In the meantime, mix the Greek yogurt with the honey or maple syrup.
    • Top the warm waffles with sweetened yogurt, fresh peaches, and a drizzle of maple syrup. Enjoy!
    [jetpack-related-posts]

    Irresistible Peaches & Cream Crumble Bars That Taste Like Summer in Every Bite

    Filed Under: Food & Drink // 05/28/2025

    One taste of this delicious dessert and you’ll be hooked!  It is very easy to make, travels well, and can be prepared using any flavor of jam you prefer. If you’re craving a dessert that’s equal parts fruity, creamy, and downright dreamy, these Peaches and Cream Crumble Bars are about to become your new go-to treat.

    With a buttery crumble base, a luscious cream cheese layer, and juicy peaches baked right in, every bite is like a little taste of summer, no matter the season. Whether you’re whipping these up for a backyard BBQ, a cozy brunch, or just because you deserve something sweet, they’re simple to make and impossible to resist. Let’s get baking!

    Also Read: 47+ Peach Recipes To Make This Summer

    How To Make Peaches & Cream Crumble Bars

    PrintPrint

    Ingredients You'll Need For This Recipeu003cul class=u0022ingredients-listu0022 style=u0022color: black; font-family: u0026quot;Cormorant Garamondu0026quot;, sans-serif; font-size: 17px; font-style: italic; font-weight: 500; letter-spacing: 0.5px; white-space-collapse: collapse;u0022u003eu003c/ulu003e

    • 3/4 cups sugar, divided

    • 2 cups all-purpose flour

    • 1/2 tsp baking powder

    • 1/4 tsp salt

    • 12 oz. cream cheese, softened at room temperature

    • 3/4 cups butter, melted

    • 1/4 cups sour cream

    • 2 tsp pure vanilla extract

    • 1 large egg

    • 10 oz. peach jam

    Step-By-Step Guide

    1. Preheat the oven to 375°F. Line a 9×13-inch baking pan with a piece of parchment paper.

    2. In a large bowl, combine 1/2 cup sugar, flour, baking powder, and salt.

    3. Pour in the melted butter and stir until a crumbly dough forms.

    4. Press 2/3 of the dough on the bottom of the prepared baking pan.

    5. In a smaller bowl, whisk together the cream cheese, sour cream, vanilla, egg, and remaining sugar.

    6. Pour the cream cheese mixture on top of the crumble base and spread the peach jam on top of the cream cheese layer.

    7. Crumble the reserved crumble topping on top of the peach jam and transfer into the oven to bake until lightly golden and puffed, approximately 35-40 minutes.

    Allow to cool completely before slicing and serving. Enjoy!

    And there you have it—peaches and cream crumble bars that are as easy to make as they are delicious to eat. Whether you serve them warm with a scoop of vanilla ice cream or enjoy them chilled straight from the fridge, these bars are guaranteed to be a hit.

    Perfectly sweet, a little tangy, and totally comforting, they’re the kind of dessert you’ll want to make on repeat. So go ahead, grab those ripe peaches and treat yourself—you’ve earned it!

    Peaches & Cream Crumble Bars
    Print

    Peaches & Cream Crumble Bars

    Recipe by AdviceFromNobodyCourse: DessertCuisine: AmericanDifficulty: Easy
    Servings

    12

    servings
    Prep time

    10

    minutes
    Cooking time

    40

    minutes
    Calories

    404

    kcal

    Ingredients

    • 3/4 cups sugar, divided

    • 2 cups all-purpose flour

    • 1/2 tsp baking powder

    • 1/4 tsp salt

    • 3/4 cups butter, melted

    • 12 oz. cream cheese, softened at room temperature

    • 1/4 cups sour cream

    • 2 tsp pure vanilla extract

    • 1 large egg

    • 10 oz. peach jam

    Directions

    • Preheat the oven to 375°F. Line a 9×13-inch baking pan with a piece of parchment paper.
    • In a large bowl, combine 1/2 cup sugar, flour, baking powder, and salt. 
    • Pour in the melted butter and stir until a crumbly dough forms. 
    • Press 2/3 of the dough on the bottom of the prepared baking pan.
    • In a smaller bowl, whisk together the cream cheese, sour cream, vanilla, egg, and remaining sugar.
    • Pour the cream cheese mixture on top of the crumble base and spread the peach jam on top of the cream cheese layer.
    • Crumble the reserved crumble topping on top of the peach jam and transfer into the oven to bake until lightly golden and puffed, approximately 35-40 minutes.
    • Allow to cool completely before slicing and serving. Enjoy!

    [jetpack-related-posts]

    Stuffed Bell Peppers That’ll Make You the Star of Dinner Time

    Filed Under: Food & Drink // 01/27/2025

    When it comes to dinner recipes that scream comfort food while still looking absolutely fancy, stuffed bell peppers are the MVPs of the kitchen. These colorful little pockets of goodness are a total showstopper, and the best part? They’re super easy to whip up with just a handful of ingredients you probably already have.

    So, pour yourself a cup of something cozy and settle in, because we’re diving into a recipe that’s equal parts hearty, healthy, and downright delicious. By the time we’re done, you’ll have a dish that’s just as Instagram-worthy as it is satisfying. Let’s get started!

    First things first—let’s talk about why stuffed bell peppers are such a dinner game-changer. They’re versatile, they’re packed with flavor, and they’re basically a meal all wrapped up in a cute edible bowl. And with this recipe, you’ll be packing them with a savory mix of rice, chicken, veggies, and spices that’ll have everyone coming back for seconds (and thirds!).

    Ready to wow your taste buds? Let’s dive into the ingredients and get cooking!

    Also Read: The Easiest Pizza Dough Recipe Ever

    How To Make Stuffed Peppers

    PrintPrint

    Ingredients You'll Need For This Recipe

    • 4 boneless, skinless chicken thighs

    • 1/2 cup round grain rice (such as Arborio or Jasmine)

    • 6 bell peppers

    • 5 mushrooms

    • 1 onion

    • 1 carrot

    • 2 cloves of garlic

    • 1 teaspoon paprika

    • 1 teaspoon cumin

    • Salt, to taste

    • Black pepper, to taste

    Also Read: 32+ Delicious One-Pot Dinner Ideas

    Step-by-Step Guide

    1. Wash the bell peppers, cut off the tops, and remove the seeds.

    2. Wash and peel the carrot and onion. Cut the onion into small cubes and grate the carrot.

    3. Finely chop the garlic and cut the chicken breasts into small pieces.

    4. Heat a skillet over medium heat and add a little olive oil. Add the chopped vegetables and chicken pieces to the skillet and cook until the chicken is no longer pink.

    Add the paprika, cumin, salt, and pepper to the skillet and mix well.

    5. In a separate pot, boil the rice for 7-10 minutes until it’s slightly undercooked. Rinse the rice and set it aside.

    6. In a large mixing bowl, combine the cooked rice with the chicken and vegetable mixture. Mix everything thoroughly and season with salt and pepper to taste.

    7. Preheat your oven to 350°F (180°C).

    8. Stuff each bell pepper with the chicken and rice mixture and replace the tops. Place the stuffed peppers in a baking dish. You can add a little water or tomato juice to the bottom of the dish.

    9. Cover the dish with foil and bake for 30 minutes. After 30 minutes, remove the foil and continue baking until the tops of the peppers are lightly browned.

    10. Enjoy your delicious stuffed peppers with chicken and rice!

    And there you have it—stuffed bell peppers that are bursting with flavor, color, and a whole lot of love! Whether you’re serving them up for a cozy weeknight dinner or impressing friends at your next gathering, this recipe has all the right moves.

    Not only are these little flavor-packed gems easy to make, but they’re also the perfect balance of hearty and healthy. Plus, they’re totally customizable, so you can switch up the fillings and spices to match your cravings.

    So, go ahead, pat yourself on the back for this culinary masterpiece, and don’t forget to grab a fork because these stuffed bell peppers are too good to wait. Dinner just got a whole lot more exciting—enjoy!

    Stuffed Bell Peppers
    Print

    Stuffed Bell Peppers

    Recipe by AdviceFromNobodyCourse: Lunch, DinnerCuisine: AmericanDifficulty: Easy
    Servings

    6

    servings
    Prep time

    20

    minutes
    Cooking time

    40

    minutes
    Calories

    240

    kcal

    These colorful little pockets of goodness are a total showstopper and the best part? They’re super easy to whip up with just a handful of ingredients you probably already have.

    Ingredients

    • 4 boneless, skinless chicken thighs

    • 1/2 cup round grain rice (such as Arborio or Jasmine)

    • 6 bell peppers

    • 5 mushrooms

    • 1 onion

    • 1 carrot

    • 2 cloves of garlic

    • 1 teaspoon paprika

    • 1 teaspoon cumin

    • Salt, to taste

    • Black pepper, to taste

    Directions

    • Wash the bell peppers, cut off the tops, and remove the seeds.
    • Wash and peel the carrot and onion. Cut the onion into small cubes and grate the carrot.
    • Finely chop the garlic and cut the chicken breasts into small pieces.
    • Heat a skillet over medium heat and add a little olive oil. Add the chopped vegetables and chicken pieces to the skillet and cook until the chicken is no longer pink. Add the paprika, cumin, salt, and pepper to the skillet and mix well
    • In a separate pot, boil the rice for 7-10 minutes until it’s slightly undercooked. Rinse the rice and set it aside.
    • In a large mixing bowl, combine the cooked rice with the chicken and vegetable mixture. Mix everything thoroughly and season with salt and pepper to taste.
    • Preheat your oven to 350°F (180°C).
    • Stuff each bell pepper with the chicken and rice mixture and replace the tops. Place the stuffed peppers in a baking dish. You can add a little water or tomato juice to the bottom of the dish.
    • Cover the dish with foil and bake for 30 minutes. After 30 minutes, remove the foil and continue baking until the tops of the peppers are lightly browned.
    • Enjoy your delicious stuffed peppers with chicken and rice!
    [jetpack-related-posts]

    The Easiest Pizza Dough Recipe That’ll Have You Feeling Like a Pro Pizzaiolo!

    Filed Under: Food & Drink // 01/27/2025

    Who says making pizza dough at home has to be complicated? With just a handful of ingredients, a sprinkle of creativity, and a dash of confidence, you’ll be whipping up homemade pizza like an absolute boss in no time.

    So, grab your mixing bowl and channel your inner pizza maestro, because we’re about to dive into the easiest, foolproof pizza dough recipe ever. Whether you’re a total kitchen newbie or a seasoned cook, this recipe will make you feel like you’ve got an Italian nonna cheering you on.

    And trust me, once you see how simple and fun it is to make your own dough, you’ll never look at store-bought the same way again.

    Let’s get started, shall we? Because warm, pillowy, perfectly golden pizza crust is calling your name!

    Also Read: Low-Carb Dinner Ideas That You Can Make In The Air Fryer

    How To Make The Easiest Pizza Dough

    PrintPrint

    Ingredients You'll Need For This Recipe

    • 2 cups all-purpose flour (plus up to ¼ cup additional flour – if needed)

    • 1 packet (2 ¼ teaspoons) instant yeast

    • 1 ½ teaspoons sugar

    • ¾ teaspoon salt

    • 2 tablespoons olive oil (plus additional 1-2 tablespoons)

    • ¾ cup warm water

    Also Read: 32+ Delicious One-Pot Dinner Ideas

    Step-by-Step Guide

    1. Combine the flour, yeast, sugar, and salt in a large bowl. Add the olive oil and warm water to the dry ingredients.

    2. Mix until a dough forms. If the dough is too sticky, gradually add up to an additional ¼ cup of flour, a little at a time, until the dough is manageable.

    3. Knead the dough on a lightly floured surface for about 5-7 minutes, until smooth and elastic.

    4. Place the dough in a lightly oiled bowl, cover it with a damp cloth, and let it rise in a warm place for about 1-2 hours, or until it has doubled in size.

    5. Once the dough has risen, punch it down to release any air bubbles.

    pizza dough recipe

    6. Divide the dough if making two smaller pizzas, and shape it into a ball. Allow it to rest for 10 minutes before rolling out to the desired thickness.

    7. Preheat your oven to 425°F (220°C).

    8. Par-bake the crust: Roll out the dough, place it on a baking sheet or pizza stone, and bake for 5-7 minutes until it starts to set and puff up slightly but is not yet browned.

    9. Remove the crust from the oven, add your favorite toppings, and return it to the oven.

    10. Bake for an additional 10-12 minutes, or until the crust is golden and the cheese is bubbly and melted.

    And there you have it—your ticket to homemade pizza perfection! With this easy pizza dough recipe in your back pocket, you’re officially ready to ditch the delivery and create a masterpiece straight from your own oven.

    The best part? You can customize it however you like—classic margherita, loaded veggie, or even a quirky dessert pizza (yes, Nutella and strawberries totally belong on pizza).

    So, dust off your apron, gather your favorite toppings, and get ready to impress your taste buds—and maybe even a few friends. Because when it comes to homemade pizza, the possibilities are endless, and the flavor? Absolutely unbeatable.

    Now, go on, pizzaiolo—you’ve got some dough to knead and some memories to make!

    The Easiest Pizza Dough Recipe
    Print

    The Easiest Pizza Dough Recipe

    Recipe by AdviceFromNobodyCourse: Lunch, DinnerCuisine: ItalianDifficulty: Easy
    Servings

    12

    servings
    Prep time

    15

    minutes
    Cooking time

    20

    minutes
    Calories

    100

    kcal

    With just a handful of ingredients, a sprinkle of creativity, and a dash of confidence, you’ll be whipping up homemade pizza like an absolute boss in no time.

    Ingredients

    • 2 cups all-purpose flour (plus up to ¼ cup additional flour – if needed)

    • 1 packet (2 ¼ teaspoons) instant yeast

    • 1 ½ teaspoons sugar

    • ¾ teaspoon salt

    • 2 tablespoons olive oil (plus additional 1-2 tablespoons)

    • ¾ cup warm water

    Directions

    • Combine the flour, yeast, sugar, and salt in a large bowl. Add the olive oil and warm water to the dry ingredients.
    • Mix until a dough forms. If the dough is too sticky, gradually add up to an additional ¼ cup of flour, a little at a time, until the dough is manageable.
    • Knead the dough on a lightly floured surface for about 5-7 minutes, until smooth and elastic.
    • Place the dough in a lightly oiled bowl, cover it with a damp cloth, and let it rise in a warm place for about 1-2 hours, or until it has doubled in size.
    • Once the dough has risen, punch it down to release any air bubbles.
    • Divide the dough if making two smaller pizzas, and shape it into a ball. Allow it to rest for 10 minutes before rolling out to the desired thickness.
    • Preheat your oven to 425°F (220°C).
    • Par-bake the crust: Roll out the dough, place it on a baking sheet or pizza stone, and bake for 5-7 minutes until it starts to set and puff up slightly but is not yet browned.
    • Remove the crust from the oven, add your favorite toppings, and return it to the oven.
    • Bake for an additional 10-12 minutes, or until the crust is golden and the cheese is bubbly and melted.
    [jetpack-related-posts]
    • « Previous Page
    • 1
    • …
    • 4
    • 5
    • 6
    • 7
    • 8
    • …
    • 10
    • Next Page »

    Copyright © 2026 · Theme by Marketing Templates Co.

    We use cookies on our website to give you the most relevant experience by remembering your preferences and repeat visits.Read More By clicking “Accept All”, you consent to the use of ALL the cookies. However, you may visit "Cookie Settings" to provide a controlled consent.
    Cookie SettingsAccept All
    Manage consent

    Privacy Overview

    This website uses cookies to improve your experience while you navigate through the website. Out of these, the cookies that are categorized as necessary are stored on your browser as they are essential for the working of basic functionalities of the website. We also use third-party cookies that help us analyze and understand how you use this website. These cookies will be stored in your browser only with your consent. You also have the option to opt-out of these cookies. But opting out of some of these cookies may affect your browsing experience.
    Necessary
    Always Enabled
    Necessary cookies are absolutely essential for the website to function properly. These cookies ensure basic functionalities and security features of the website, anonymously.
    CookieDurationDescription
    cookielawinfo-checkbox-analytics11 monthsThis cookie is set by GDPR Cookie Consent plugin. The cookie is used to store the user consent for the cookies in the category "Analytics".
    cookielawinfo-checkbox-functional11 monthsThe cookie is set by GDPR cookie consent to record the user consent for the cookies in the category "Functional".
    cookielawinfo-checkbox-necessary11 monthsThis cookie is set by GDPR Cookie Consent plugin. The cookies is used to store the user consent for the cookies in the category "Necessary".
    cookielawinfo-checkbox-others11 monthsThis cookie is set by GDPR Cookie Consent plugin. The cookie is used to store the user consent for the cookies in the category "Other.
    cookielawinfo-checkbox-performance11 monthsThis cookie is set by GDPR Cookie Consent plugin. The cookie is used to store the user consent for the cookies in the category "Performance".
    viewed_cookie_policy11 monthsThe cookie is set by the GDPR Cookie Consent plugin and is used to store whether or not user has consented to the use of cookies. It does not store any personal data.
    Functional
    Functional cookies help to perform certain functionalities like sharing the content of the website on social media platforms, collect feedbacks, and other third-party features.
    Performance
    Performance cookies are used to understand and analyze the key performance indexes of the website which helps in delivering a better user experience for the visitors.
    Analytics
    Analytical cookies are used to understand how visitors interact with the website. These cookies help provide information on metrics the number of visitors, bounce rate, traffic source, etc.
    Advertisement
    Advertisement cookies are used to provide visitors with relevant ads and marketing campaigns. These cookies track visitors across websites and collect information to provide customized ads.
    Others
    Other uncategorized cookies are those that are being analyzed and have not been classified into a category as yet.
    SAVE & ACCEPT